Set up SCIM EnterpriseEnterprise +
The System for Cross-Domain Identity Management (SCIM) makes user data more secure and simplifies the admin and end-user lifecycle experience by automating user identities and groups. You can create or disable user identities in your Identity Provider (IdP), and SCIM will automatically make those changes in near real-time downstream in dbt.
Prerequisites
To configure SCIM in your dbt environment:
- You must be on an Enterprise or Enterprise+ plan.
- You must use Okta or Entra ID as your SSO provider and have it connected in the dbt platform.
- You must have permissions to configure the account settings in dbt and change application settings in Okta.
- If you have IP restrictions enabled, you must add Okta's IPs to your allowlist.
Supported features
The currently available supported features for SCIM are:
- User provisioning and de-provisioning
- User profile updates
- Group creation and management
- Importing groups and users
When SCIM is enabled, the following functionality will change:
- Users are not automatically added to default groups
- Manual actions such as inviting users, updating user information and updating group memberships are disabled by default
- SSO group mappings are disabled in favor of SCIM group management
To overwrite these updates to functionality with SCIM enabled, enable manual updates as part of the SCIM configuration (not recommended).
When users are provisioned, the following attributes are supported
- Username
- Family name
- Given name
The following IdPs are supported in the dbt UI:
If your IdP isn’t on the list, it can be supported using dbt APIs.
Set up dbt
To retrieve the necessary dbt configurations for use in Okta or Entra ID:
-
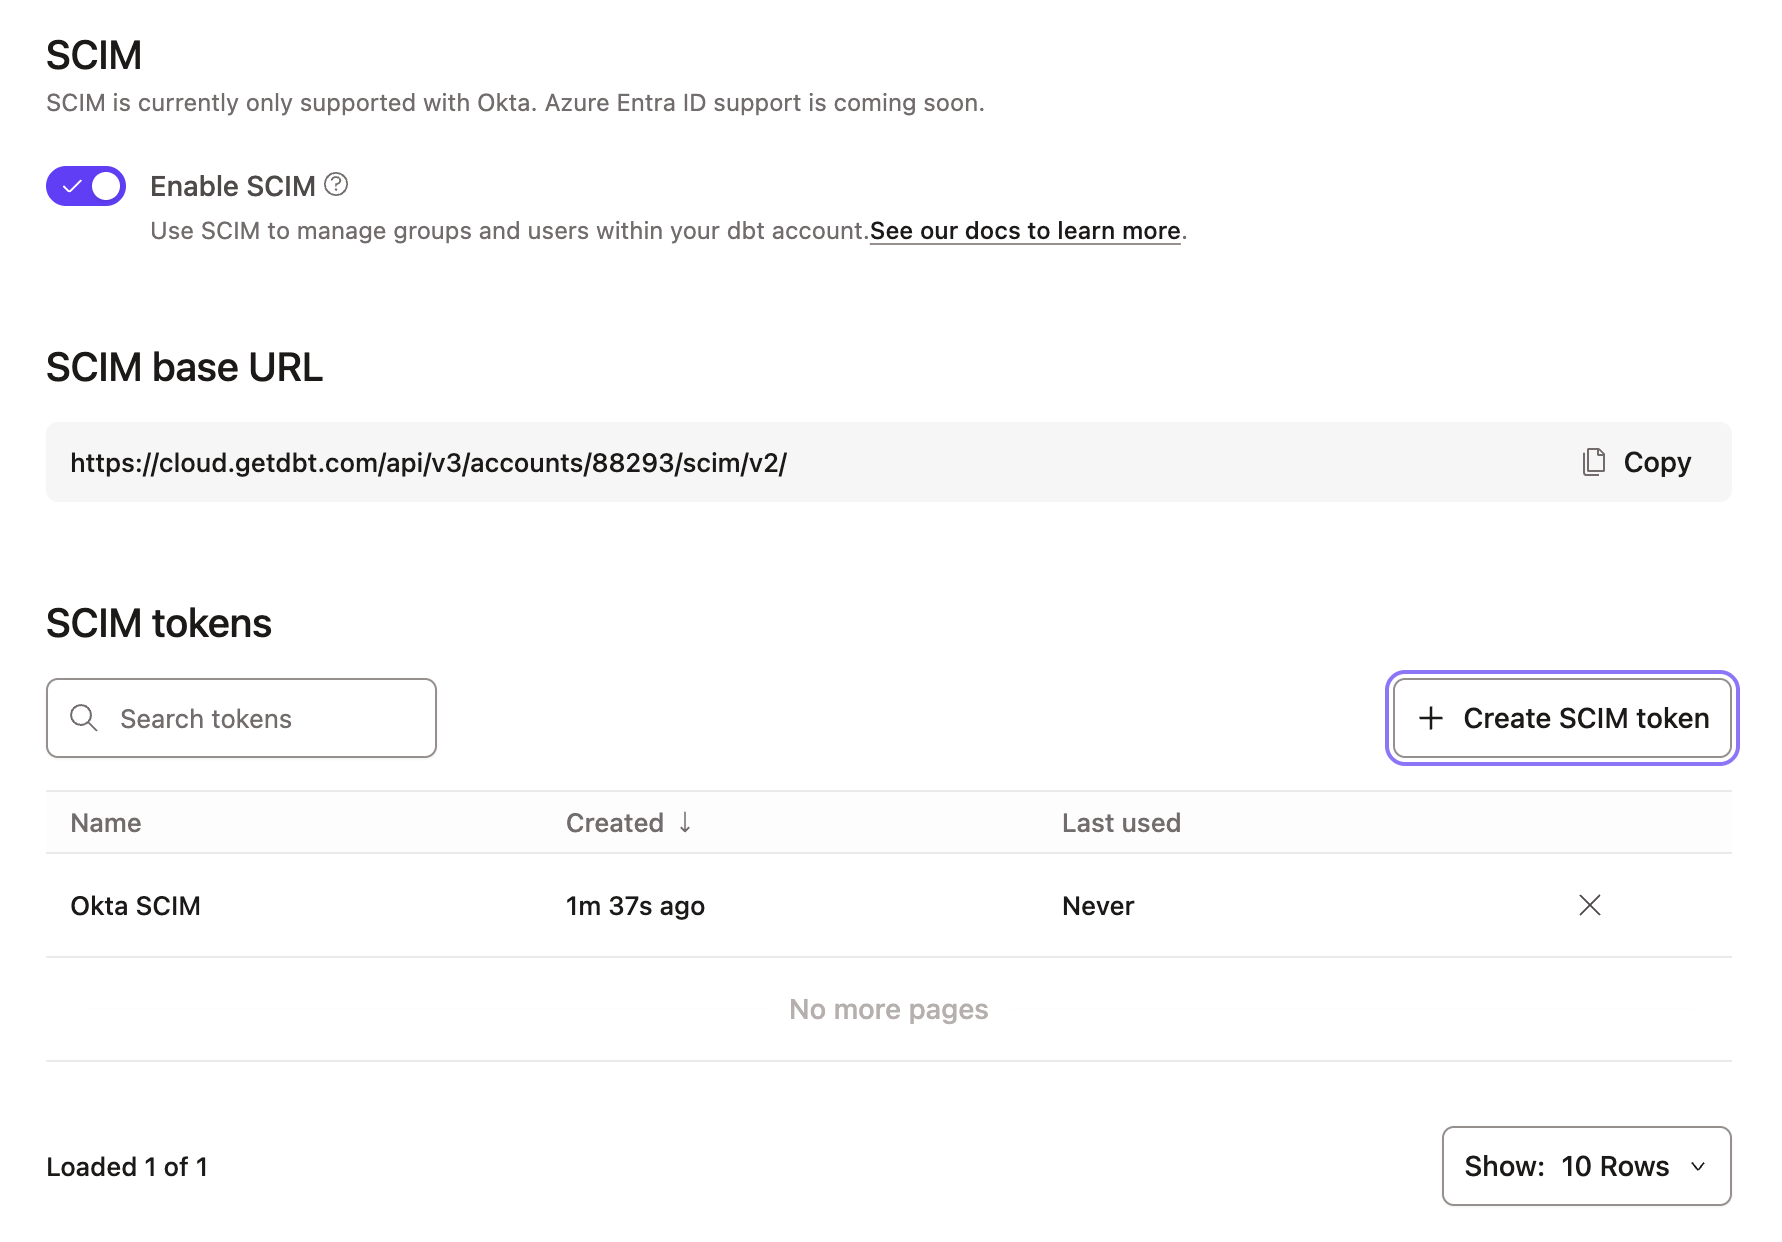
Navigate to your dbt Account settings.
-
Under Settings, click SSO & SCIM.
-
Scroll to the bottom of your SSO configuration settings and click Enable SCIM.
-
Record the SCIM base URL field for use in a later step.
-
Click Create SCIM token.
noteTo follow best practices, you should regularly rotate your SCIM tokens. To do so, follow these same instructions you did to create a new one. To avoid service disruptions, remember to replace your token in your IdP before deleting the old token in dbt.
-
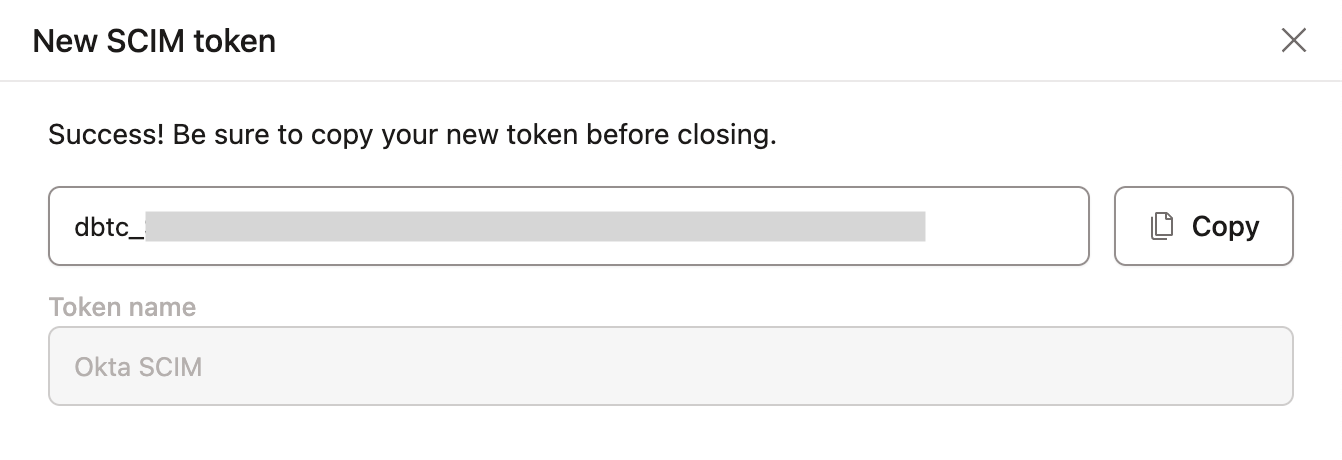
In the pop-up window, give the token a name that will make it easily identifiable. Click Save.
-
Copy the token and record it securely, as it will not be available again after you close the window. You must create a new token if you lose the current one.
-
(Optional) Manual updates are turned off by default for all SCIM-managed entities, including the ability to invite new users manually. This ensures SCIM-managed entities stay in sync with the IdP, and we recommend keeping this setting disabled.
- However, if you need to make manual updates (like update group membership for a SCIM-managed group), you can enable this setting by clicking Allow manual updates.
SCIM configuration for Okta
Please complete the setup SSO with Okta steps before configuring SCIM settings.
Set up Okta
-
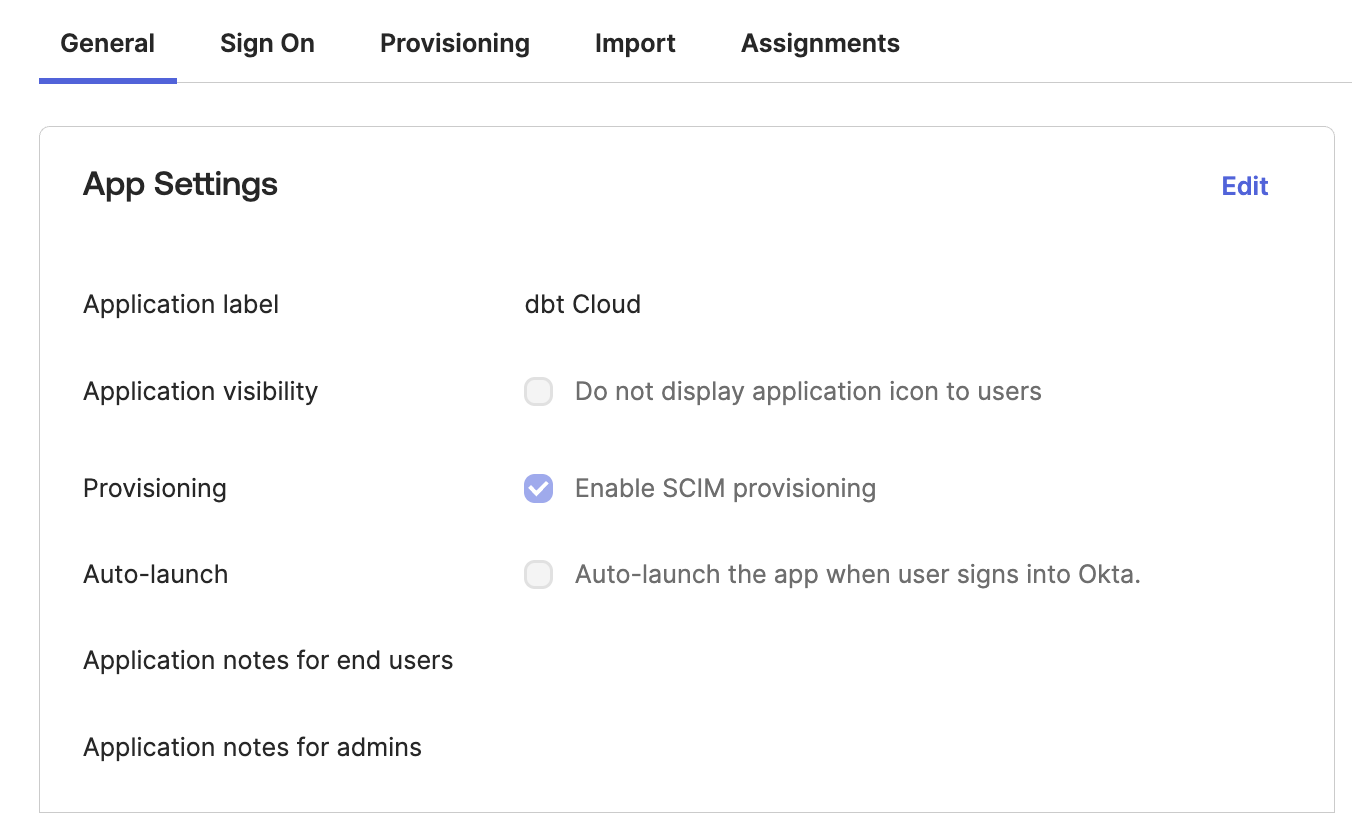
Log in to your Okta account and locate the app configured for the dbt SSO integration.
-
Navigate to the General tab and ensure Enable SCIM provisioning is checked or the Provisioning tab will not be displayed.
-
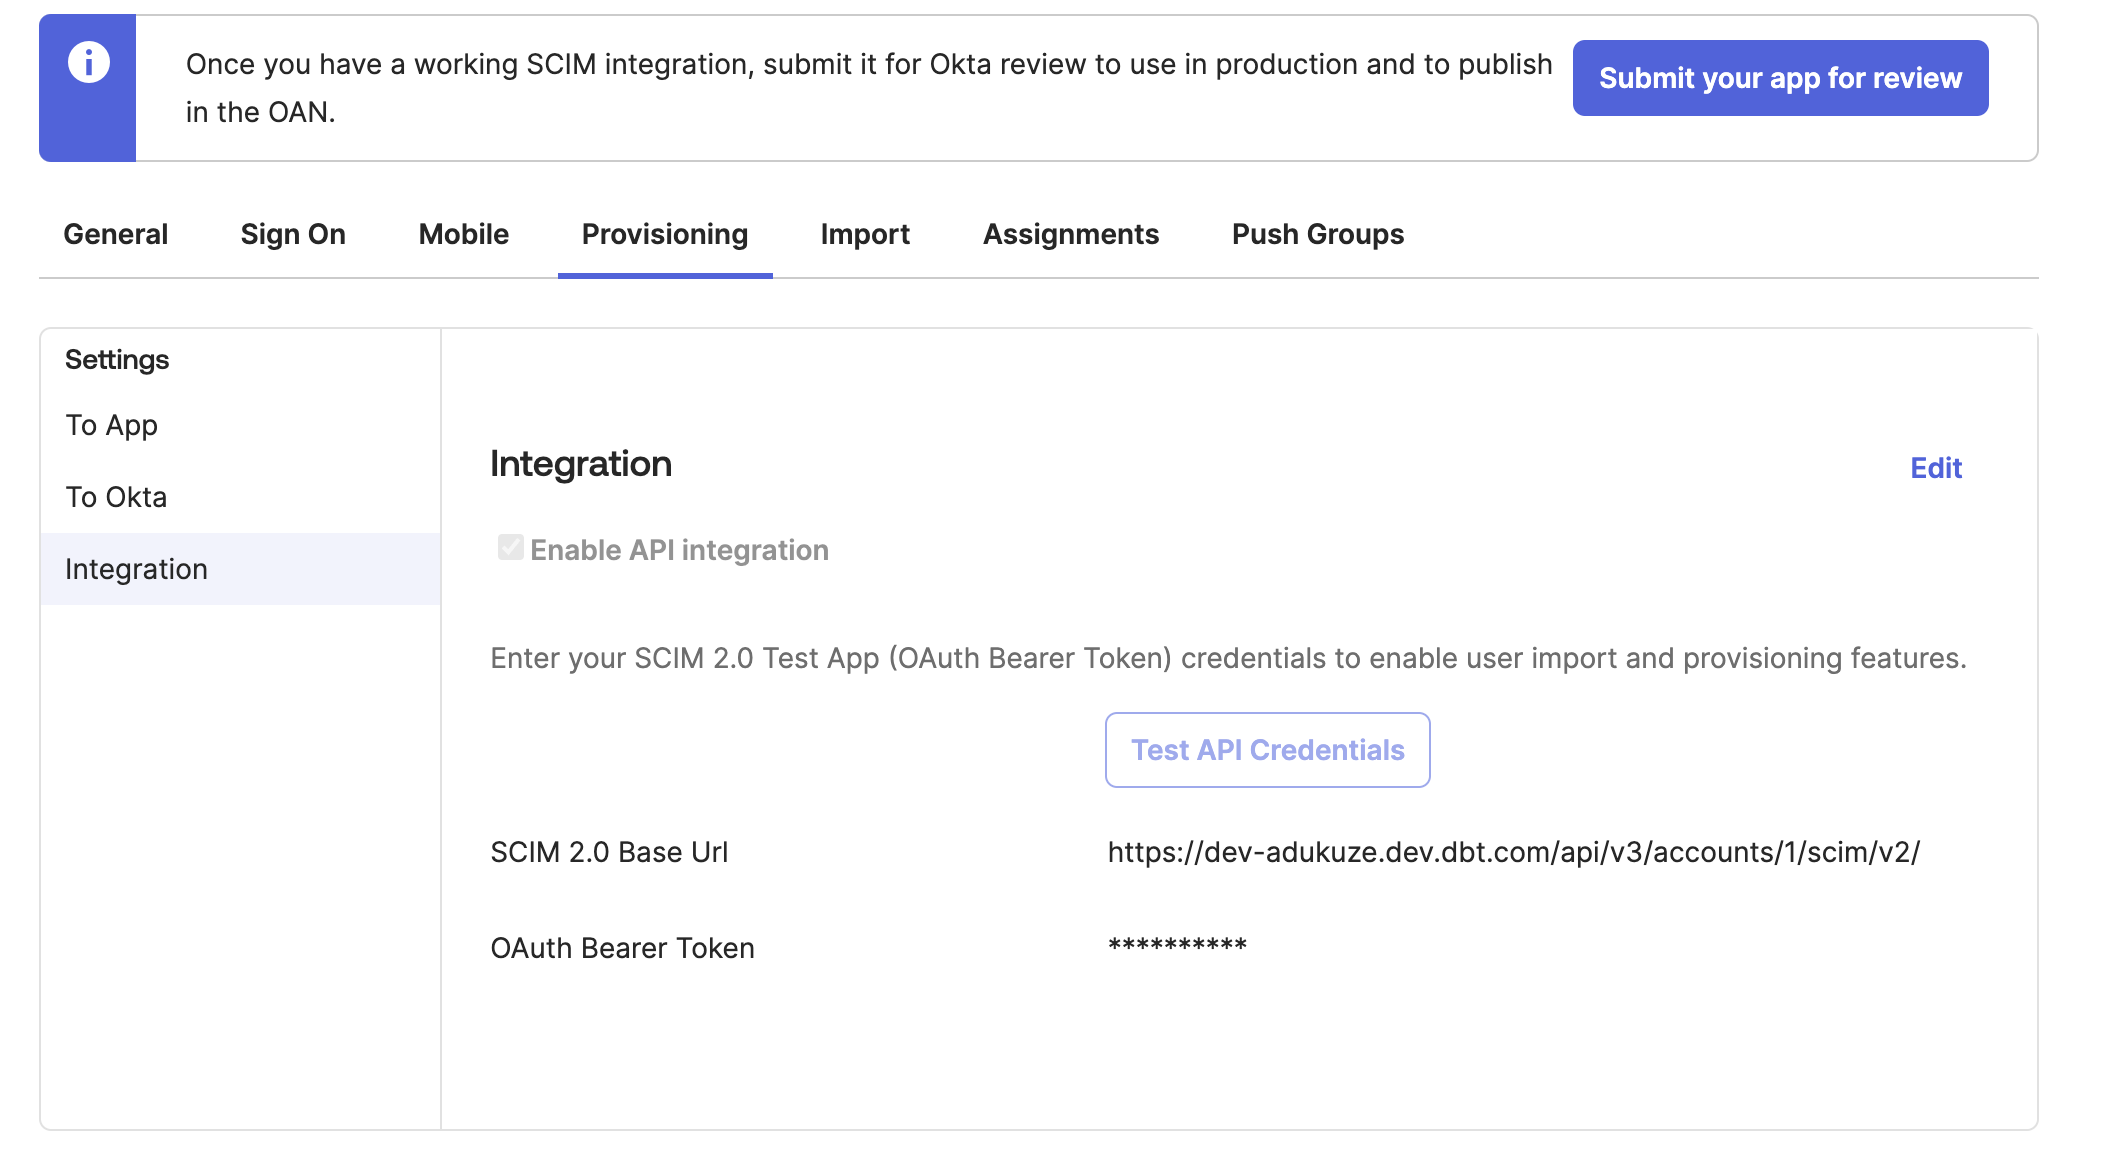
Open the Provisioning tab and select Integration.
-
Paste the SCIM base URL from dbt to the first field, then enter your preferred Unique identifier field for users — we recommend
userName. -
Click the checkboxes for the following Supported provisioning actions:
- Push New Users
- Push Profile Updates
- Push Groups
- Import New Users and Profile Updates (Optional for users created before SSO/SCIM setup)
-
From the Authentication mode dropdown, select HTTP Header.
-
In the Authorization section, paste the token from dbt into the Bearer field.
-
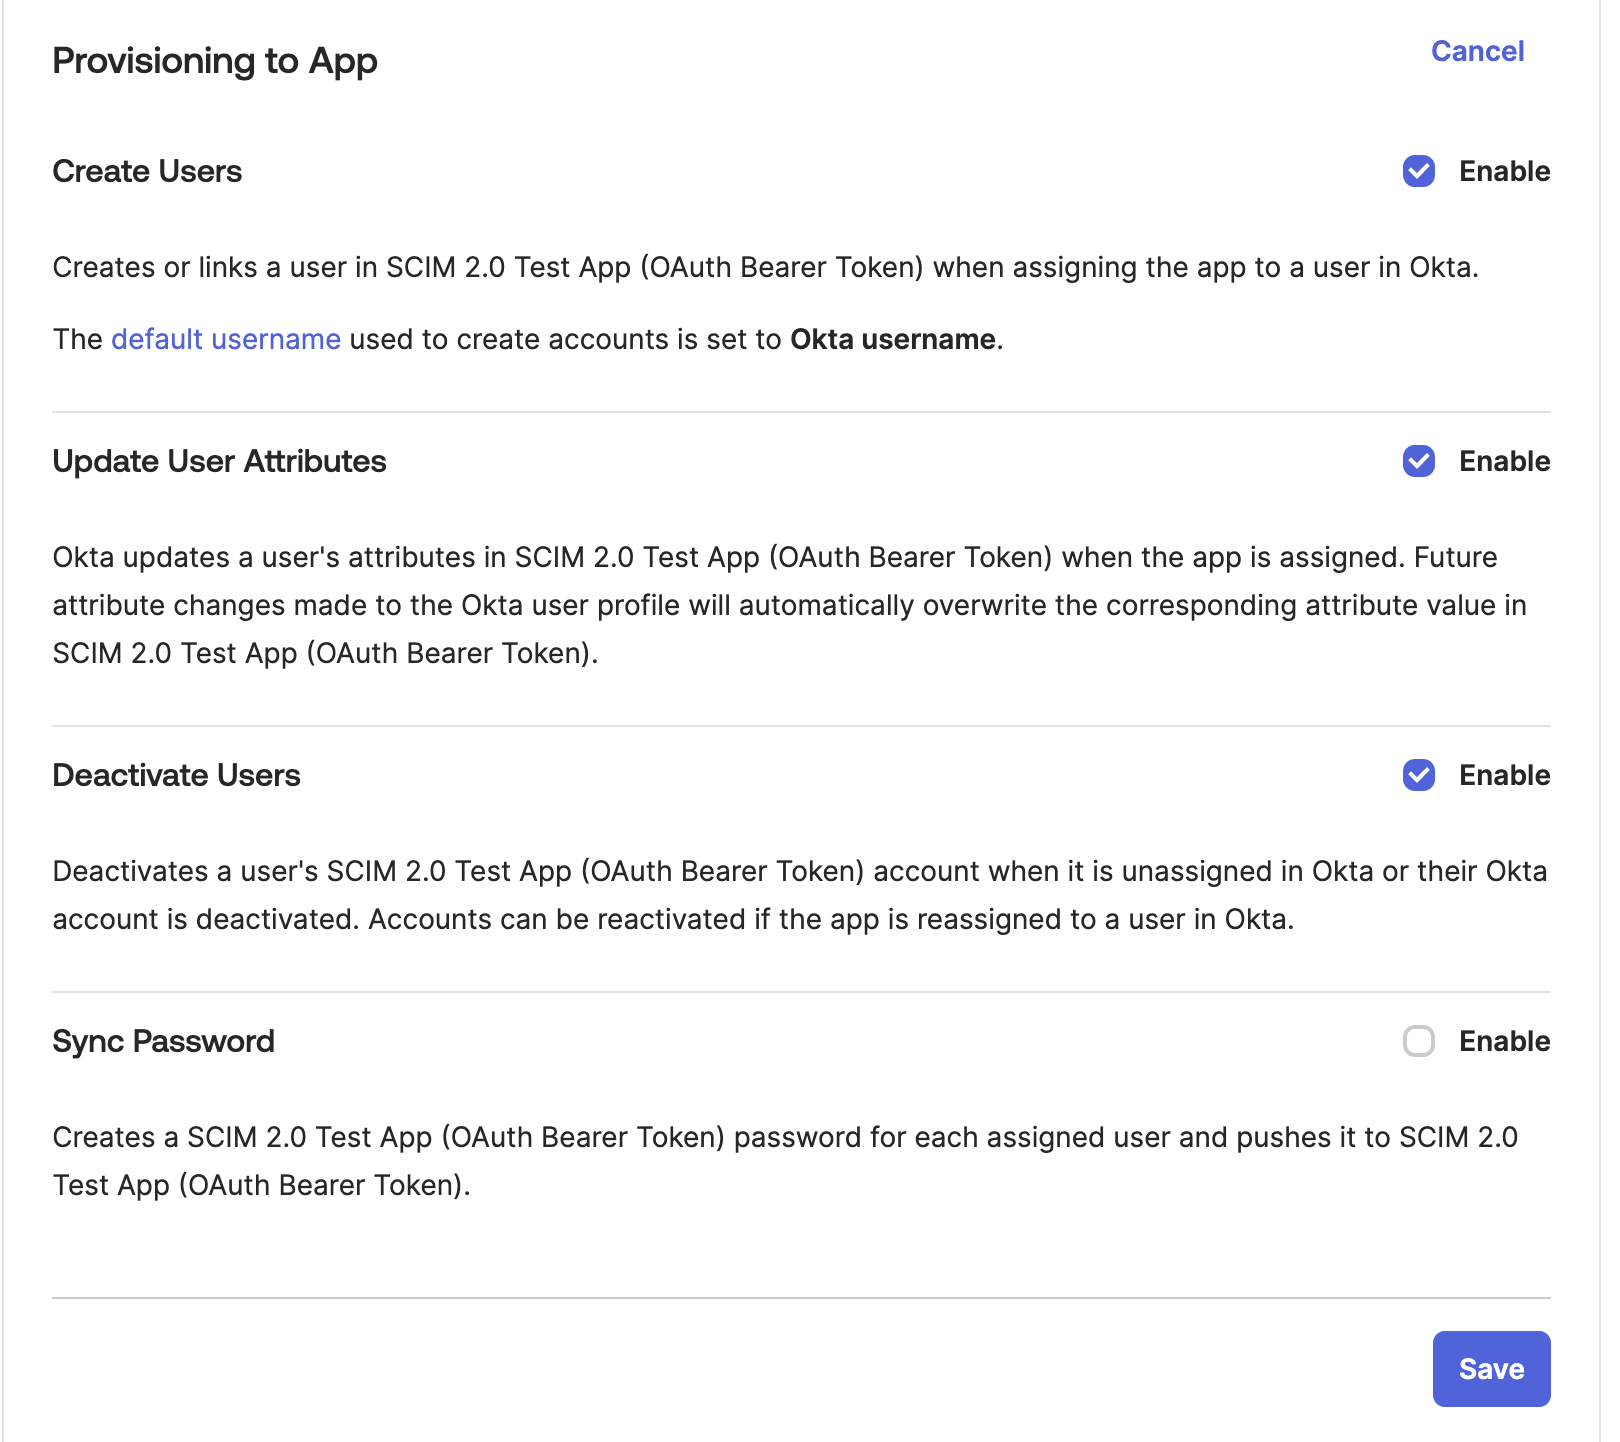
Ensure that the following provisioning actions are selected:
- Create users
- Update user attributes
- Deactivate users
-
Test the connection and click Save once completed.
You've now configured SCIM for the Okta SSO integration in dbt.
SCIM username format
SCIM requires the username to be in the email address format. If your Okta configurations map the Username field to a different attribute, SCIM user provisioning will fail. To get around this without altering your user profiles, set your Okta app config to Email:
- Open the SAML app created for the dbt integration.
- In the Sign on tab, click Edit in the Settings pane.
- Set the Application username format field to Email.
- Click Save.
Existing Okta integrations
If you are adding SCIM to an existing Okta integration in dbt (as opposed to setting up SCIM and SSO concurrently for the first time), there is some functionality you should be aware of:
- Users and groups already synced to dbt will become SCIM-managed once you complete the SCIM configuration.
- (Recommended) Import and manage existing dbt groups and users with Okta's Import Groups and Import Users features. Update the groups in your IdP with the same naming convention used for dbt groups. New users, groups, and changes to existing profiles will be automatically imported into dbt.
- Ensure the Import users and profile updates and Import groups checkboxes are selected in the Provisioning settings tab in the Okta SCIM configuration.
- Use Import Users to sync all users from dbt, including previously deleted users, if you need to re-provision those users.
- Read more about this feature in the Okta documentation.
SCIM configuration for Entra ID
Please complete the setup SSO with Entra ID steps before configuring SCIM settings.
Set up Entra ID
- Log in to your Azure account and open the Entra ID configurations.
- From the sidebar, under Manage, click Enterprise Applications.
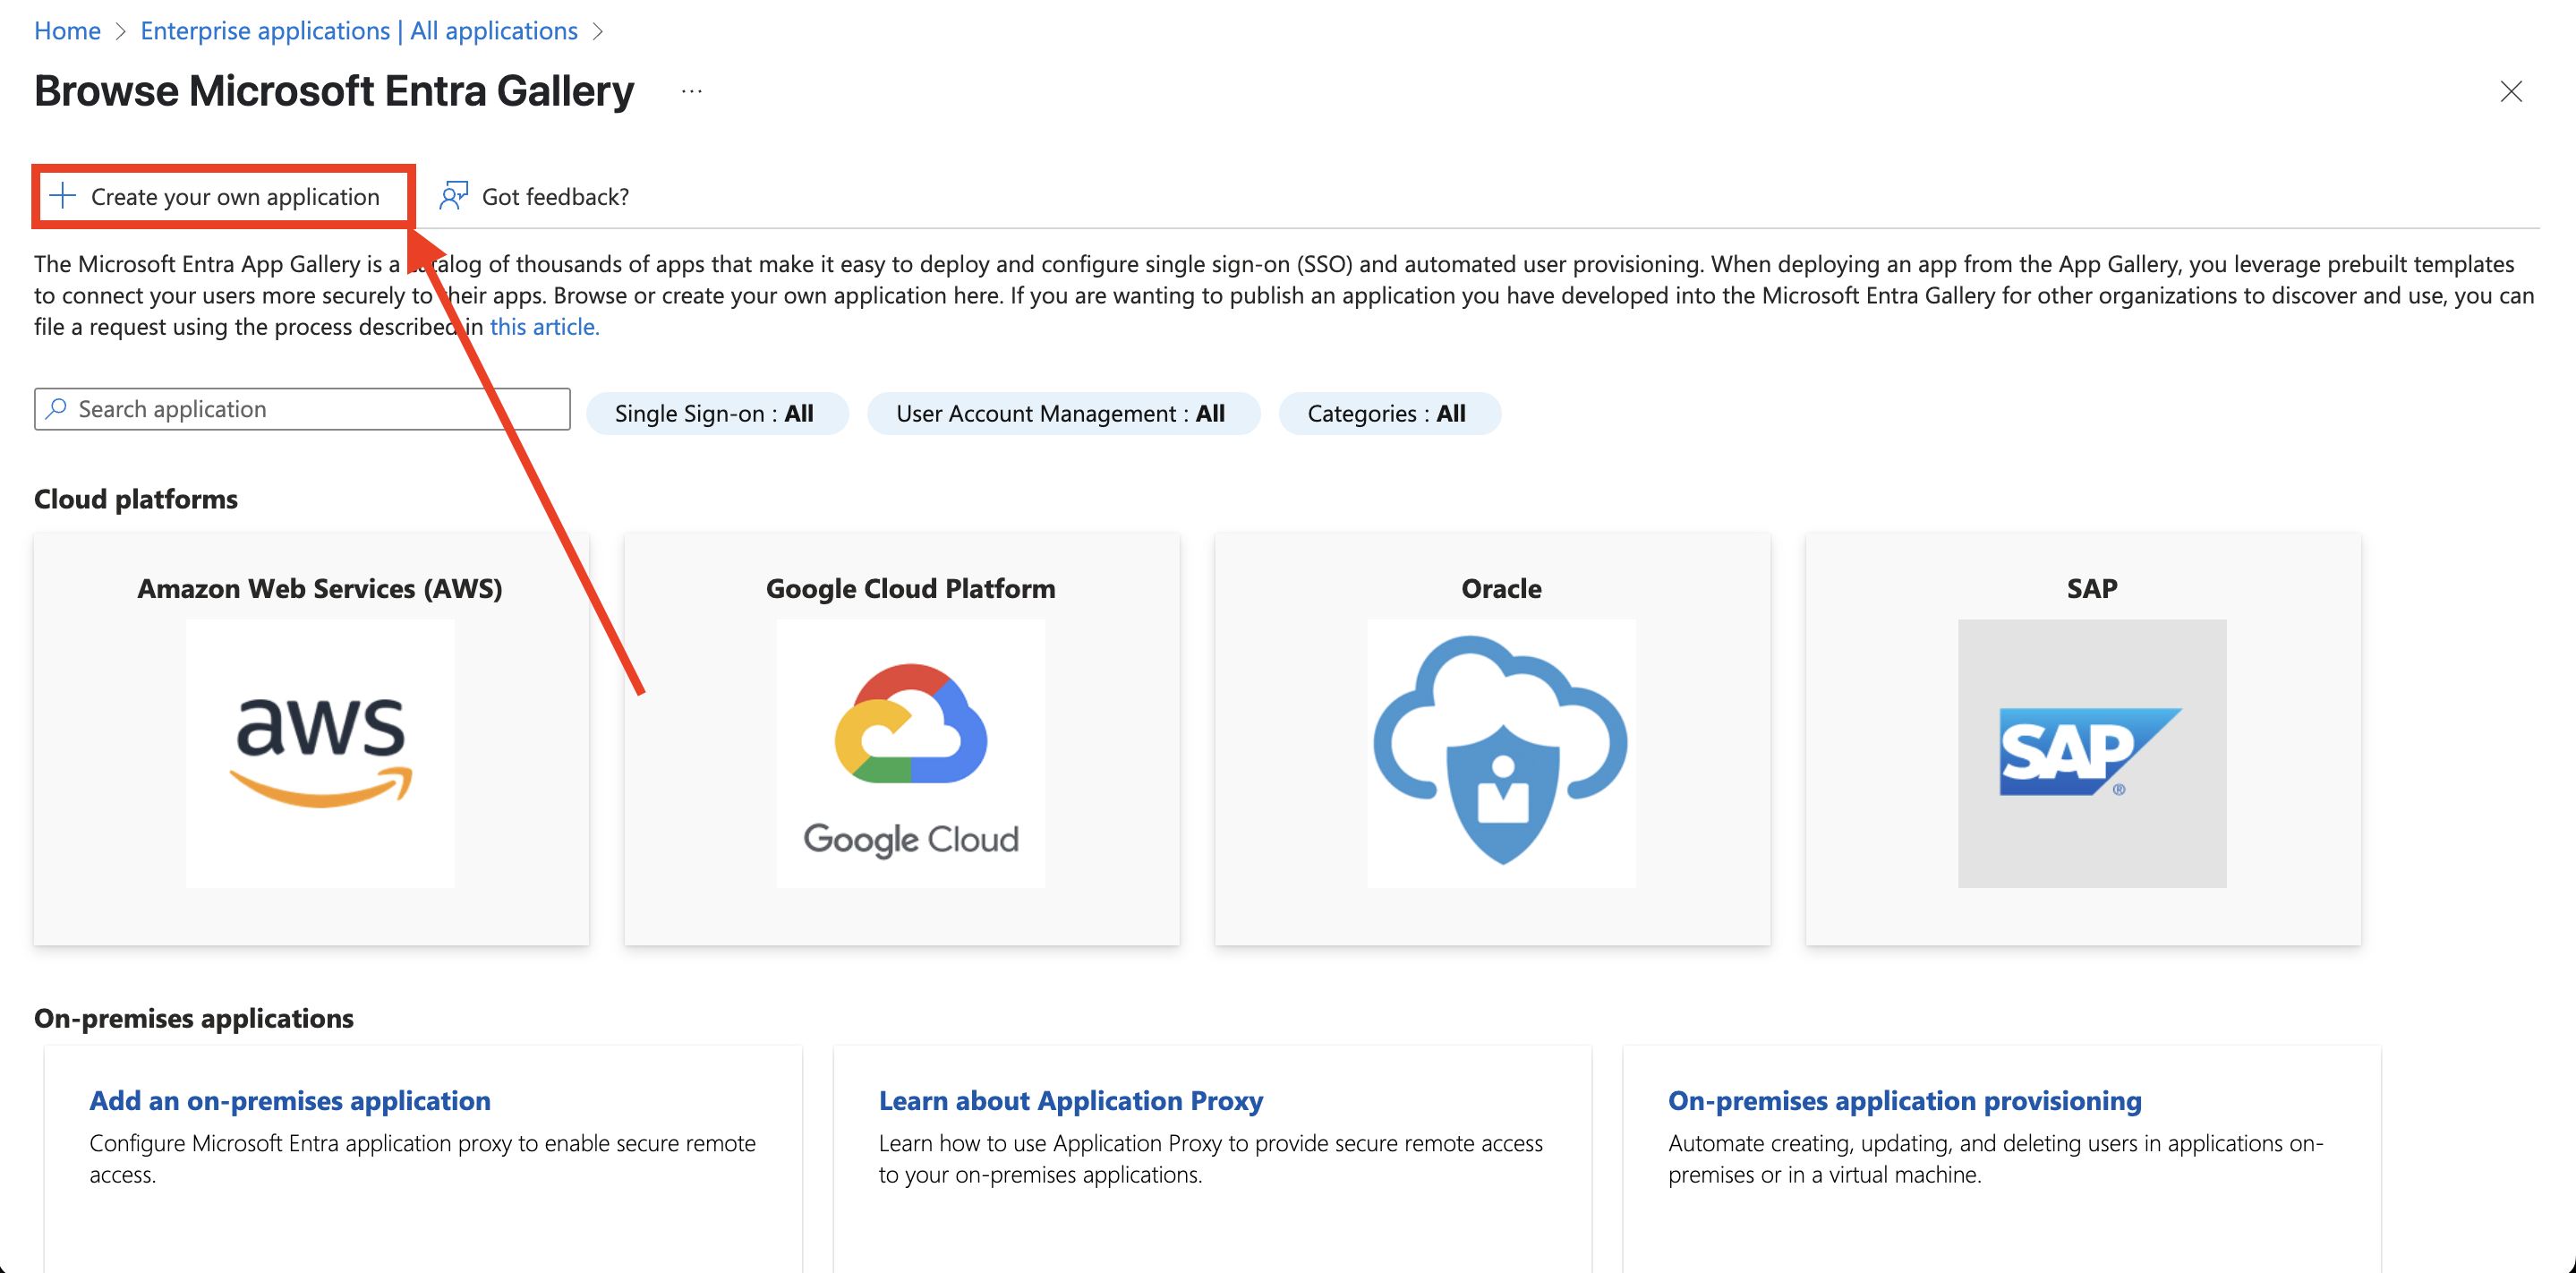
- Click New Application and select the option to Create your own application.
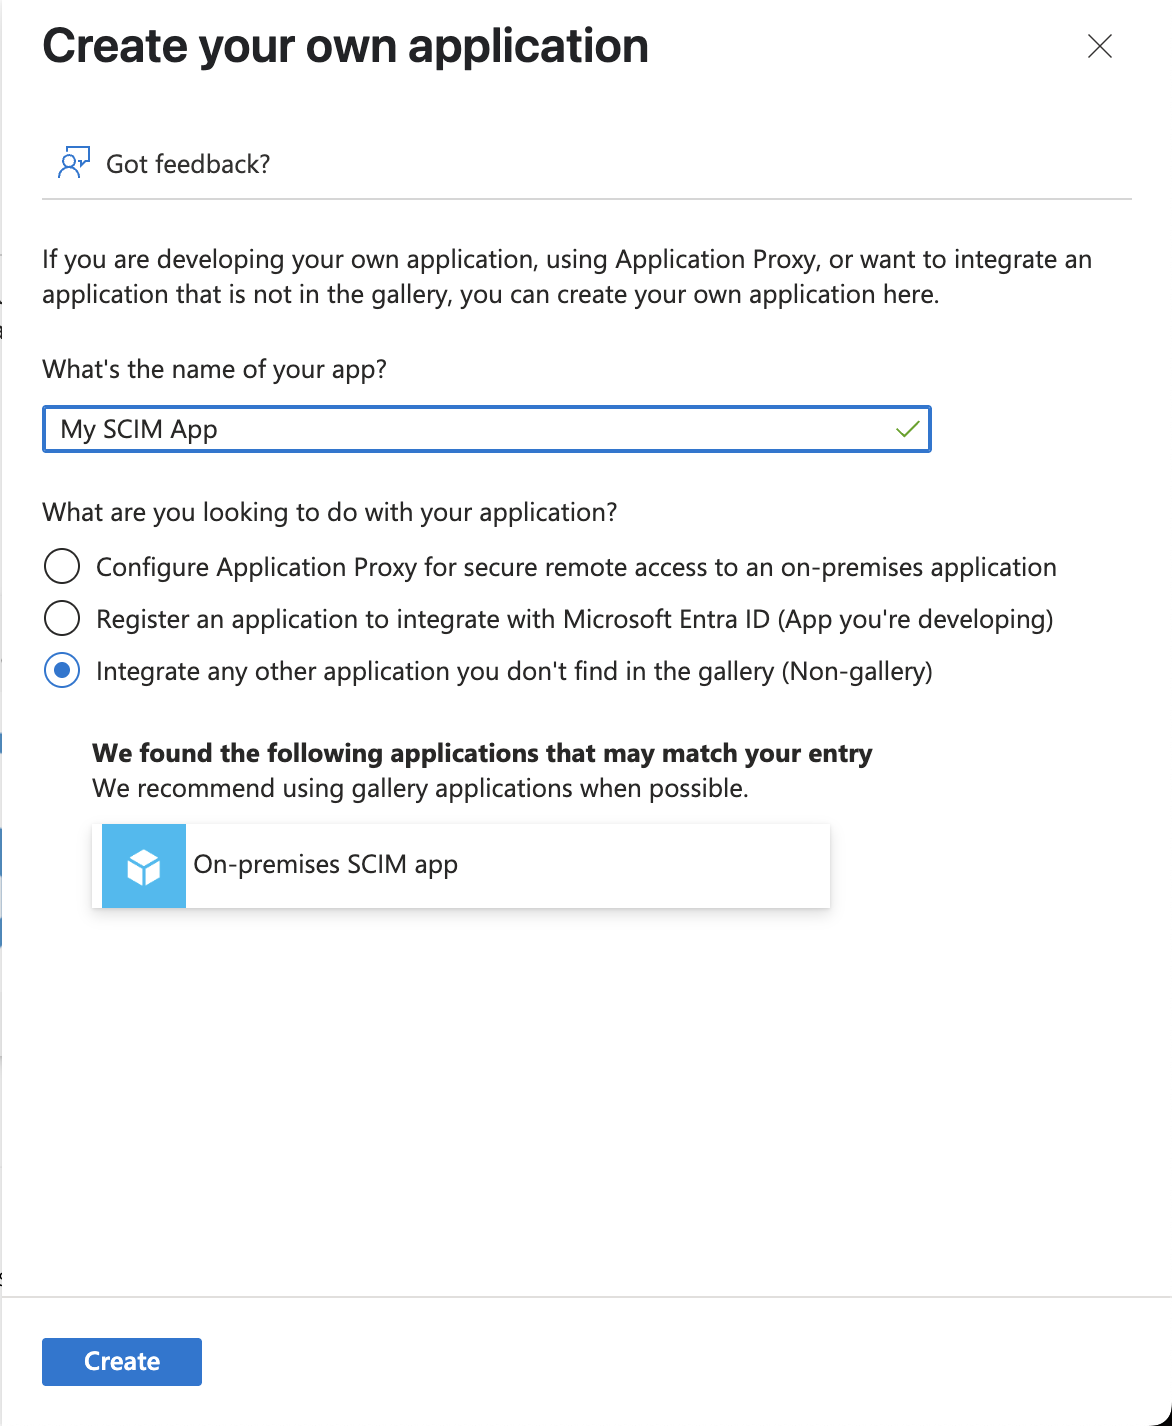
- Give your app a unique name and ensure the Integrate any other application you don't find in the gallery (Non-gallery) field is selected. Ignore any prompts for existing apps. Click Create.
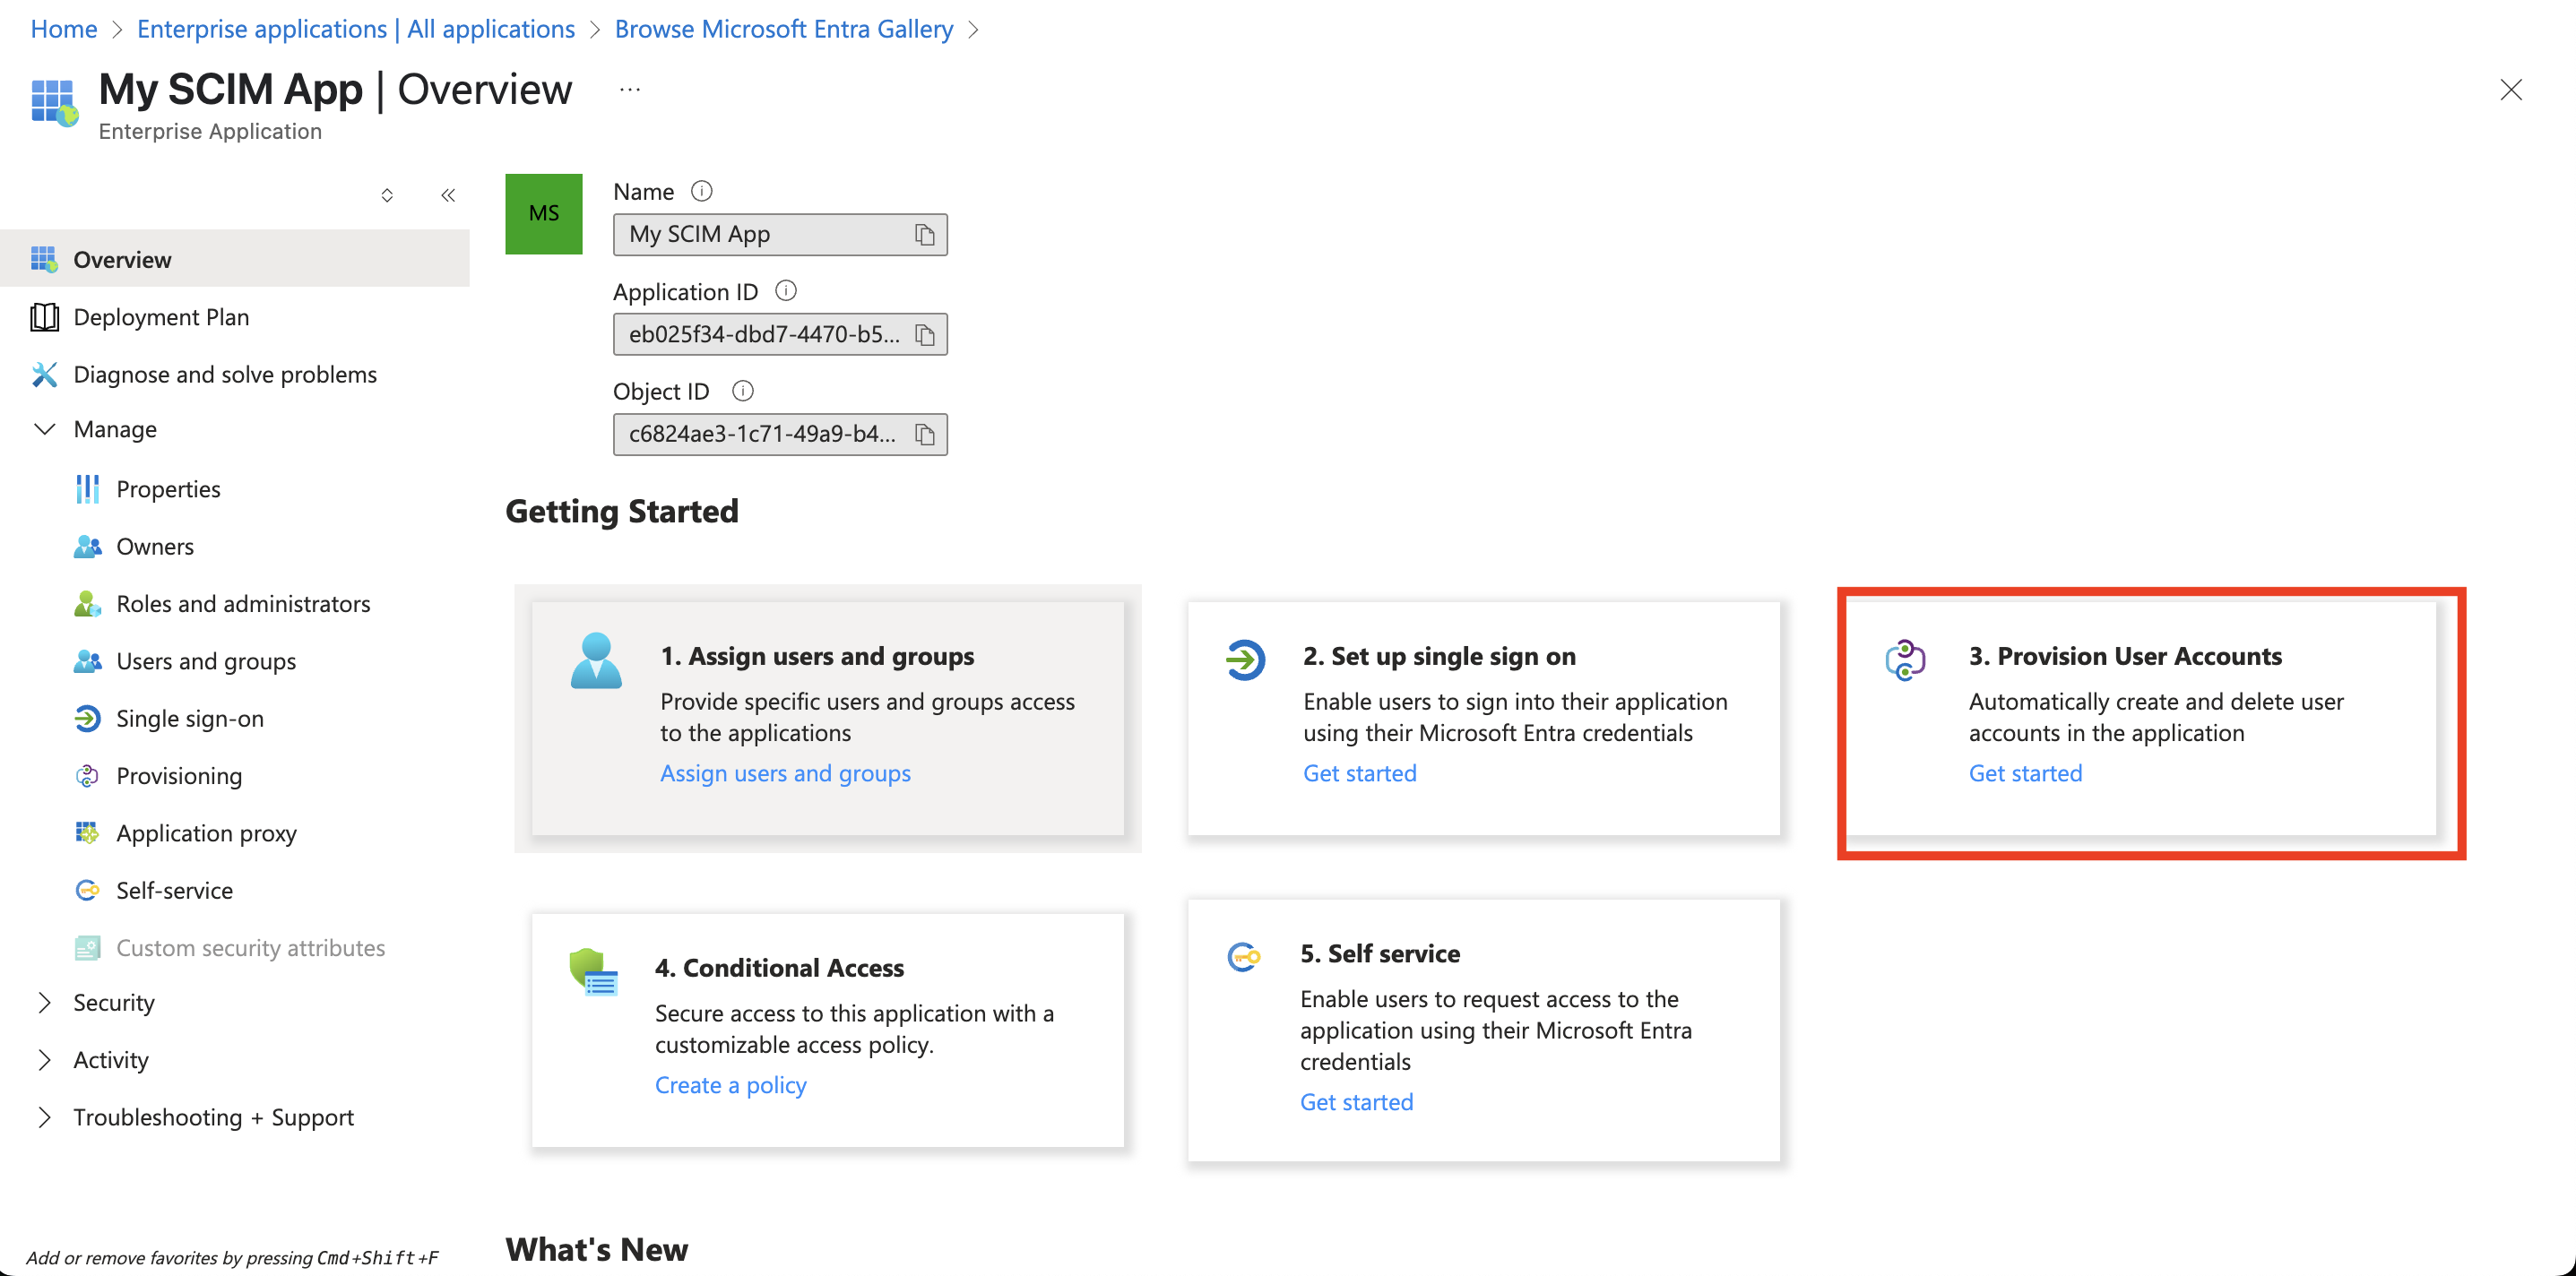
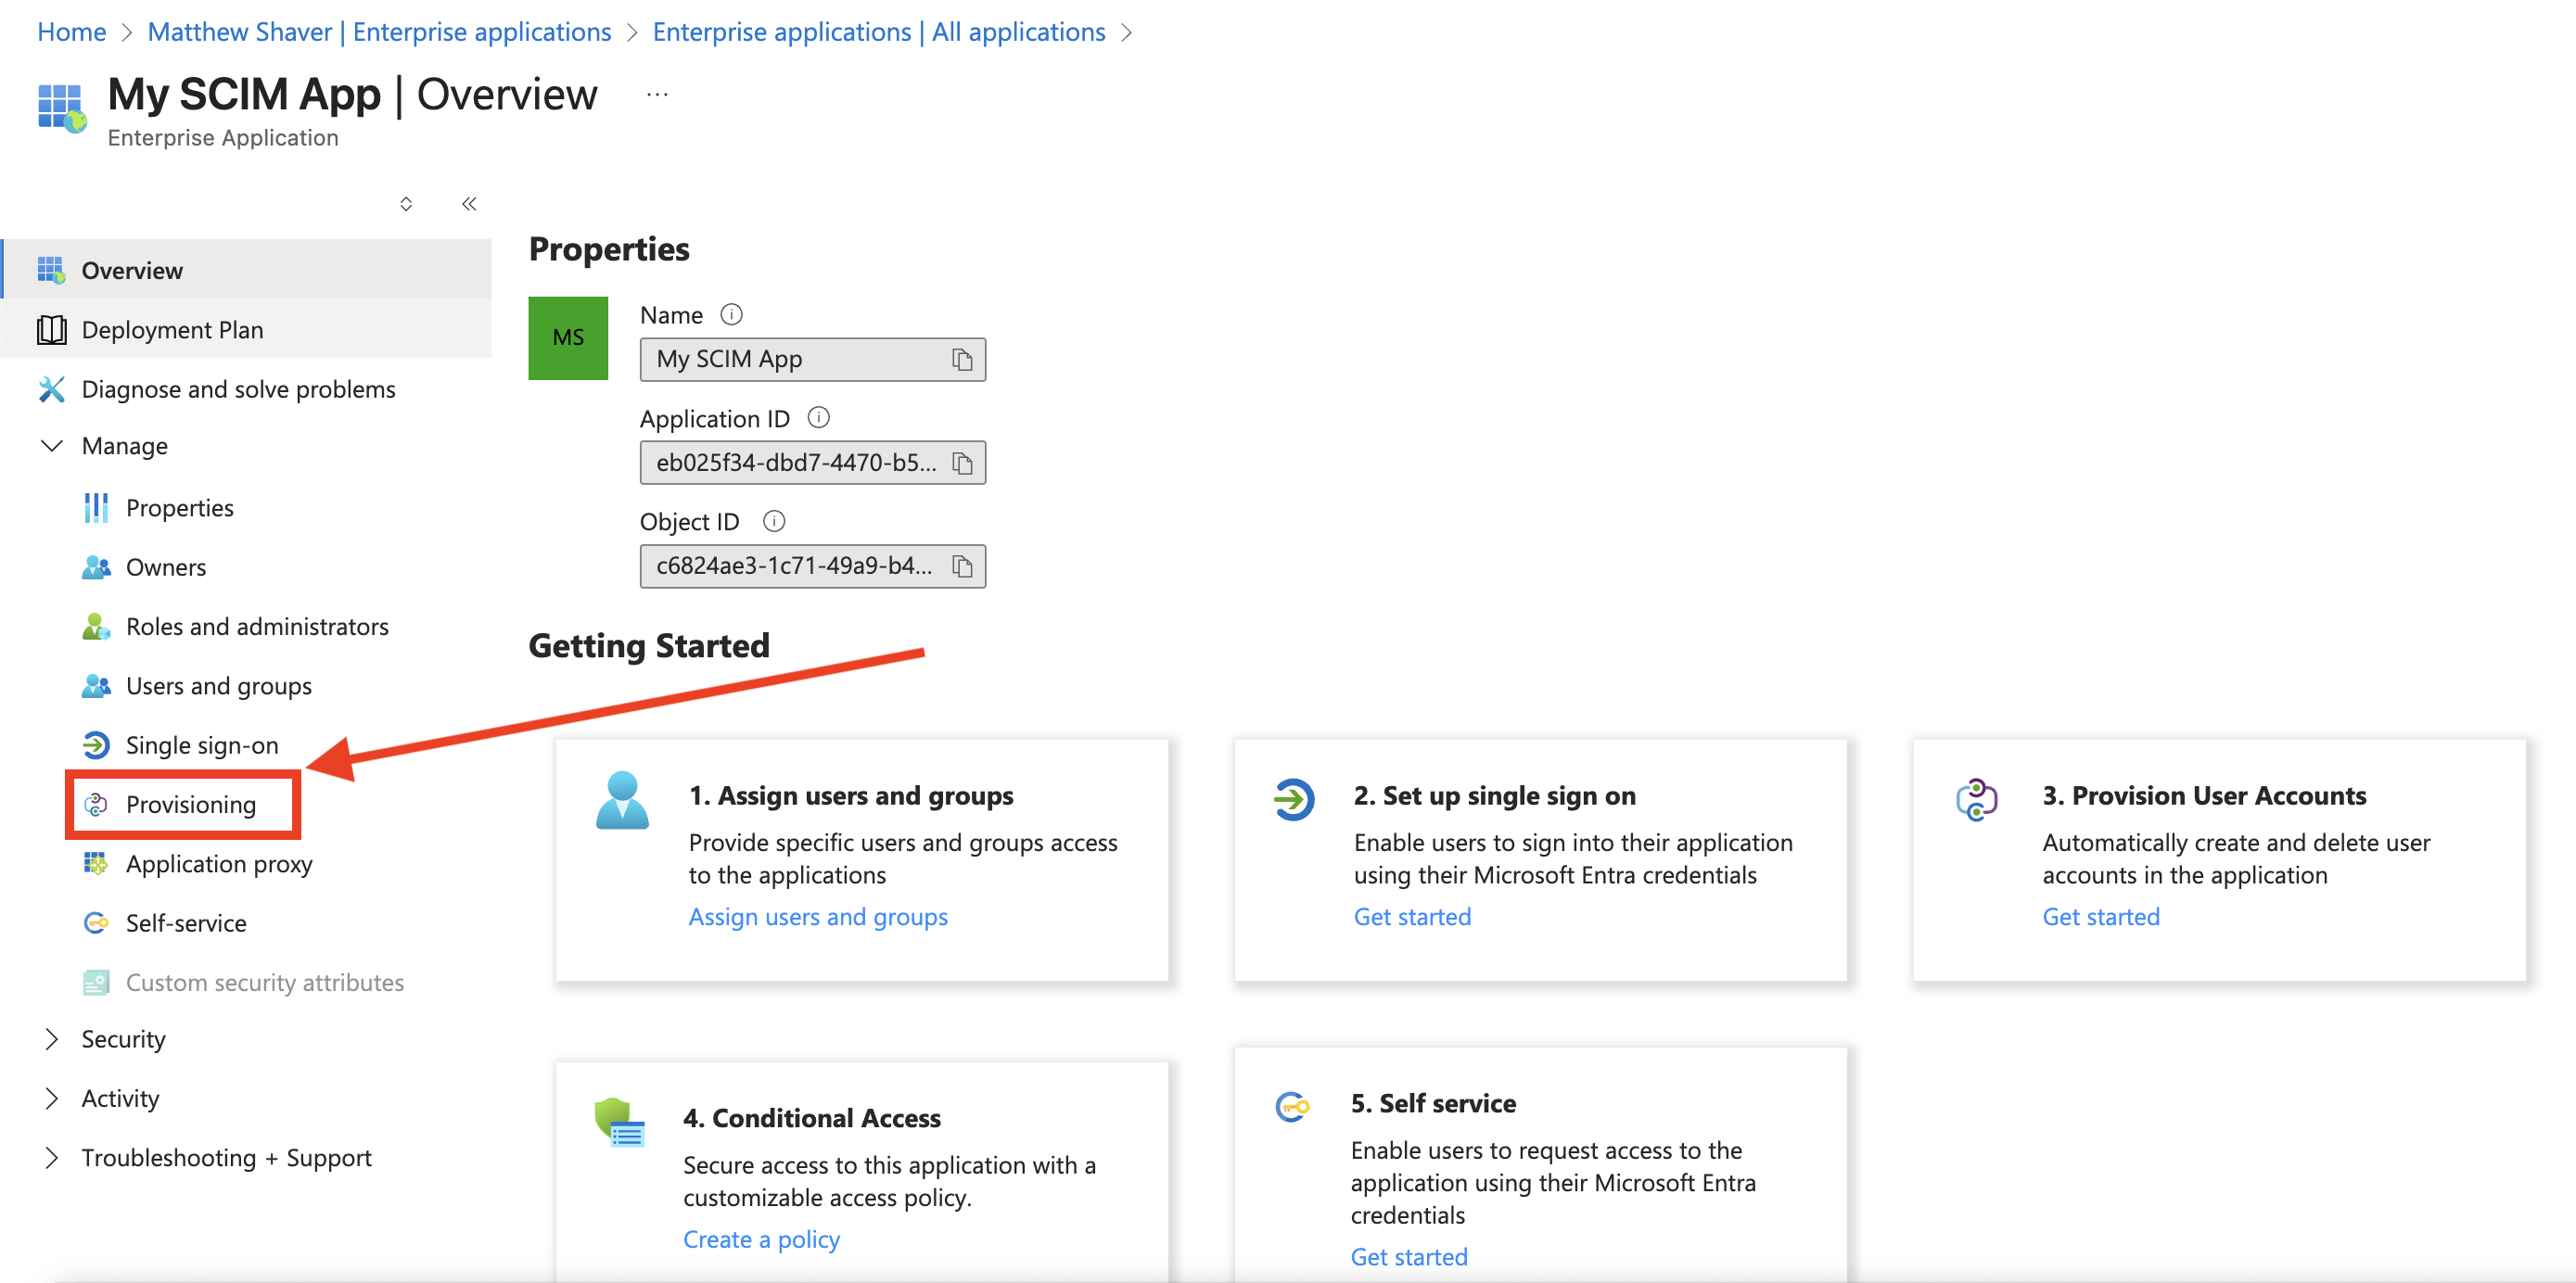
- From the application Overview screen, click Provision User Accounts.
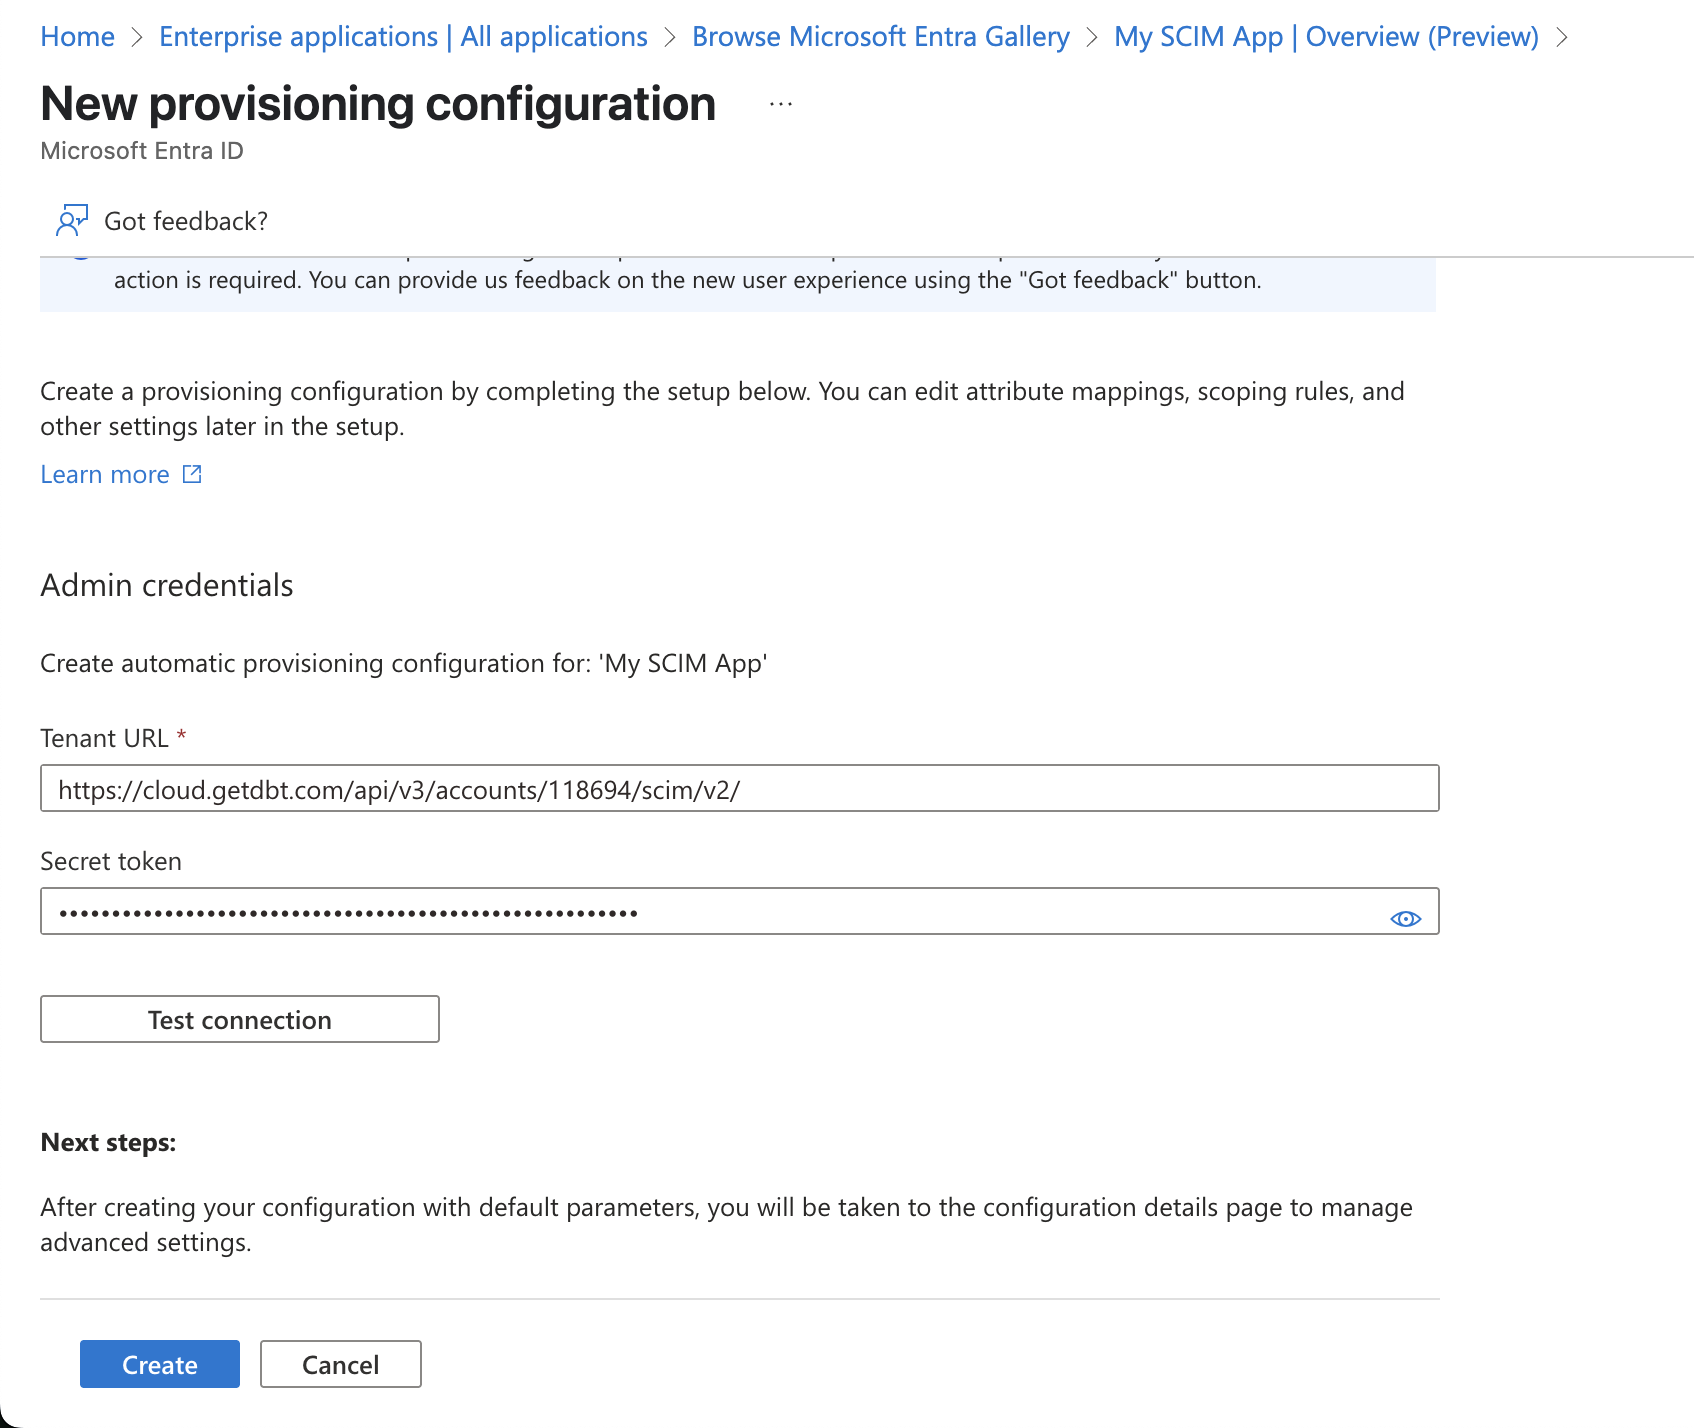
- From the Create configuration section, click Connect your application
- Fill out the form with the information from your dbt account:
- The Tenant URL in Entra ID is your SCIM based URL from dbt
- The Secret token in Entra ID is your SCIM token* from dbt
- Click Test connection and click Create once complete.
Attribute mapping
To map the attributes that will sync with dbt:
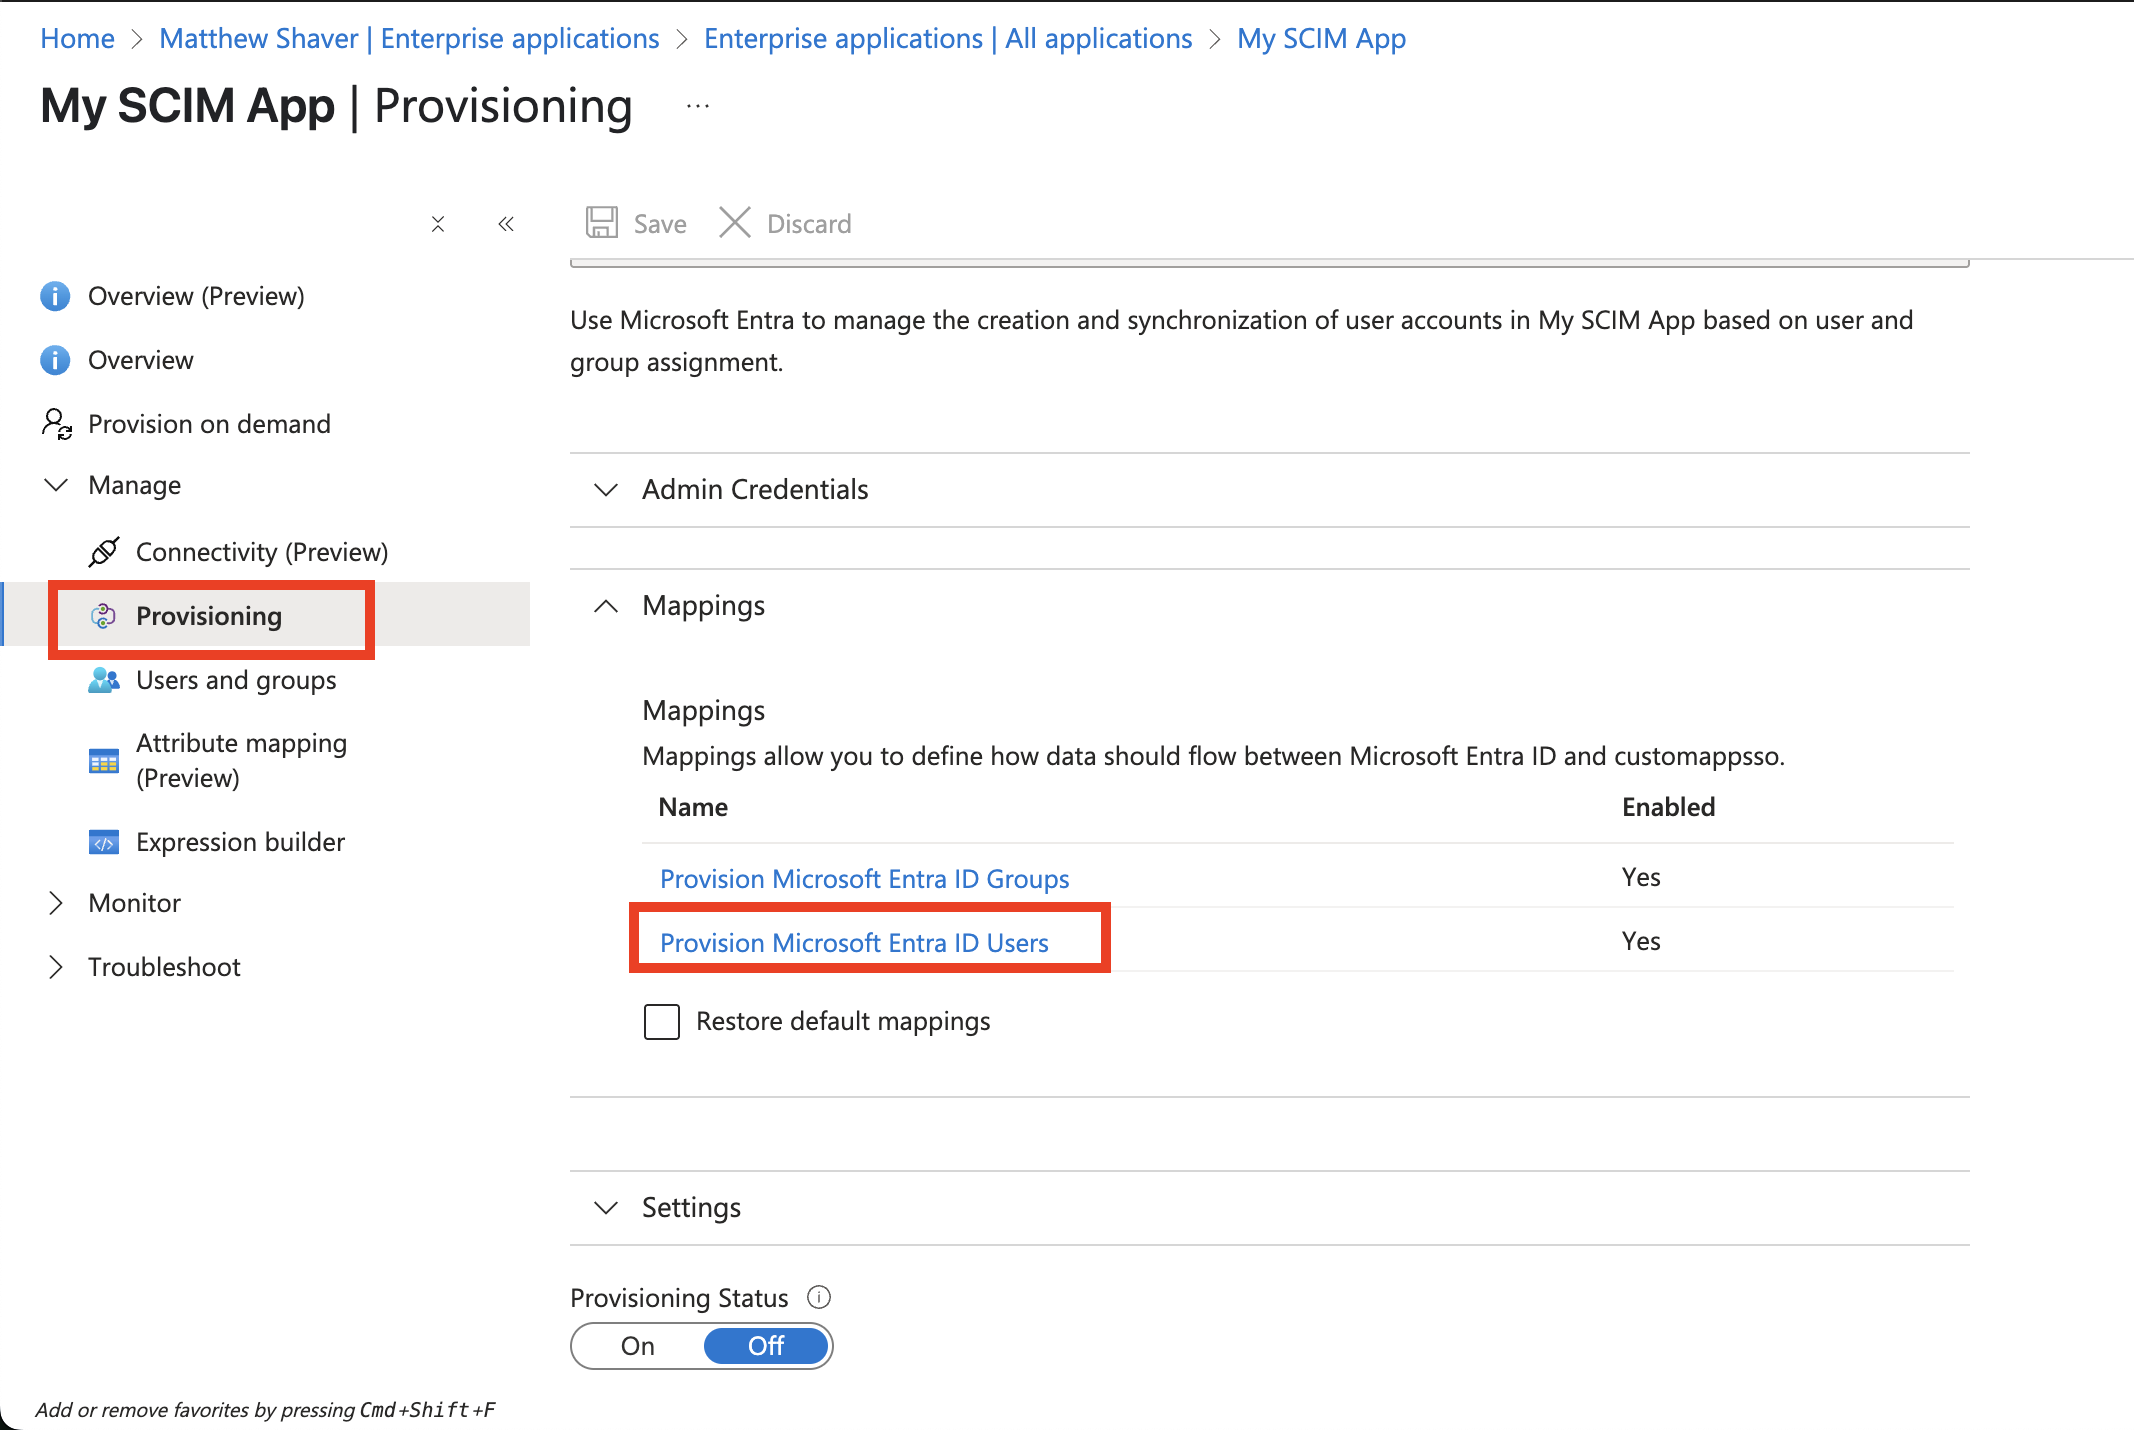
- From the enteprise app Overview screen sidebar menu, click Provisioning.
- From under Manage, again click Provisioning.
- Expand the Mappings section and click Provision Microsoft Entra ID users.
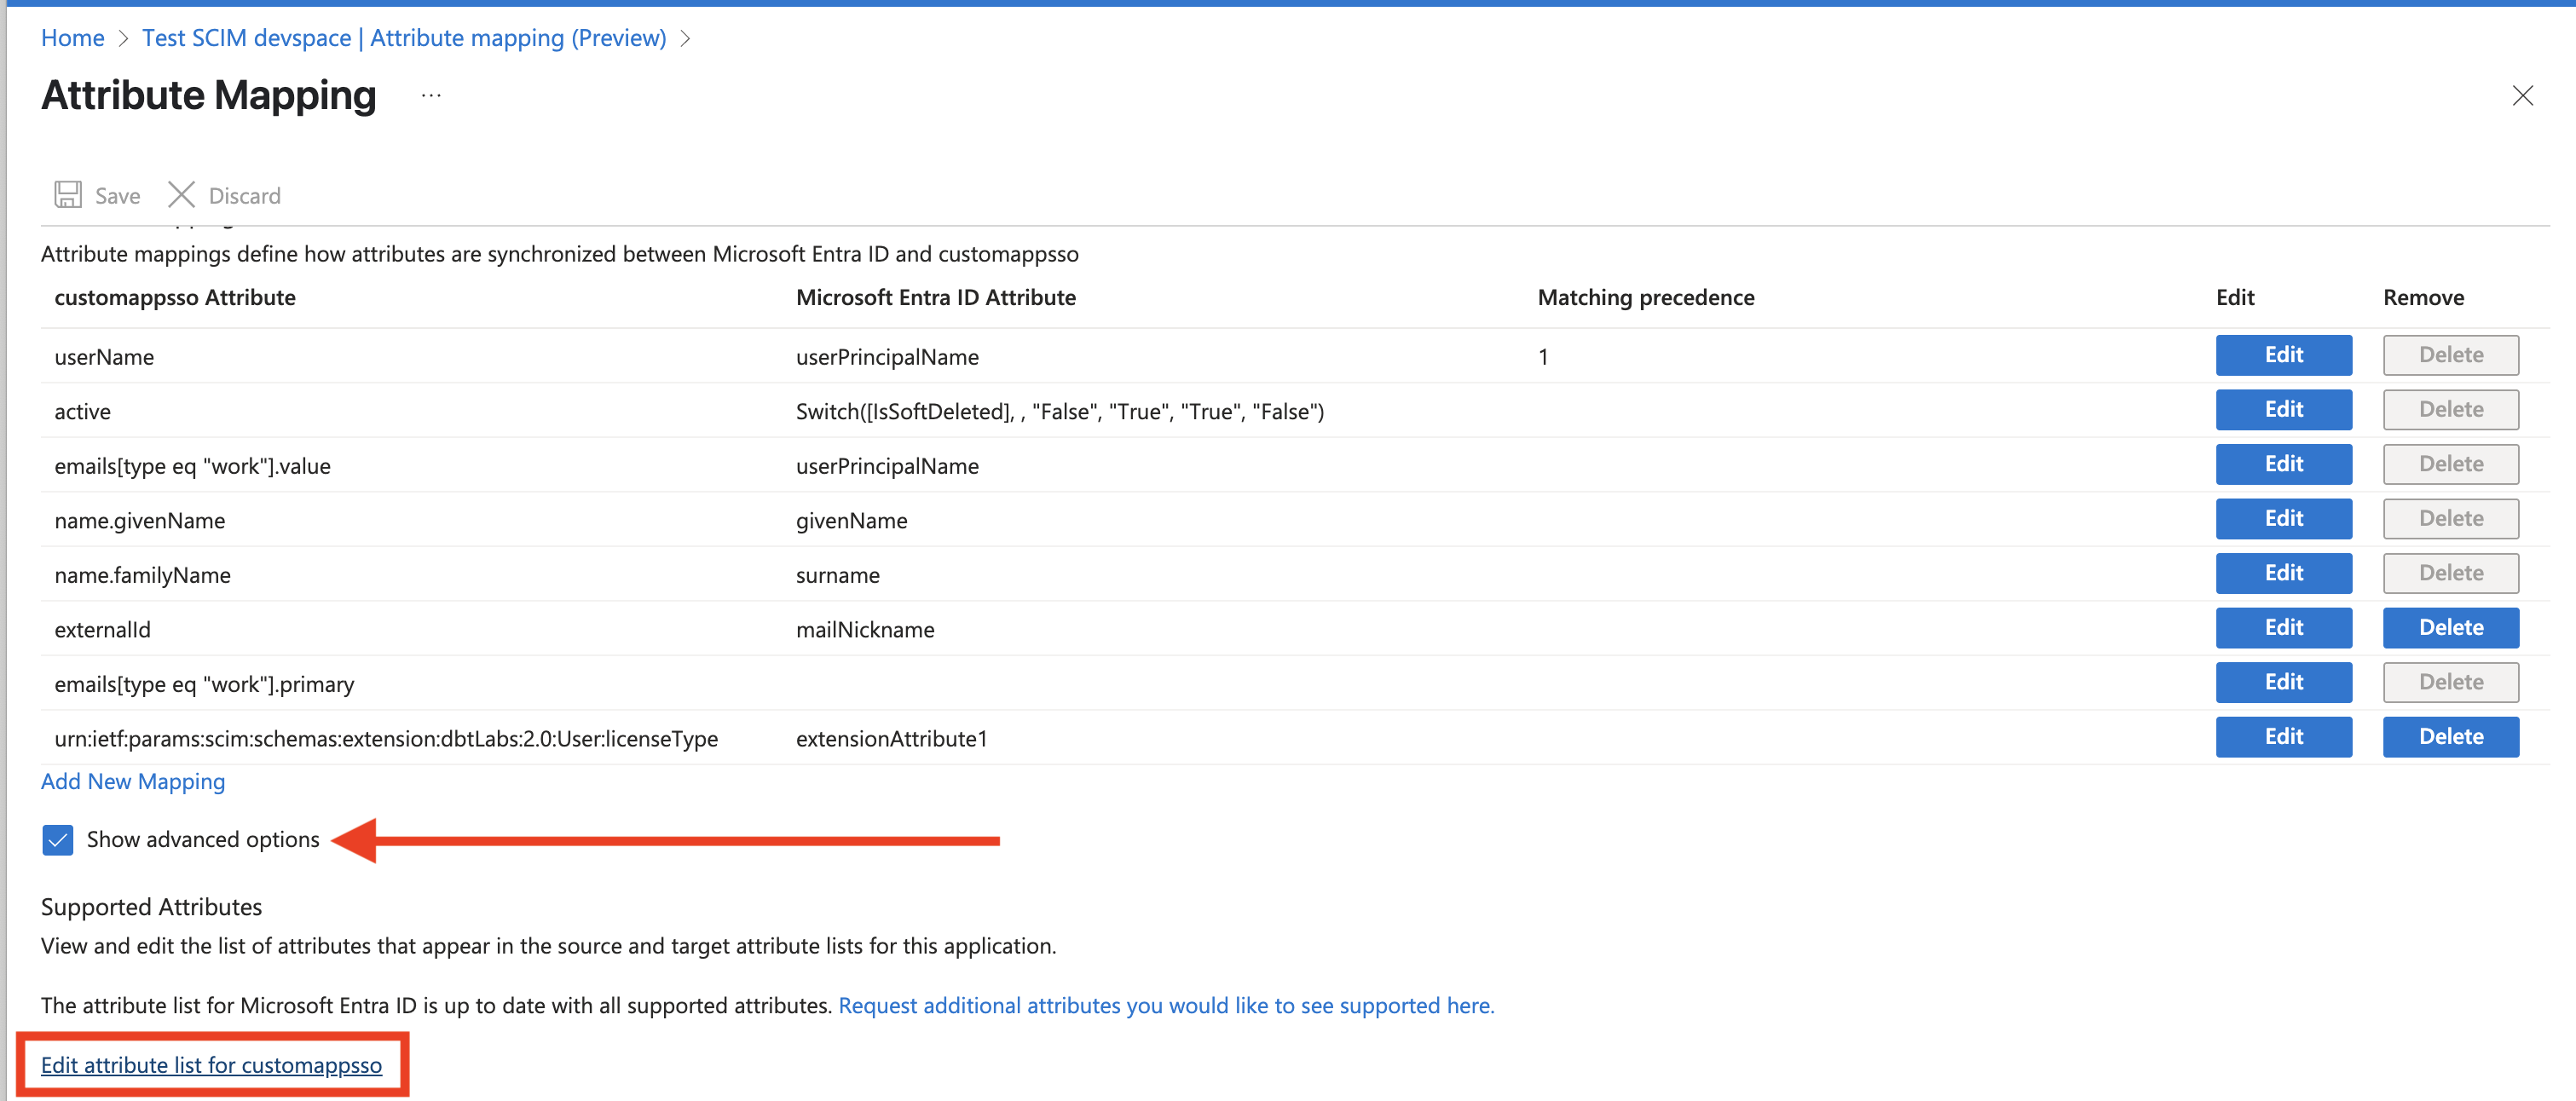
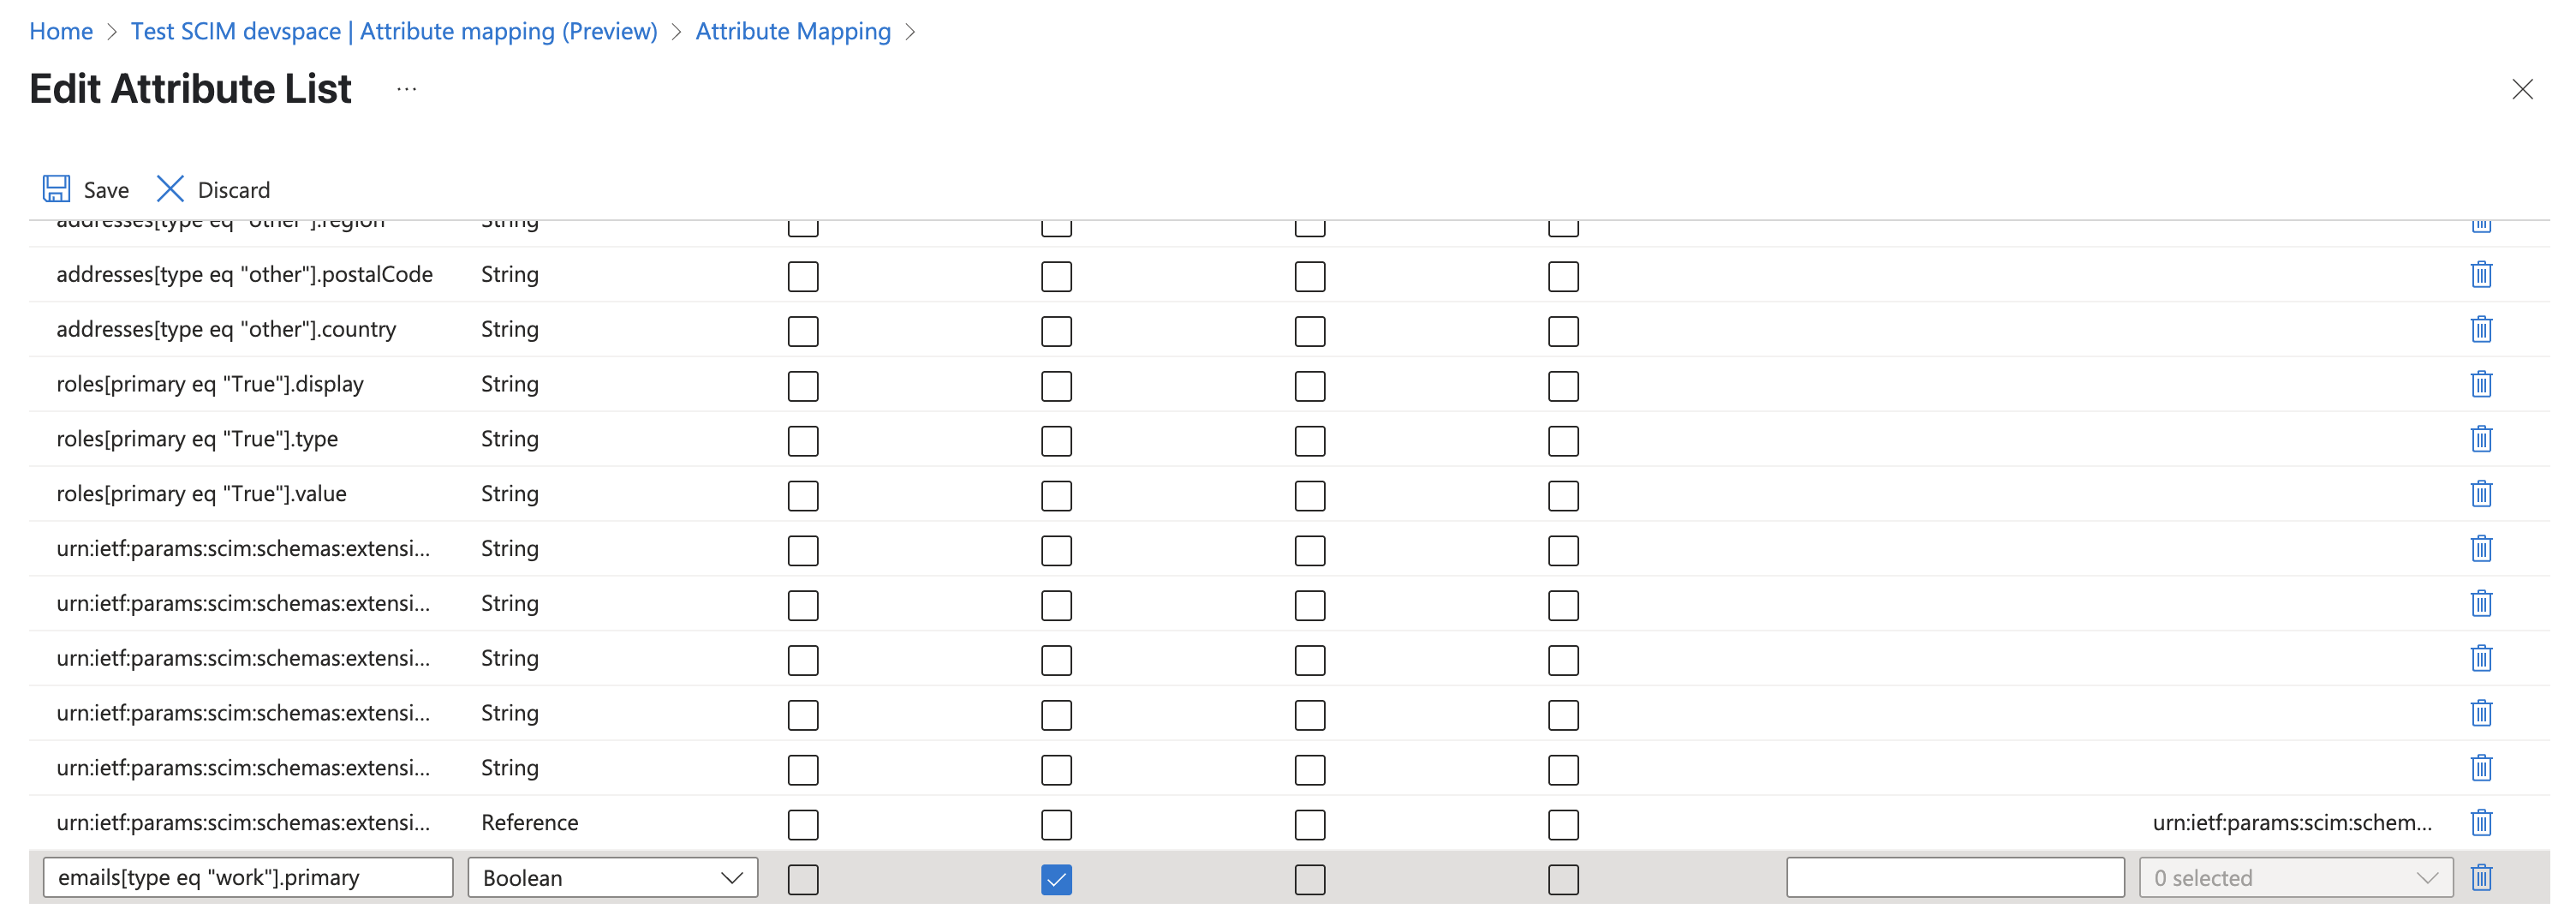
- Click the box for Show advanced options and then click Edit attribute list for customappsso.
- Scroll to the bottom of the Edit attribute list window and find an empty field where you can add a new entry with the following fields:
- Name:
emails[type eq "work"].primary - Type:
Boolean - Required: True
- Name:
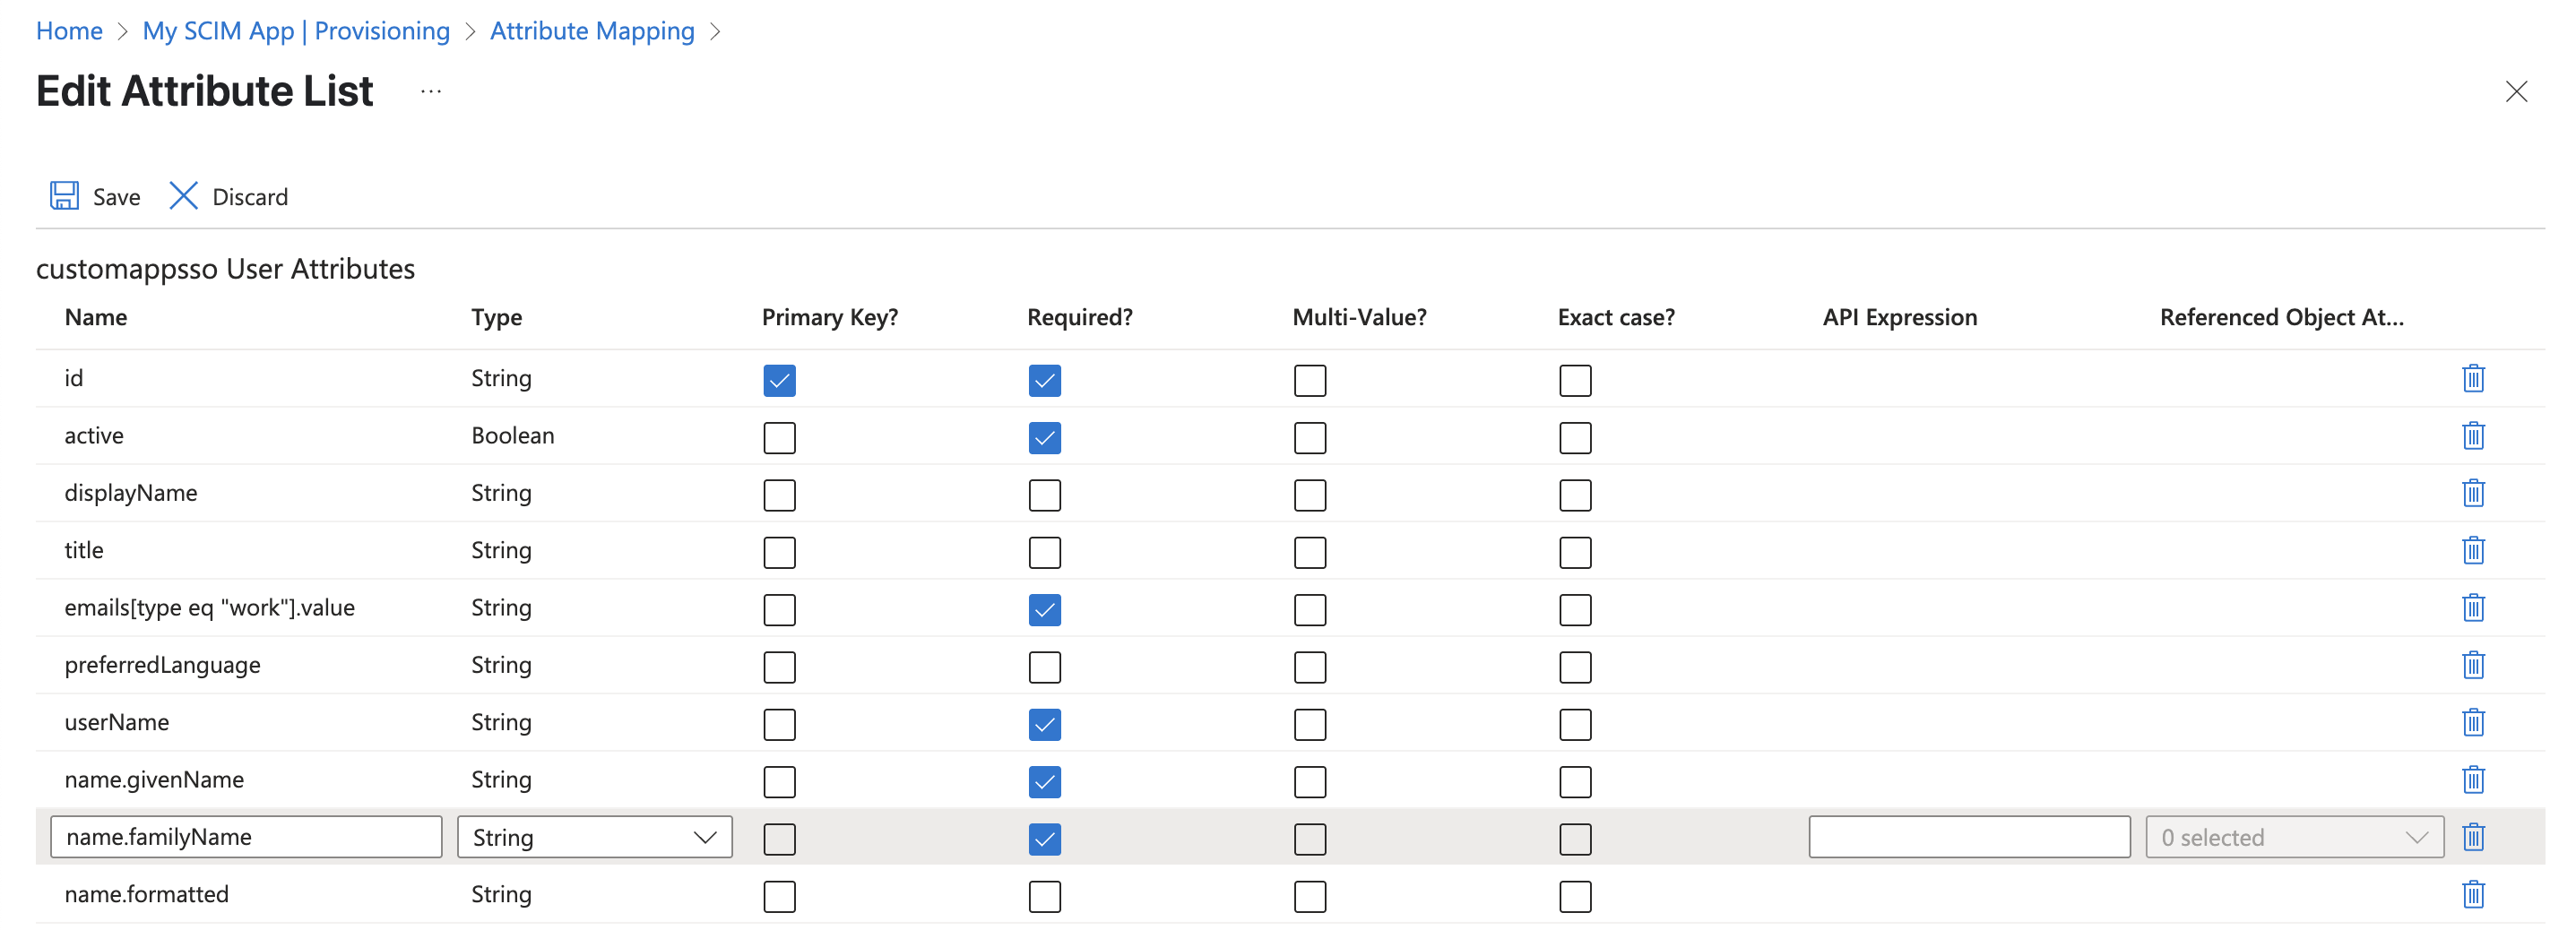
- Mark all of the fields listed in Step 10 below as
Required. - Click Save
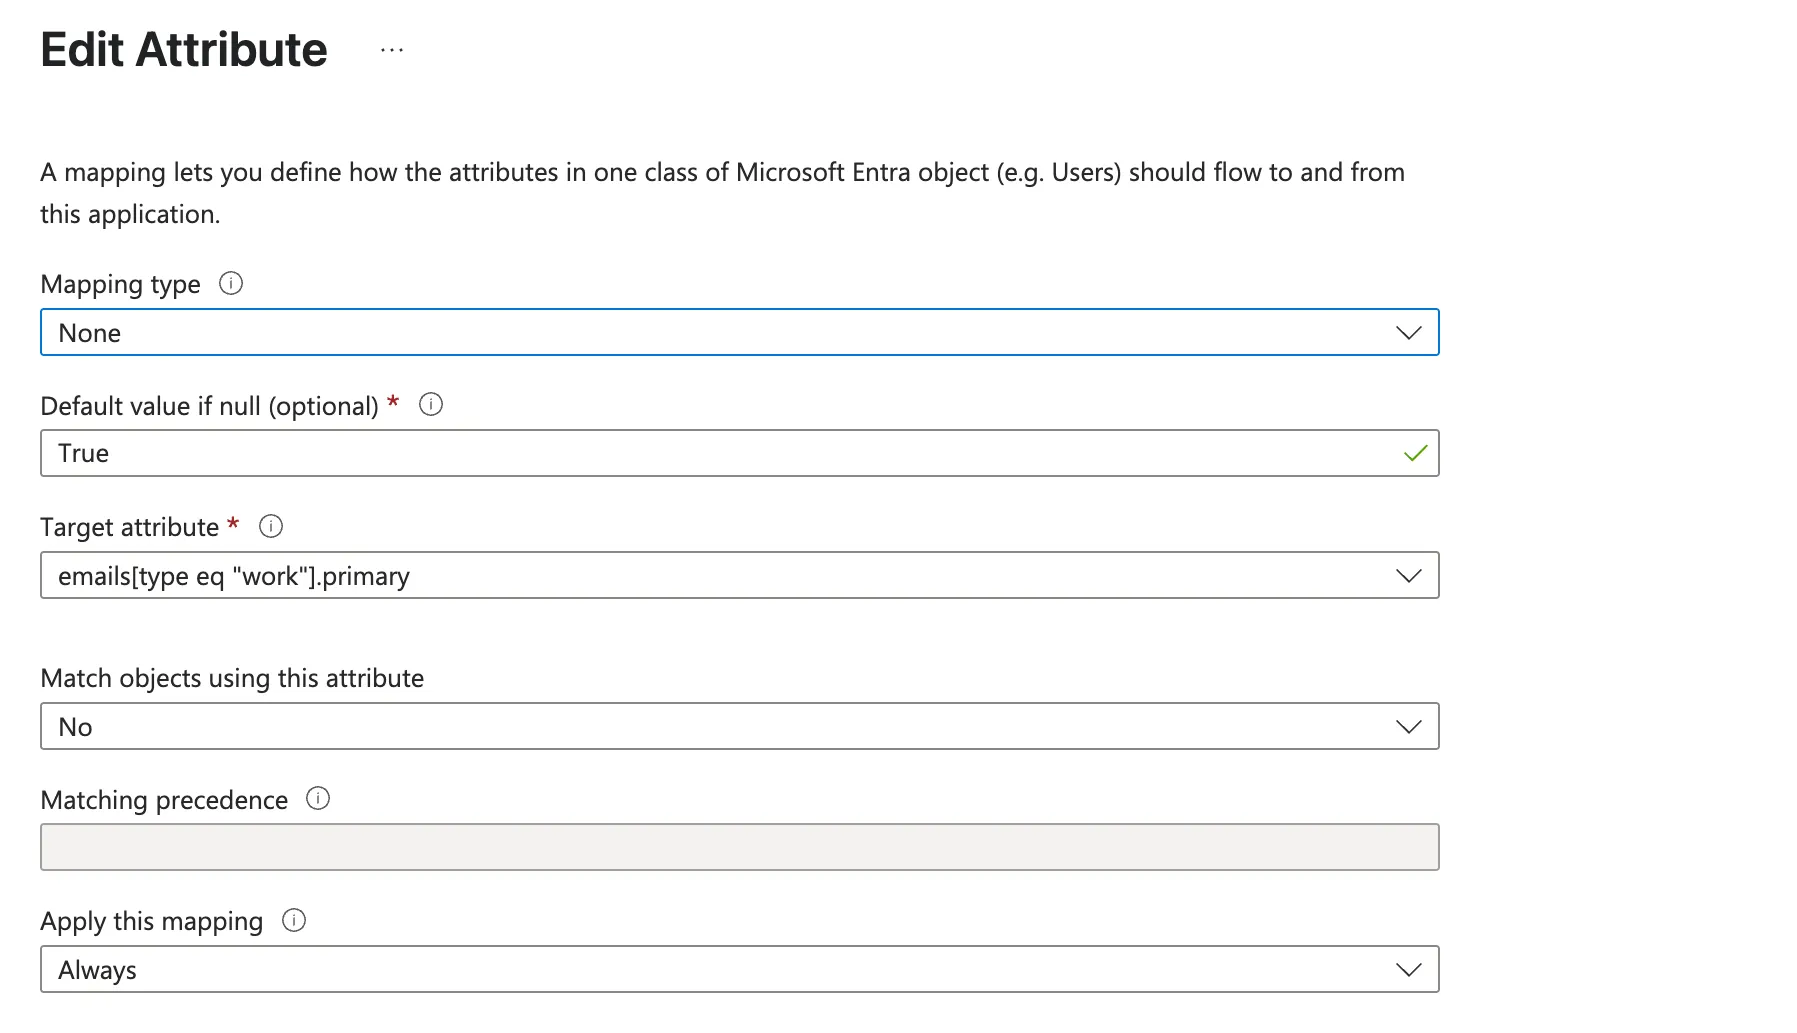
- Back on the Attribute mapping window, click Add new mapping and complete fields with the following:
- Mapping type:
none - Default value if null (optional):
True - Target attribute:
emails[type eq "work"].primary - Match objects using this attribute:
No - Matching precedence: Leave blank
- Apply this mapping:
Always
- Mapping type:
- Click Ok
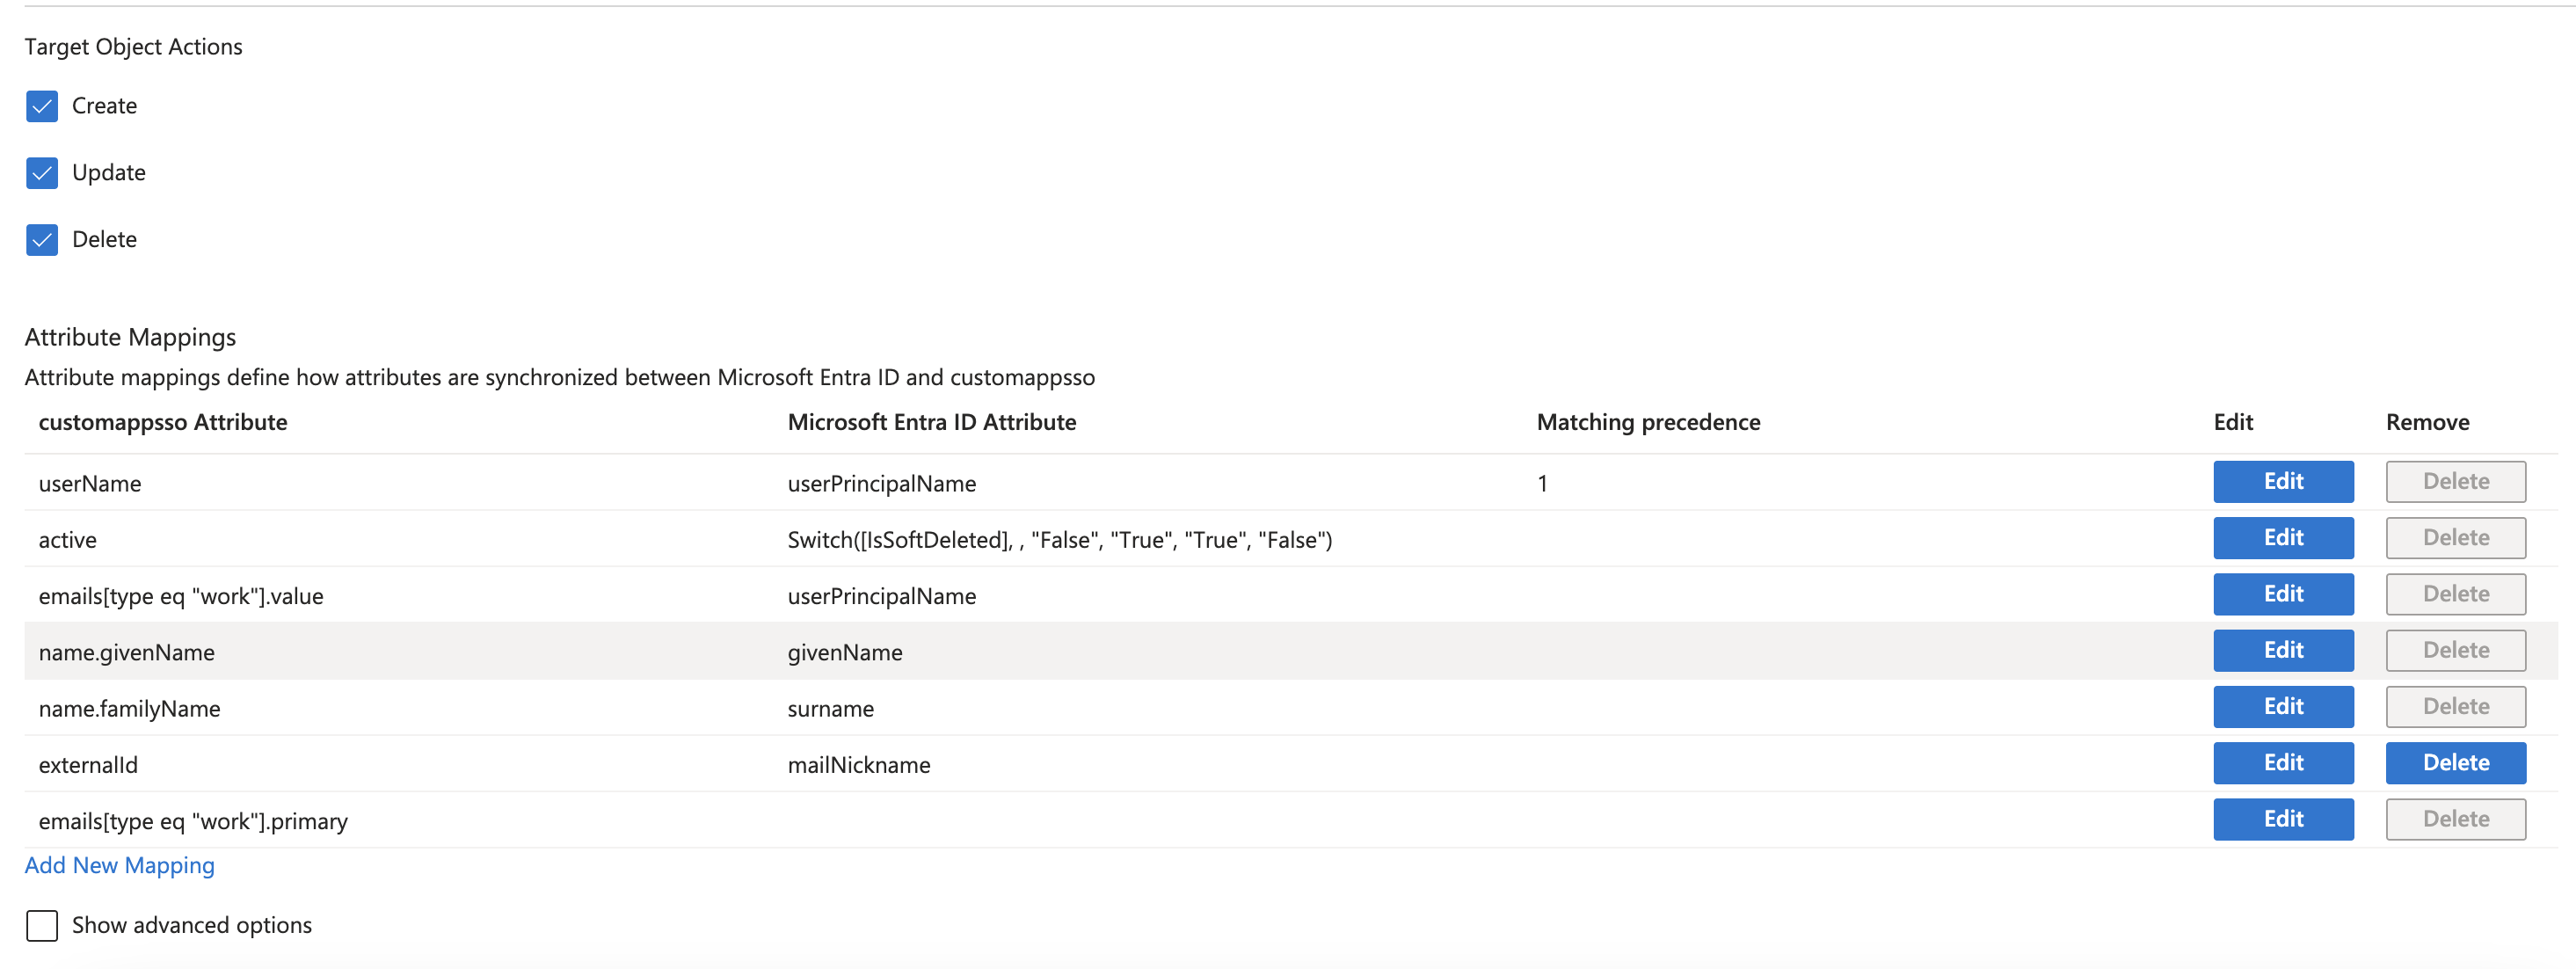
- Make sure the following mappings are in place and delete any others:
- UserName:
userPrincipalNameor the value you want users to leverage to log in to dbt. - active:
Switch([IsSoftDeleted], , "False", "True", "True", "False") - emails[type eq "work"].value:
userPrincipalNameis the most common, but this value needs to be the same set for UserName. - name.givenName:
givenName - name.familyName:
surname - externalid:
mailNickname - emails[type eq "work"].primary
- UserName:
- Click Save.
You can now begin assigning users to your SCIM app in Entra ID!
Assign users to SCIM app
The following steps go over how to assign users/groups to the SCIM app. Refer to Microsoft's official instructions for assigning users or groups to an Enterprise App in Entra ID to learn more. Although the article is written for Databricks, the steps are identical.
- Navigate to Enterprise applications and select the SCIM app.
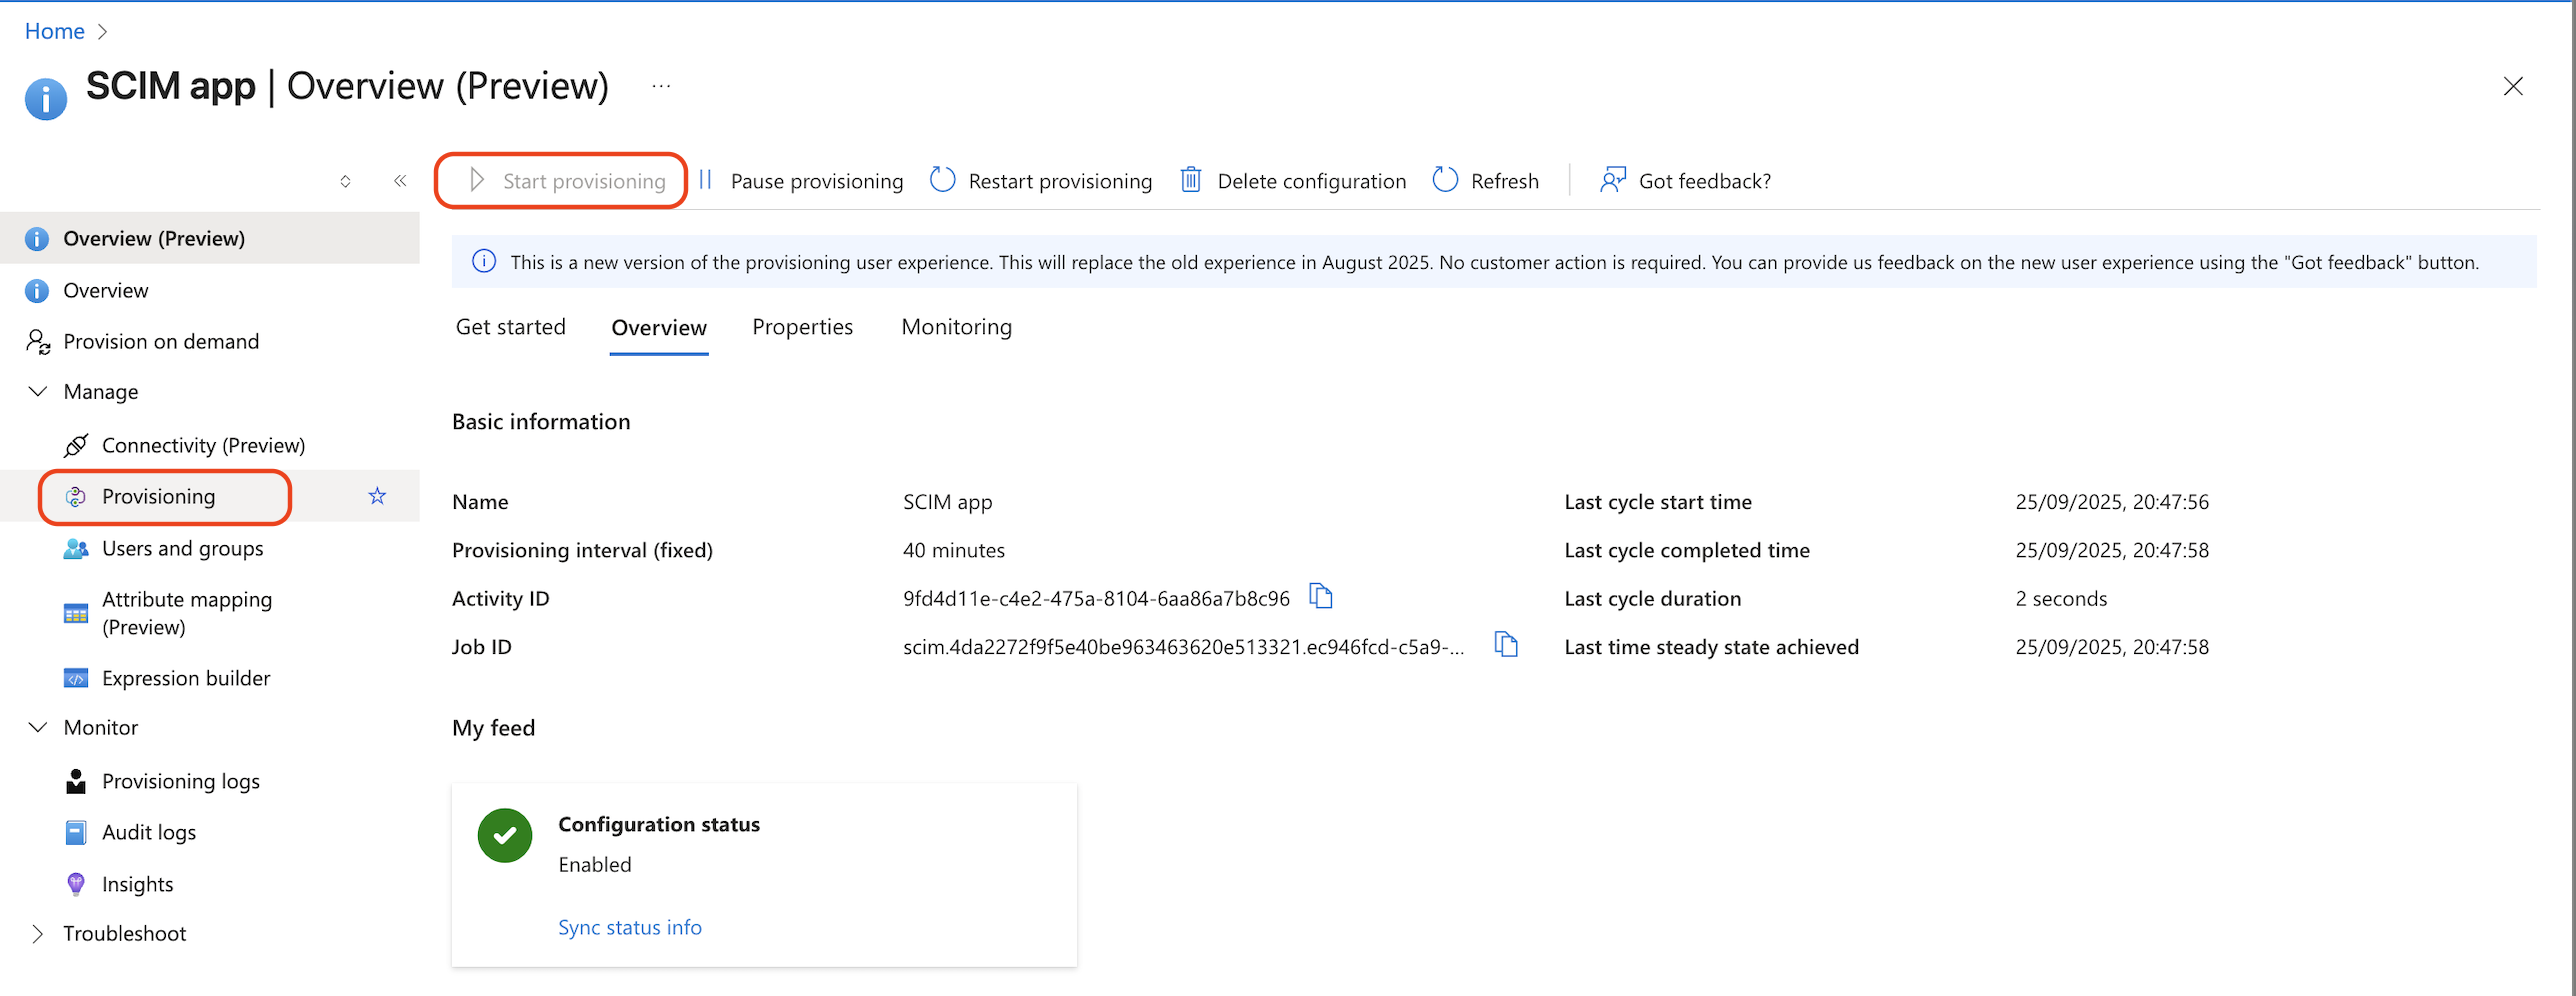
- Go to Manage > Provisioning.
- To synchronize Microsoft Entra ID users and groups to dbt, click the Start provisioning button.
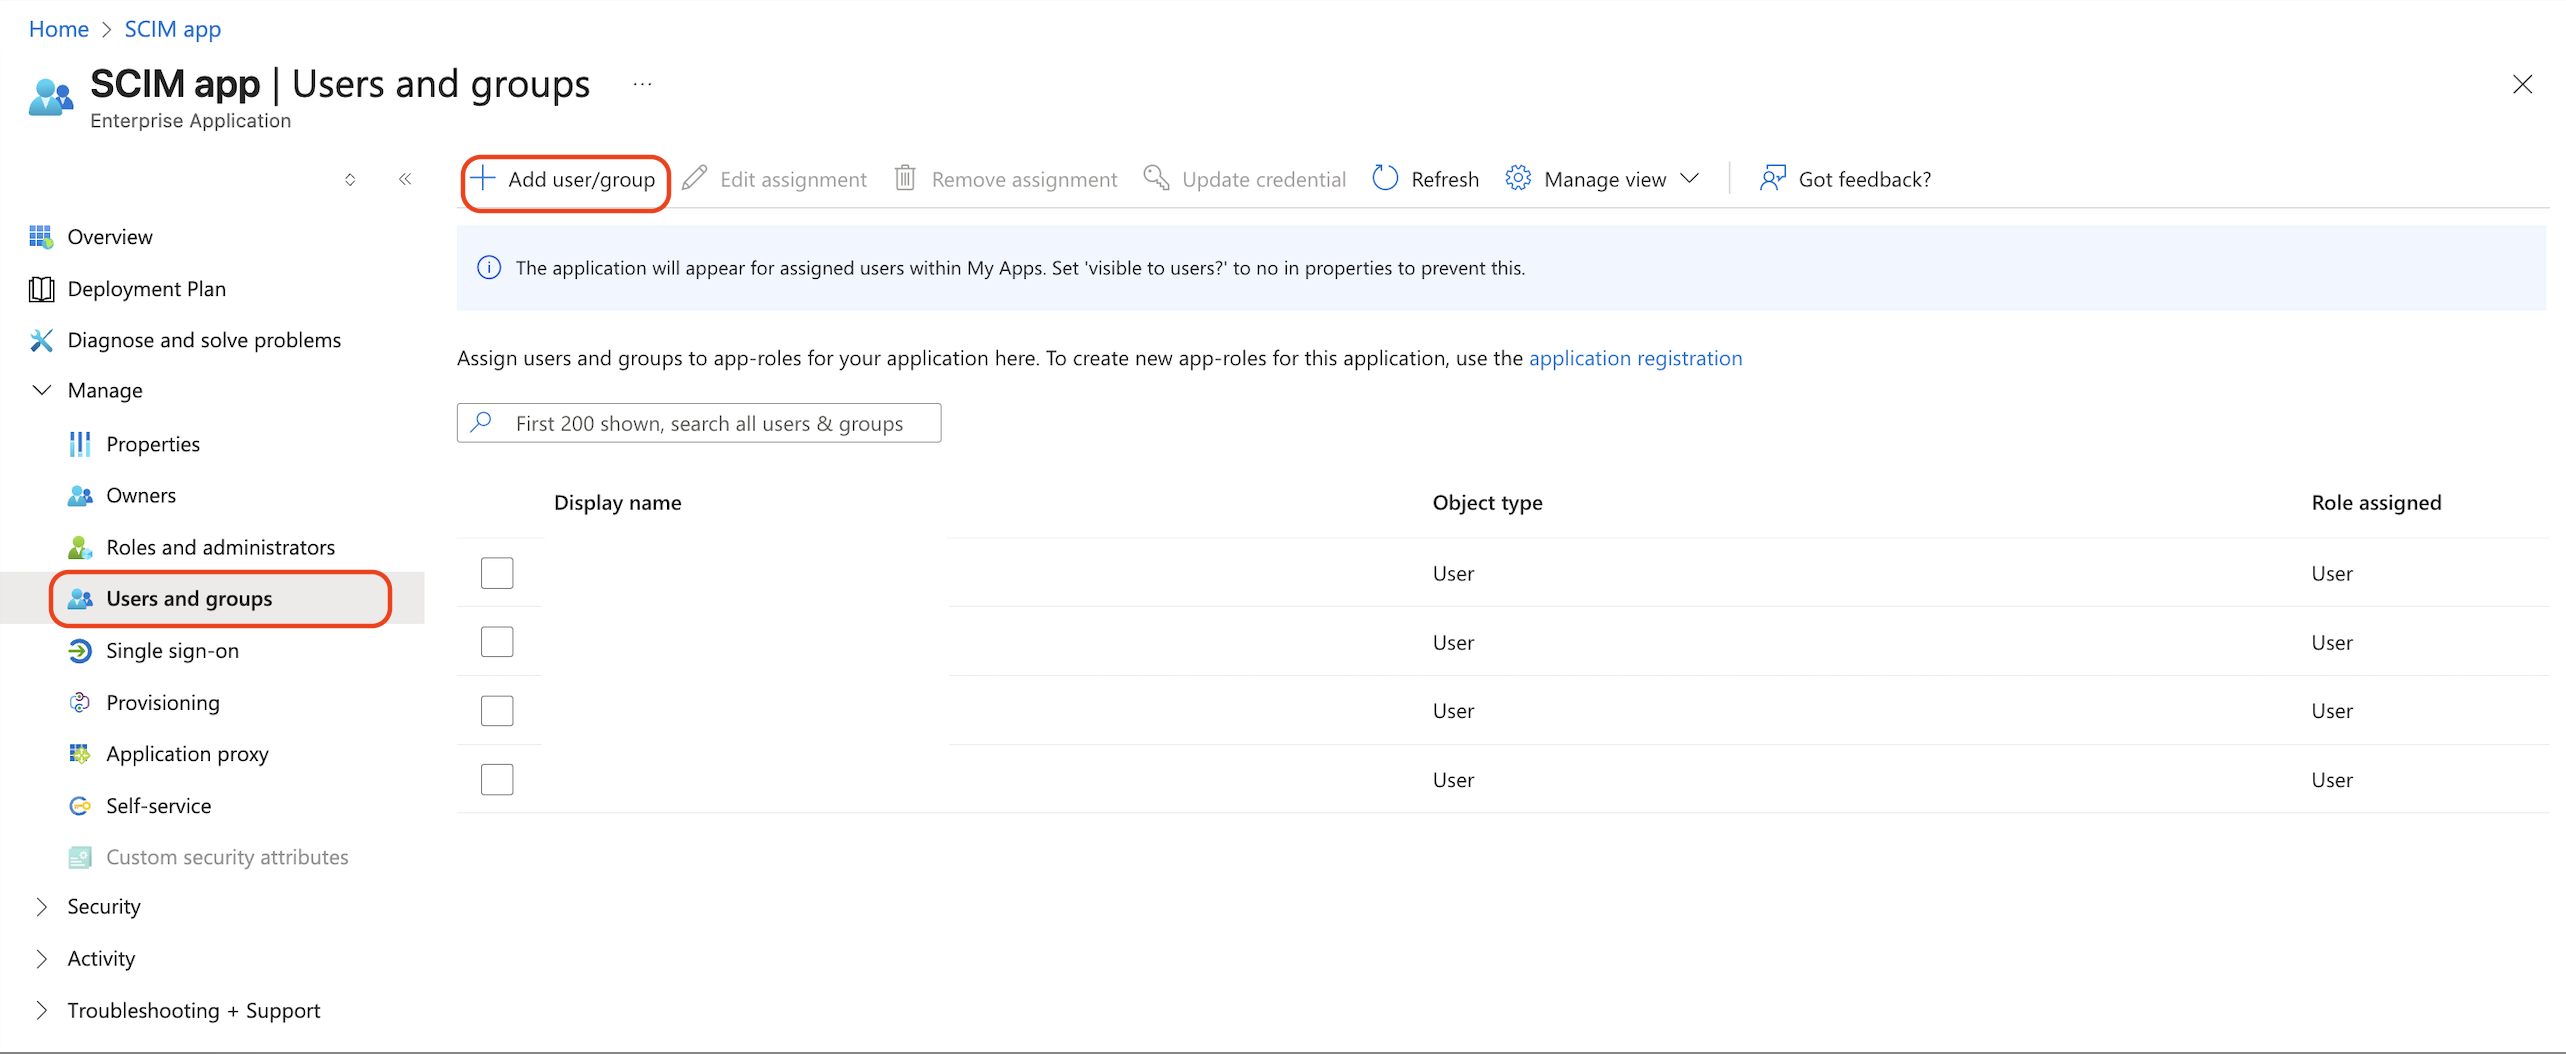
- Navigate back to the SCIM app's overview page and go to Manage > Users and groups.
- Click Add user/group and select the users and groups.
- Click the Assign button.
- Wait a few minutes. In the dbt platform, confirm the users and groups exist in your dbt account.
- Users and groups that you add and assign will automatically be provisioned to your dbt account when Microsoft Entra ID schedules the next sync.
- By enabling provisioning, you immediately trigger the initial Microsoft Entra ID sync. Subsequent syncs are triggered every 20-40 minutes, depending on the number of users and groups in the application. Refer to Microsoft Entra ID's Provisioning tips documentation for more information.
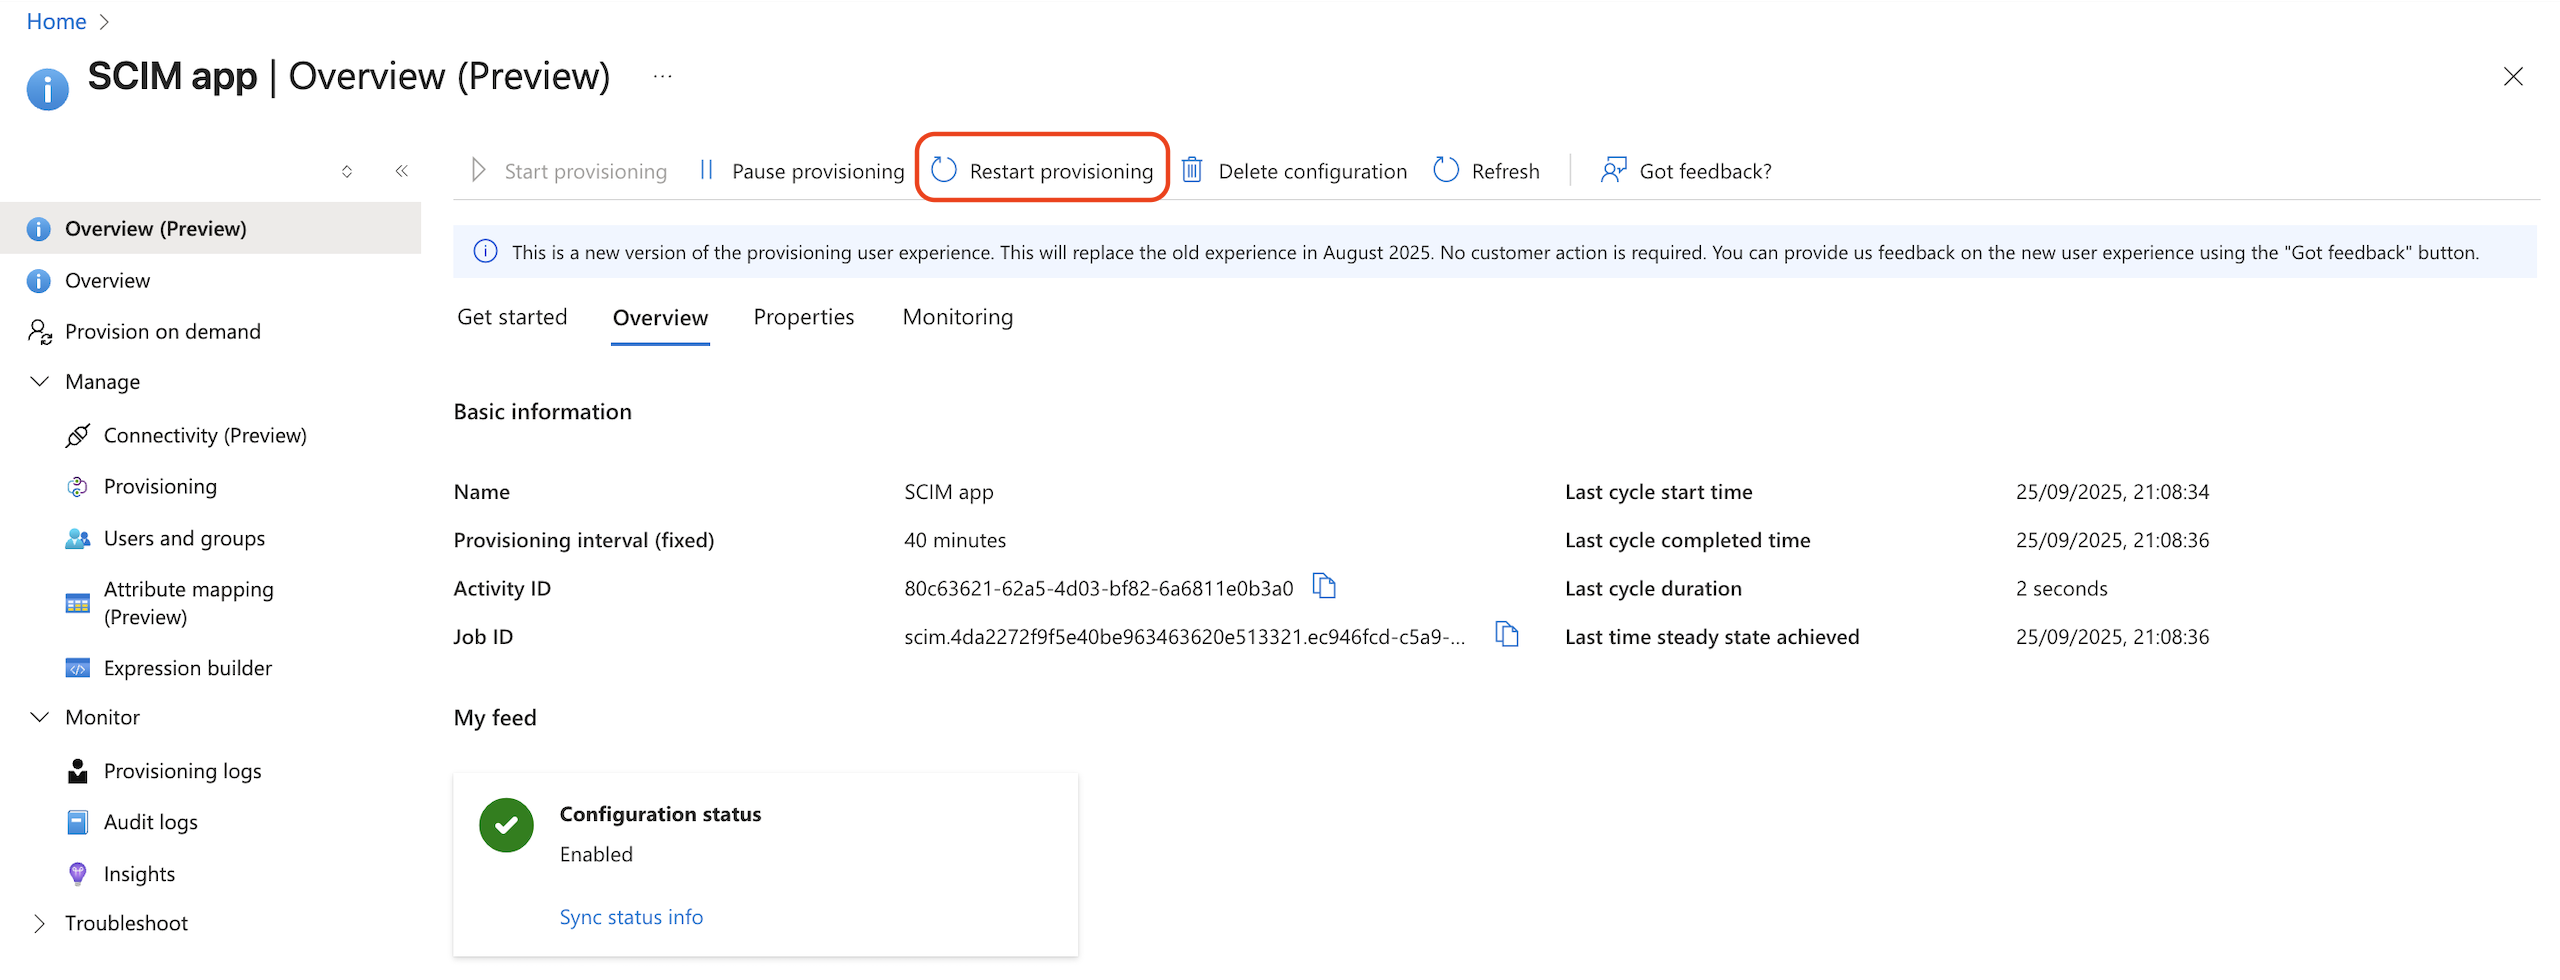
- You can also prompt a manual provisioning outside of the cycle by clicking Restart provisioning.
Manage user licenses with SCIM
You can manage user license assignments via SCIM with a user attribute in your IdP environment. This ensures accurate license assignment as users are provisioned in the IdP and onboarded into your dbt account.
The Analyst license is only available for select plans. Assigning an Analyst license via SCIM will result in a user update error if that license type is not available for your dbt account.
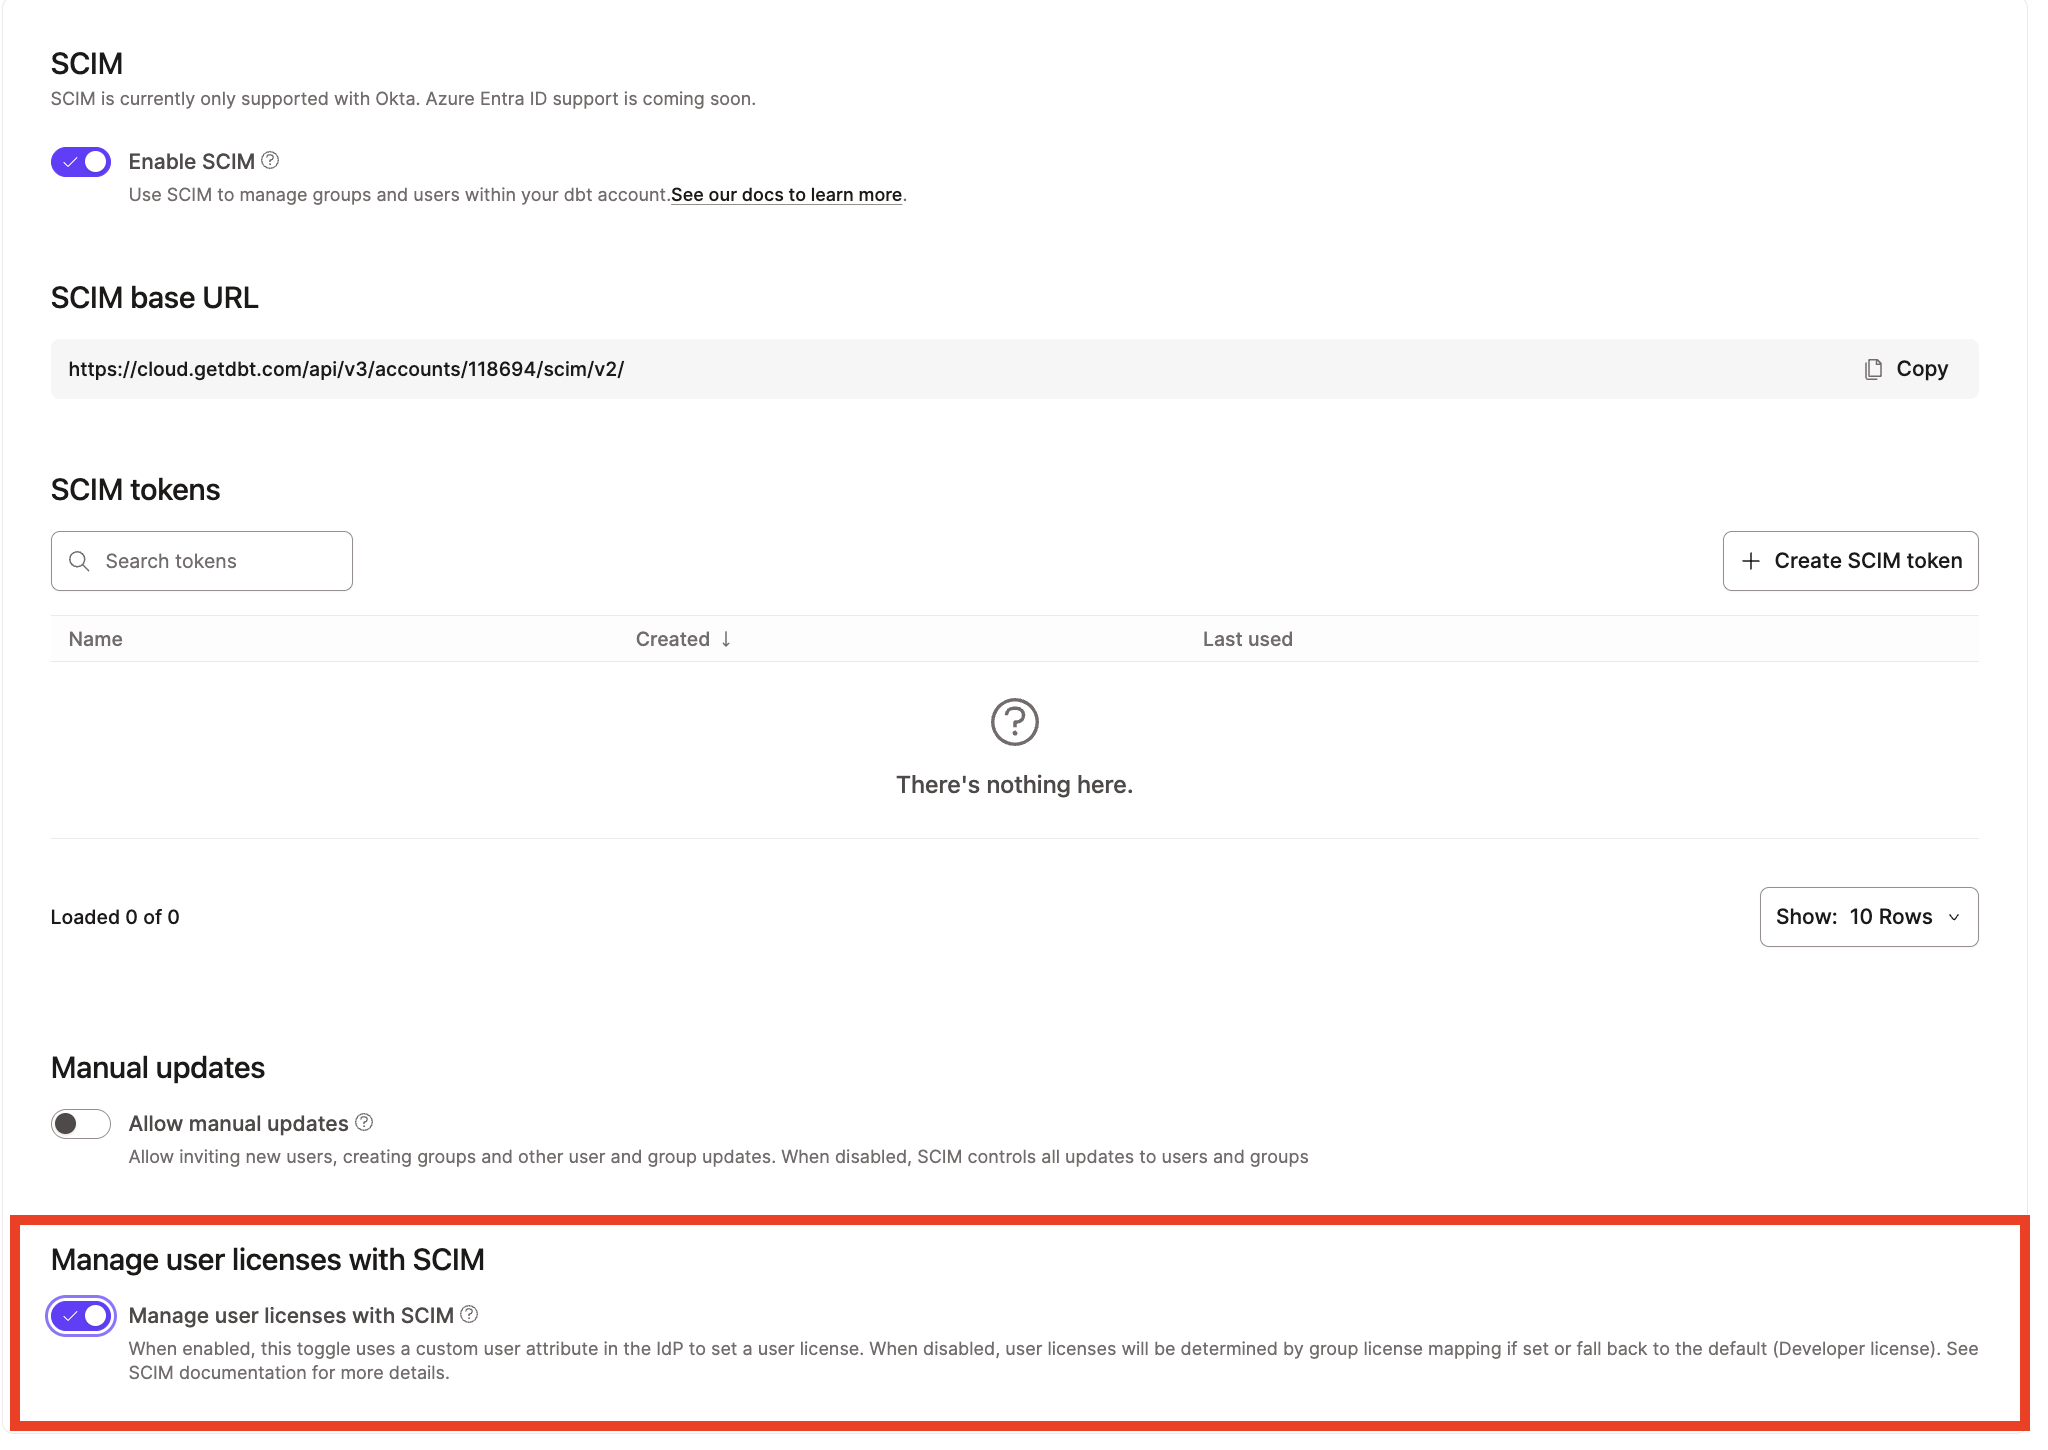
To use license management via SCIM, enable the feature under the SCIM section in the SSO & SCIM settings. This setting will enforce license type for a user based on their SCIM attribute and disable the license mapping and manual configuration set up in dbt.
We recommend that you complete the setup instructions for your identity provider prior to enabling this toggle in your dbt account. Once enabled, any existing license mappings in dbt platform will be ignored. SCIM license mapping is currently only supported for Okta.
The recommended steps for migrating to SCIM license mapping are as follows:
- Set up SCIM but keep the toggle disabled so existing license mappings continue to work as expected.
- Configure license attributes in your Identity Provider (IdP).
- Test that SCIM attributes are being used to set license type in dbt platform.
- Enable the toggle to ignore existing license mappings so that SCIM is the source-of-truth for assigning licenses to users.
Add license type attribute for Okta
To add the attribute for license types to your Okta environment:
-
From your Okta application, navigate to the Provisioning tab, scroll down to Attribute Mappings, and click Go to Profile Editor.
-
Click Add Attribute.
-
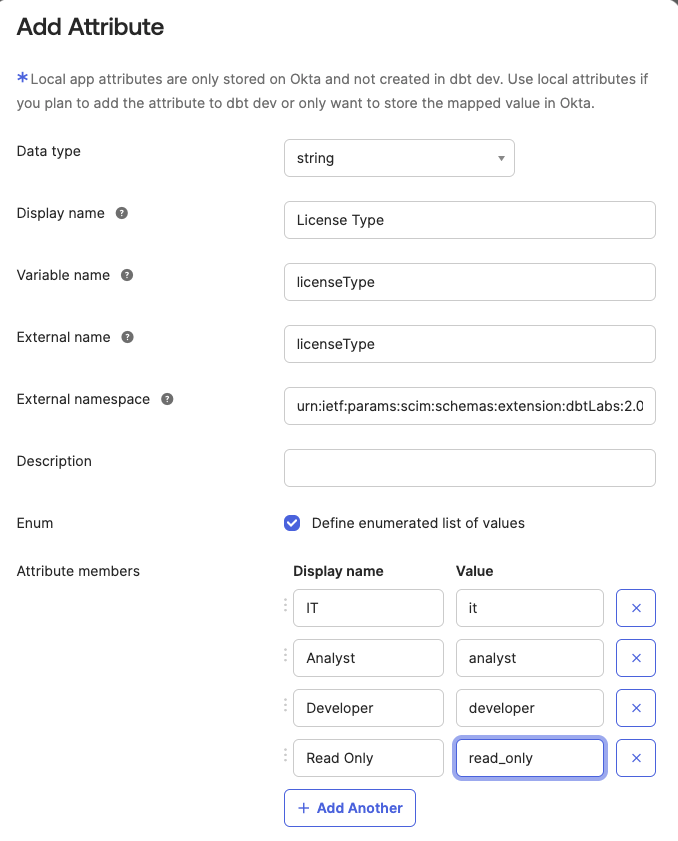
Configure the attribute fields as follows (the casing should match for the values of each):
- Date type:
string - Display name:
License Type - Variable name:
licenseType - External name:
licenseType - External namespace:
urn:ietf:params:scim:schemas:extension:dbtLabs:2.0:User - Description: An arbitrary string of your choosing.
- Enum: Check the box for Define enumerated list of values
- Attribute members: Add the initial attribute and then click Add another until each license type is defined. We recommend adding all of the values even if you don't use them today, so they'll be available in the future.
Loading table... - Attribute type: Personal
- Date type:
-
Save the attribute mapping.
-
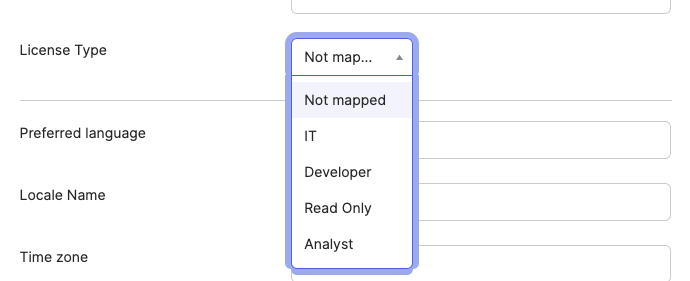
Users can now have license types set in their profiles and when they are being provisioned.
Was this page helpful?
This site is protected by reCAPTCHA and the Google Privacy Policy and Terms of Service apply.
