Migrating to Auth0 for SSO EnterpriseEnterprise +
dbt Labs is partnering with Auth0 to bring enhanced features to dbt's single sign-on (SSO) capabilities. Auth0 is an identity and access management (IAM) platform with advanced security features, and it will be leveraged by dbt. These changes will require some action from customers with SSO configured in dbt today, and this guide will outline the necessary changes for each environment.
If you have not yet configured SSO in dbt, refer instead to our setup guides for SAML, Okta, Google Workspace, or Microsoft Entra ID (formerly Azure AD) single sign-on services.
Start the migration
The Auth0 migration feature is being rolled out incrementally to customers who have SSO features already enabled. When the migration option has been enabled on your account, you will see SSO Update Required on the right side of the menu bar, near the settings icon.
Alternatively, you can start the process by clicking your account name at the bottom left-hand menu and going to Account settings > SSO & SCIM. Click the Begin Migration button to start.
Don't use vanity URLs when configuring the SSO settings. You need to use the generic URL provided in the SSO settings for your environment. For example, if your vanity URL is cloud.MY_COMPANY.getdbt.com, configure auth.cloud.getdbt.com as <YOUR_AUTH0_URI>.
There are two fields in the SSO settings that you need for the migration:
- Single sign-on URL: This will be in the format of your login URL
https://<YOUR_AUTH0_URI>/login/callback?connection=<SLUG> - Audience URI (SP Entity ID): This will be in the format
urn:auth0:<YOUR_AUTH0_ENTITYID>:<SLUG>
Once you have opted to begin the migration process, the following steps will vary depending on the configured identity provider. You can just skip to the section that's right for your environment. These steps only apply to customers going through the migration; new setups will use the existing setup instructions.
SAML 2.0
SAML 2.0 users must update a few fields in the SSO app configuration to match the new Auth0 URL and URI. You can approach this by editing the existing SSO app settings or creating a new one to accommodate the Auth0 settings. One approach isn't inherently better, so you can choose whichever works best for your organization.
SAML 2.0 and Okta
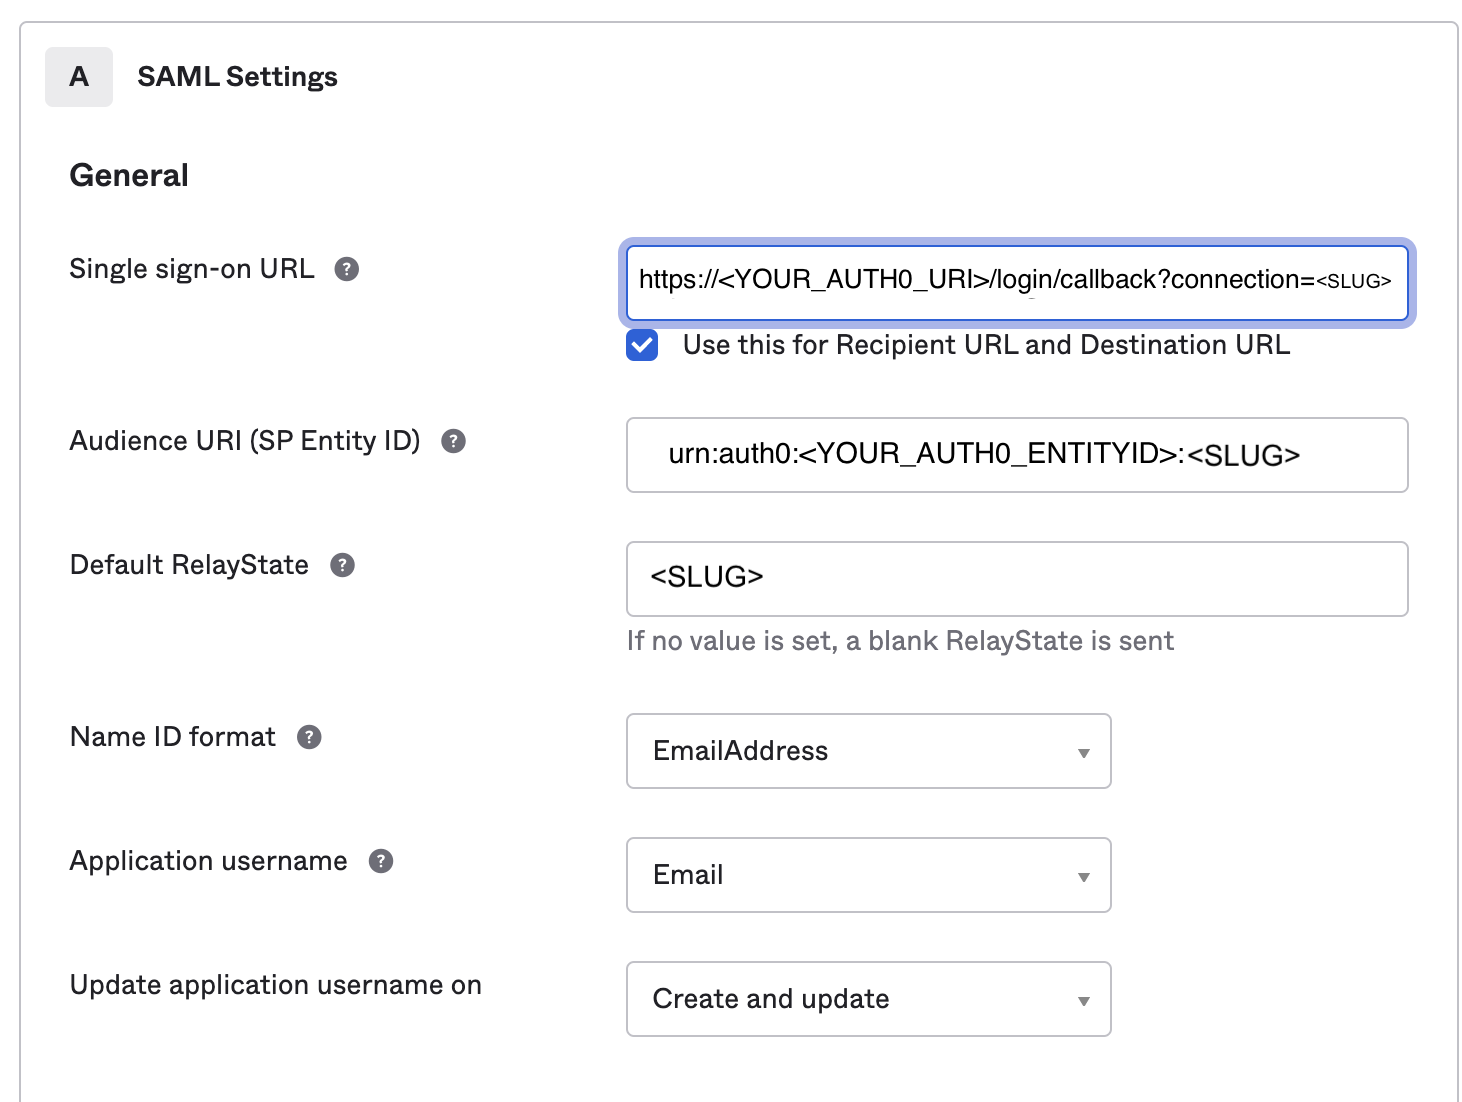
The Okta fields that will be updated are:
- Single sign-on URL —
https://<YOUR_AUTH0_URI>/login/callback?connection=<SLUG> - Audience URI (SP Entity ID) —
urn:auth0:<YOUR_AUTH0_ENTITYID>:<SLUG>
Below are sample steps to update. You must complete all of them to ensure uninterrupted access to dbt and you should coordinate with your identity provider admin when making these changes.
- Replace
<SLUG>with your account’s login URL slug.
Here is an example of an updated SAML 2.0 setup in Okta.
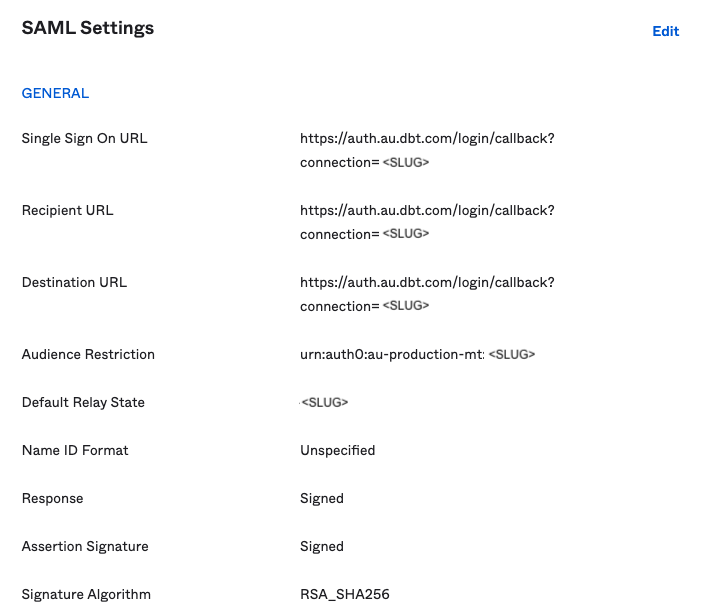
- Save the configuration, and your SAML settings will look something like this:
-
Toggle the
Enable new SSO authenticationoption to ensure the traffic is routed correctly. The new SSO migration action is final and cannot be undone. -
Save the settings and test the new configuration using the SSO login URL provided on the settings page.
SAML 2.0 and Entra ID
The Entra ID fields that will be updated are:
- Single sign-on URL —
https://<YOUR_AUTH0_URI>/login/callback?connection=<SLUG> - Audience URI (SP Entity ID) —
urn:auth0:<YOUR_AUTH0_ENTITYID>:<SLUG>
The new values for these fields can be found in dbt by navigating to Account settings > SSO & SCIM.
-
Replace
<SLUG>with your organization’s login URL slug. -
Locate your dbt SAML2.0 app in the Enterprise applications section of Azure. Click Single sign-on on the left side menu.
-
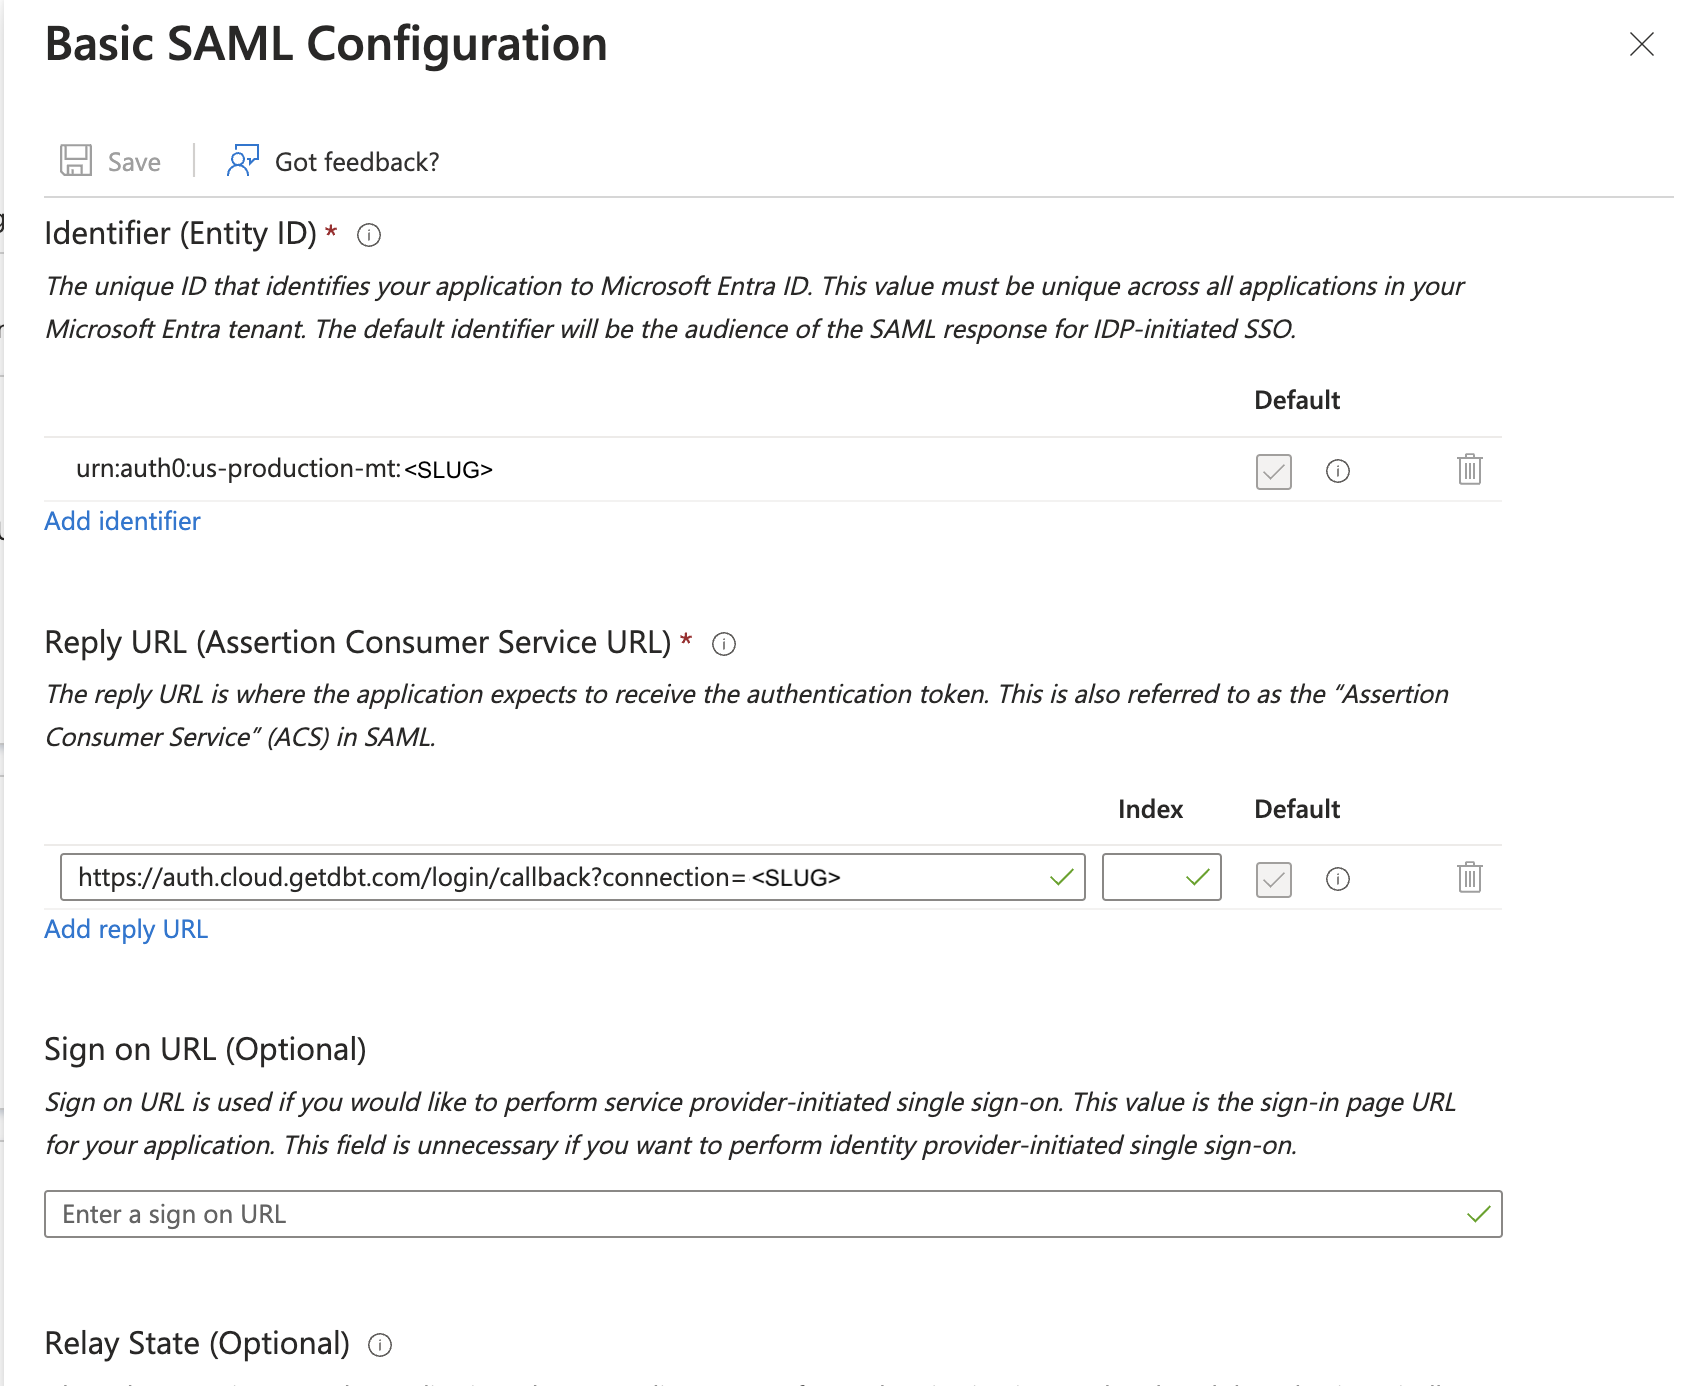
Edit the Basic SAML configuration tile and enter the values from your account:
- Entra ID Identifier (Entity ID) = dbt Audience URI (SP Entity ID)
- Entra ID Reply URL (Assertion Consumer Service URL) = dbt Single sign-on URL
-
Save the fields and the completed configuration will look something like this:
-
Toggle the
Enable new SSO authenticationoption to ensure the traffic is routed correctly. The new SSO migration action is final and cannot be undone. -
Save the settings and test the new configuration using the SSO login URL provided on the settings page.
Microsoft Entra ID
Microsoft Entra ID admins using OpenID Connect (ODIC) will need to make a slight adjustment to the existing authentication app in the Azure portal. This migration does not require that the entire app be deleted or recreated; you can edit the existing app. Start by opening the Azure portal and navigating to the Microsoft Entra ID overview.
Below are steps to update. You must complete all of them to ensure uninterrupted access to dbt and you should coordinate with your identity provider admin when making these changes.
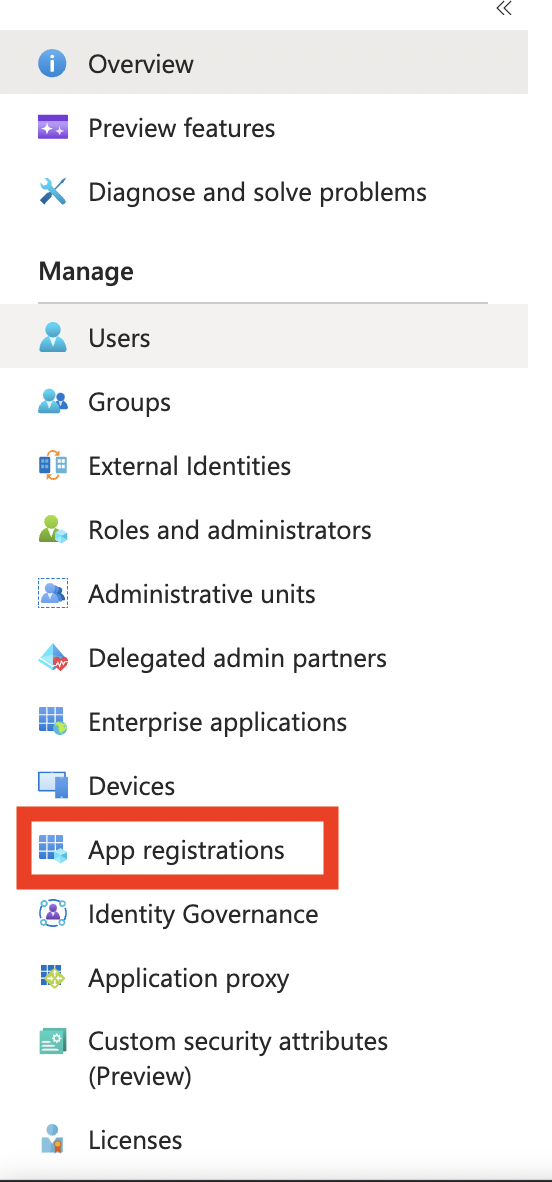
- Click App Registrations on the left side menu.
- Select the proper dbt app (name may vary) from the list. From the app overview, click on the hyperlink next to Redirect URI
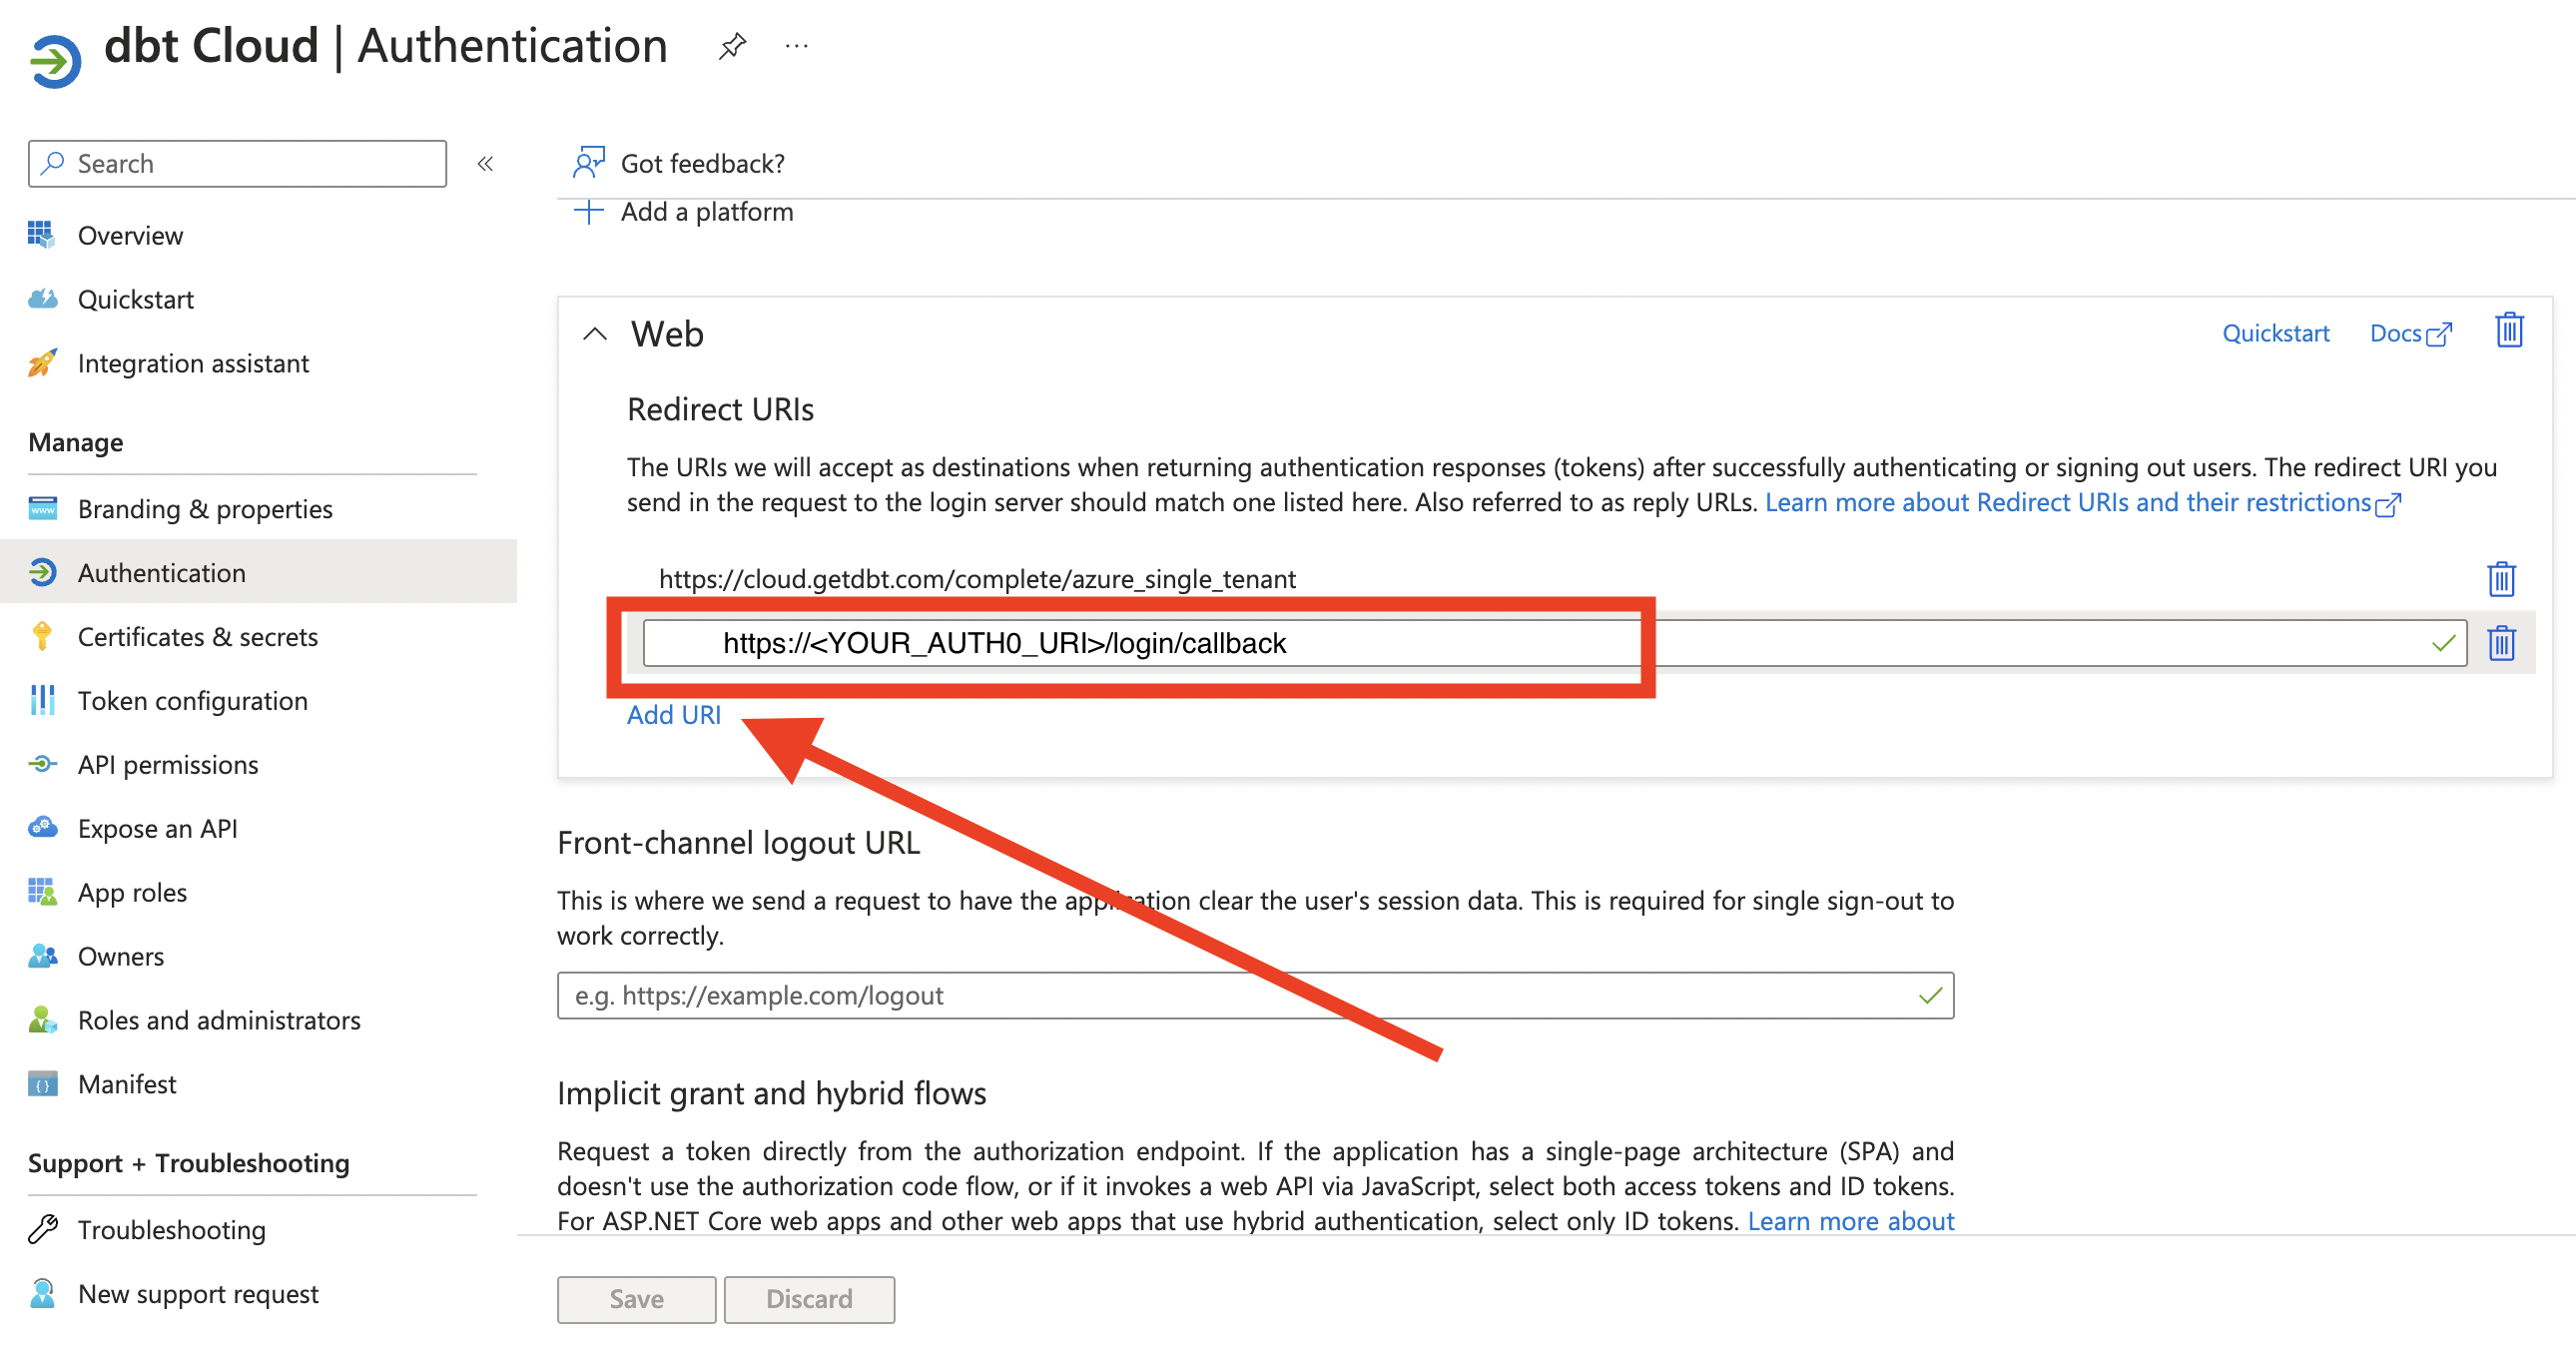
- In the Web pane with Redirect URIs, click Add URI and enter the appropriate
https://<YOUR_AUTH0_URI>/login/callback. Save the settings and verify it is counted in the updated app overview.
- Navigate to the dbt environment and open the Account settings. Click the SSO & SCIM option from the left-side menu and click the Edit option from the right side of the SSO pane. The domain field is the domain your organization uses to login to Microsoft Entra ID. Toggle the Enable New SSO Authentication option and Save. Once this option is enabled, it cannot be undone.
You must complete the domain authorization before you toggle Enable New SSO Authentication, or the migration will not complete successfully.
Google Workspace
Google Workspace admins updating their SSO APIs with the Auth0 URL won't have to do much if it is an existing setup. This can be done as a new project or by editing an existing SSO setup. No additional scopes are needed since this is migrating from an existing setup. All scopes were defined during the initial configuration.
Below are steps to update. You must complete all of them to ensure uninterrupted access to dbt and you should coordinate with your identity provider admin when making these changes.
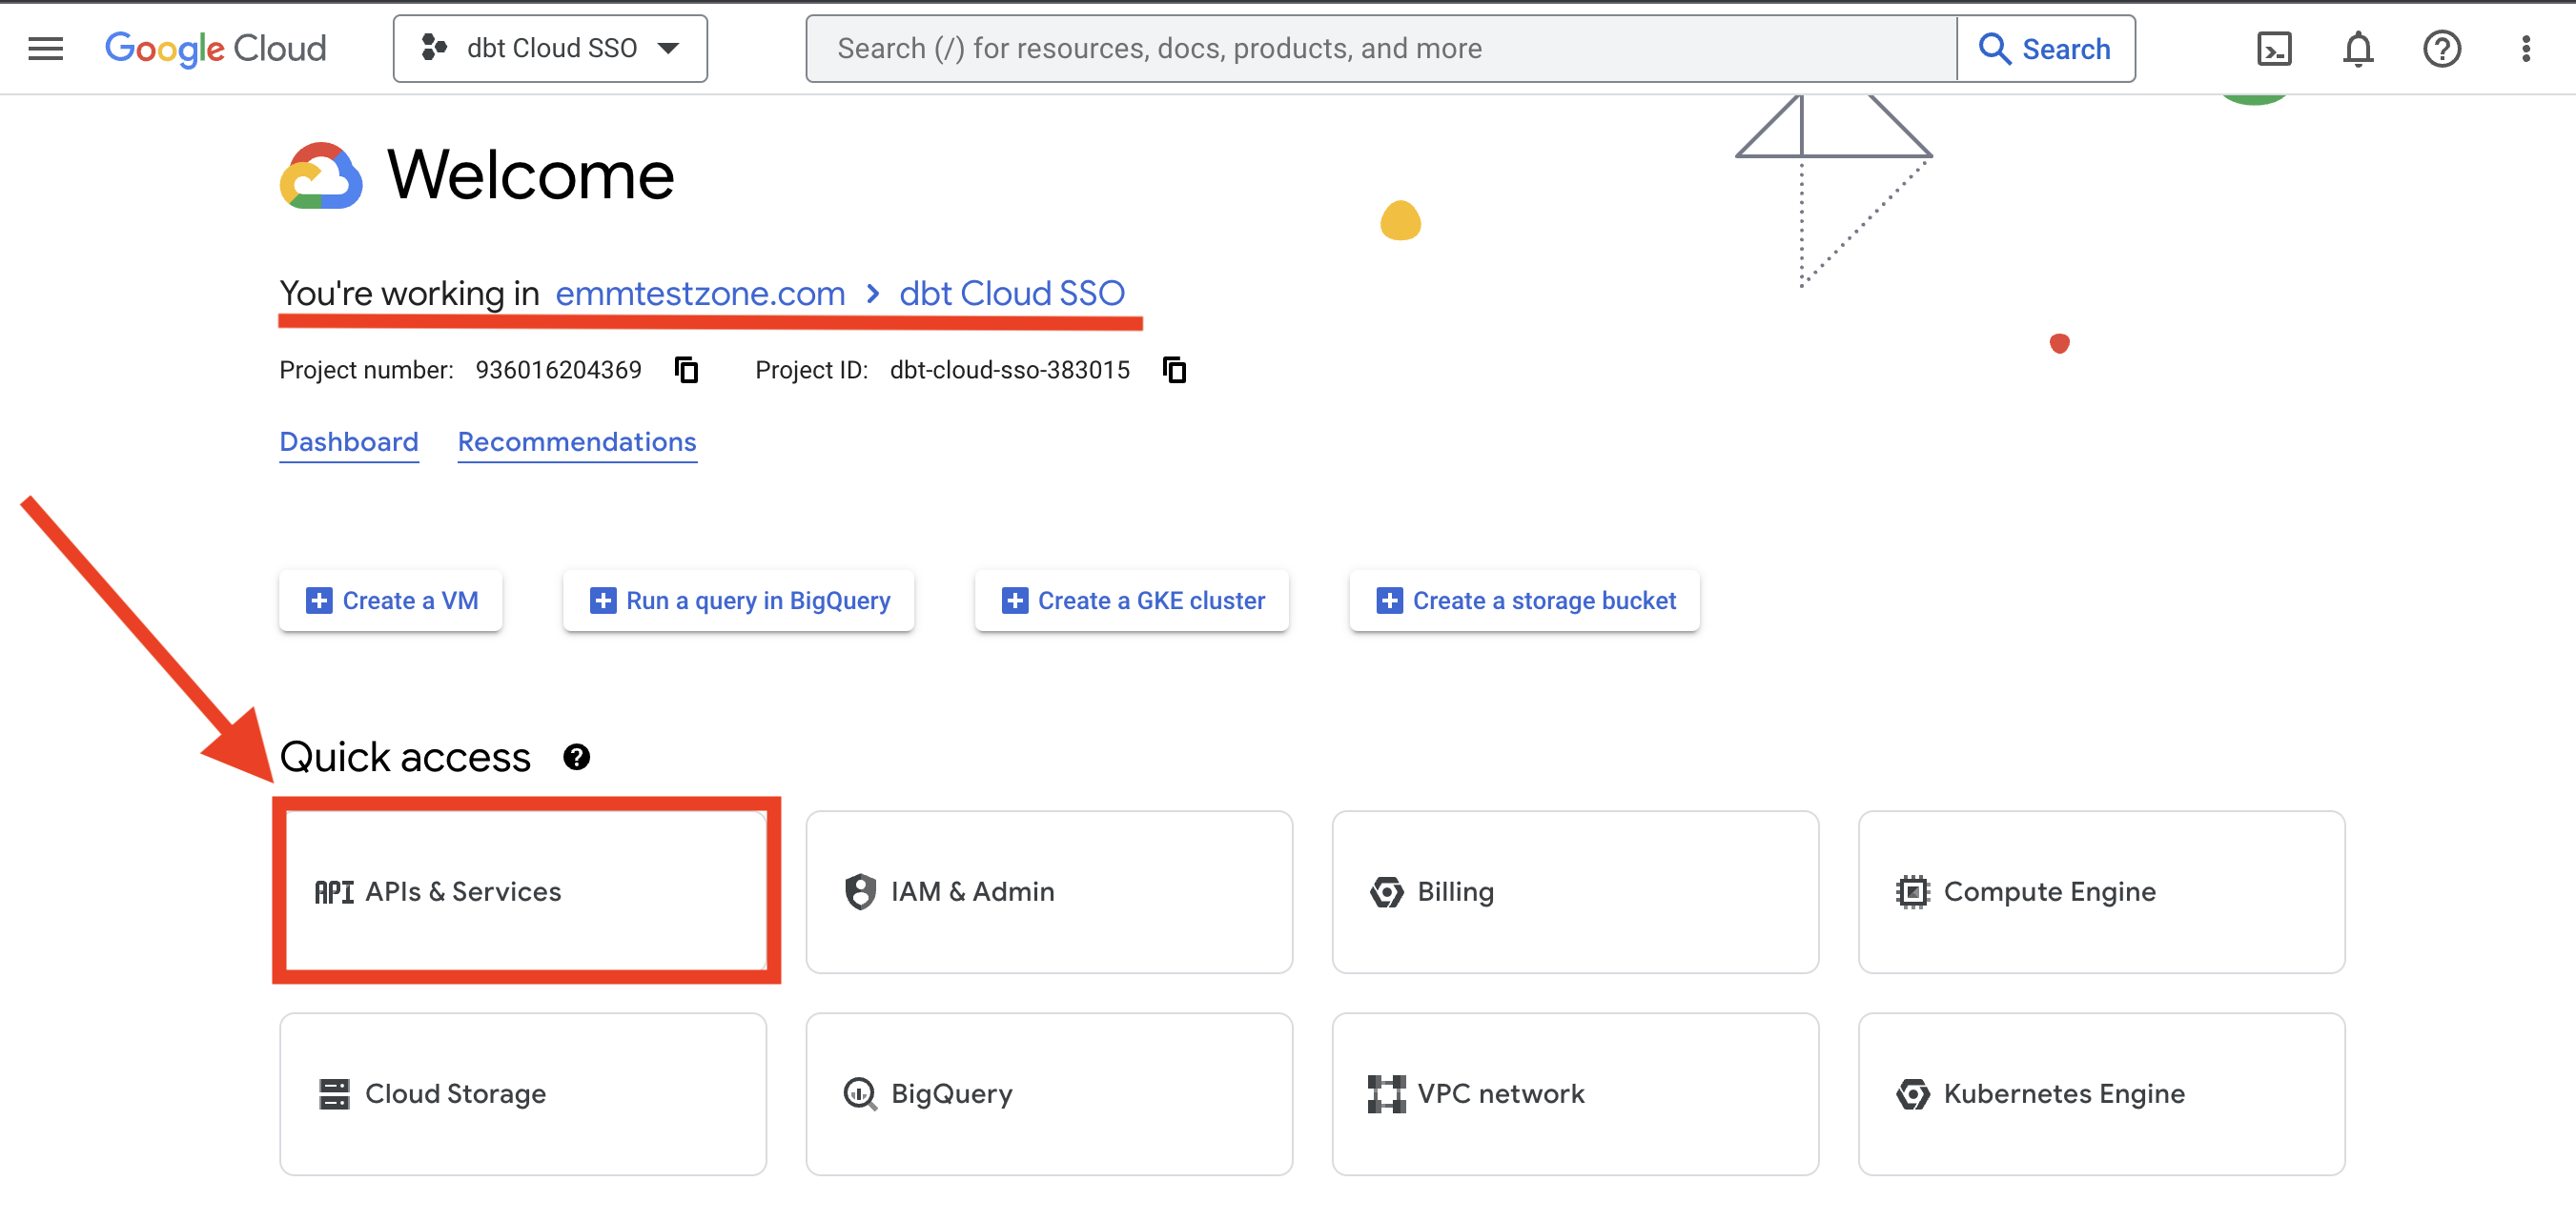
- Open the Google Cloud console and select the project with your dbt single sign-on settings. From the project page Quick Access, select APIs and Services
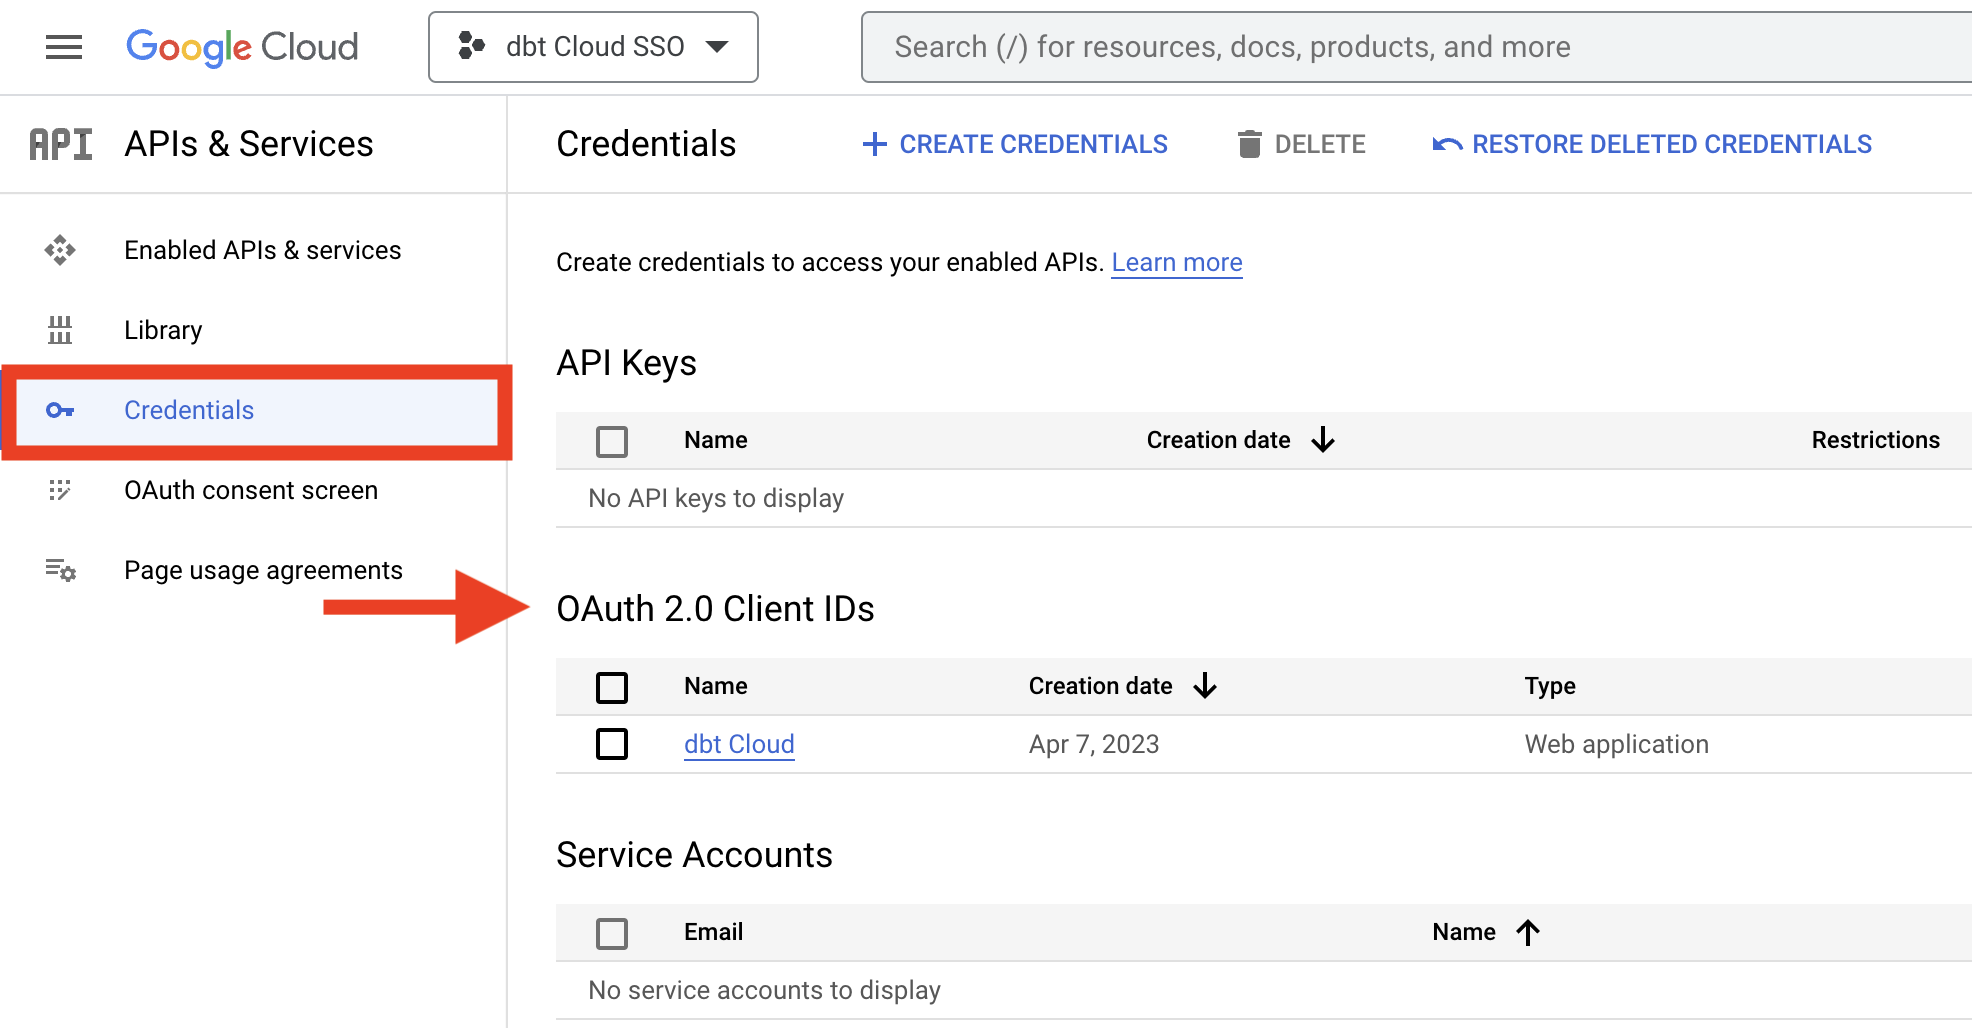
- Click Credentials from the left side pane and click the appropriate name from OAuth 2.0 Client IDs
- In the Client ID for Web application window, find the Authorized Redirect URIs field and click Add URI and enter
https://<YOUR_AUTH0_URI>/login/callback.
Click Save once you are done.
- You will need a person with Google Workspace admin privileges to complete these steps in dbt. In dbt, navigate to the Account settings, click on SSO & SCIM, and then click Edit on the right side of the Single sign-on pane. Toggle the Enable New SSO Authentication option and select Save. This will trigger an authorization window from Google that will require admin credentials. The migration action is final and cannot be undone. Once the authentication has gone through, test the new configuration using the SSO login URL provided on the settings page.
You must complete the domain authorization before you toggle Enable New SSO Authentication, or the migration will not complete successfully.
Was this page helpful?
This site is protected by reCAPTCHA and the Google Privacy Policy and Terms of Service apply.
