Set up BigQuery OAuth EnterpriseEnterprise +
This guide describes a feature available in the dbt platform Enterprise and Enterprise+ plans. If you’re interested in learning more about our Enterprise-tier plans, contact us at sales@getdbt.com.
The dbt platform supports OAuth with BigQuery, providing an additional layer of security for dbt enterprise users.
Set up BigQuery native OAuth
When BigQuery OAuth is enabled for a dbt platform project, all dbt platform developers must authenticate with BigQuery to access development tools, such as the Studio IDE.
To set up BigQuery OAuth in the dbt platform, a BigQuery admin must:
- Locate the redirect URI value in the dbt platform.
- Create a BigQuery OAuth 2.0 client ID and secret in BigQuery.
- Configure the connection in the dbt platform.
To use BigQuery in the Studio IDE, all developers must:
- Authenticate to BigQuery in the their profile credentials.
Locate the redirect URI value
To get started, locate the connection's redirect URI for configuring BigQuery OAuth. To do so:
- Navigate to your account name, above your profile icon on the left side panel.
- Select Account settings from the menu.
- From the left sidebar, select Connections.
- Click the BigQuery connection.
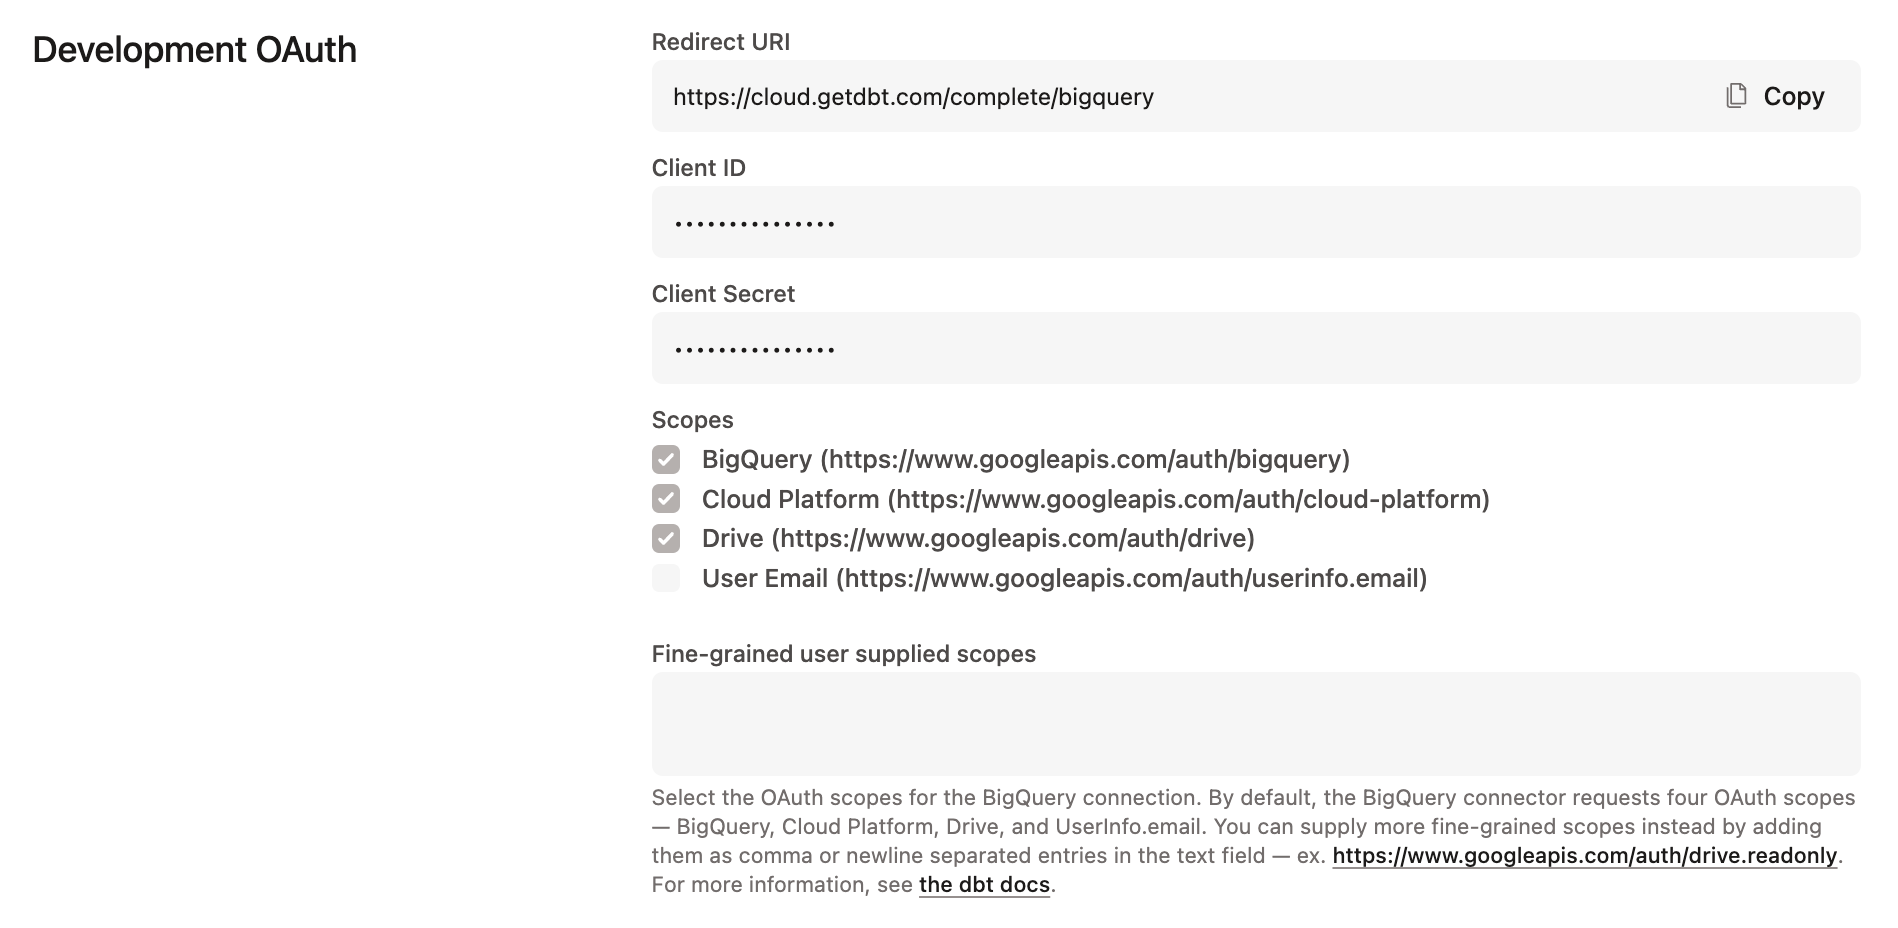
- Locate the Redirect URI field under the Development OAuth section. Copy this value to your clipboard to use later on.
Creating a BigQuery OAuth 2.0 client ID and secret
The dbt platform will request the required BigQuery scopes automatically during the OAuth flow. Configuring scopes in the BigQuery OAuth consent screen is optional and not required for dbt platform to connect to BigQuery. Required scopes are requested and approved when users authenticate with OAuth.
To get started, you need to create a client ID and secret for authentication with BigQuery. This client ID and secret will be stored in the dbt platform to manage the OAuth connection between the dbt platform users and BigQuery.
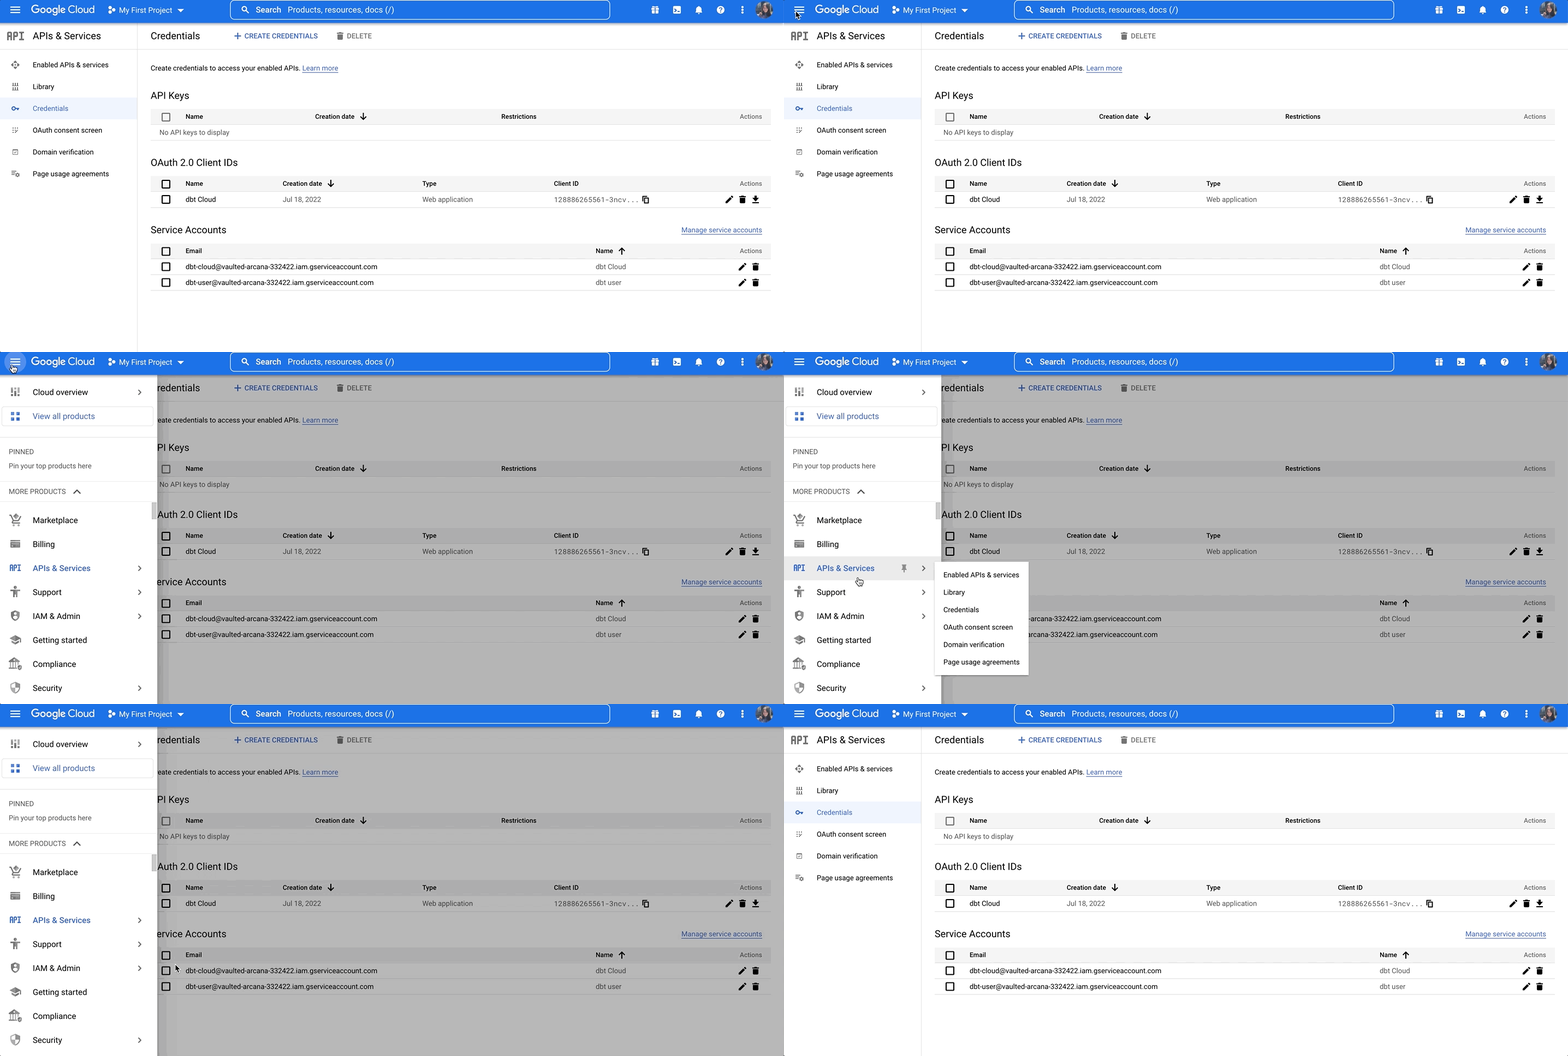
- In the BigQuery console, navigate to APIs & Services and select Credentials:
On the Credentials page, you can see your existing keys, client IDs, and service accounts.
-
Set up an OAuth consent screen if you haven't already.
-
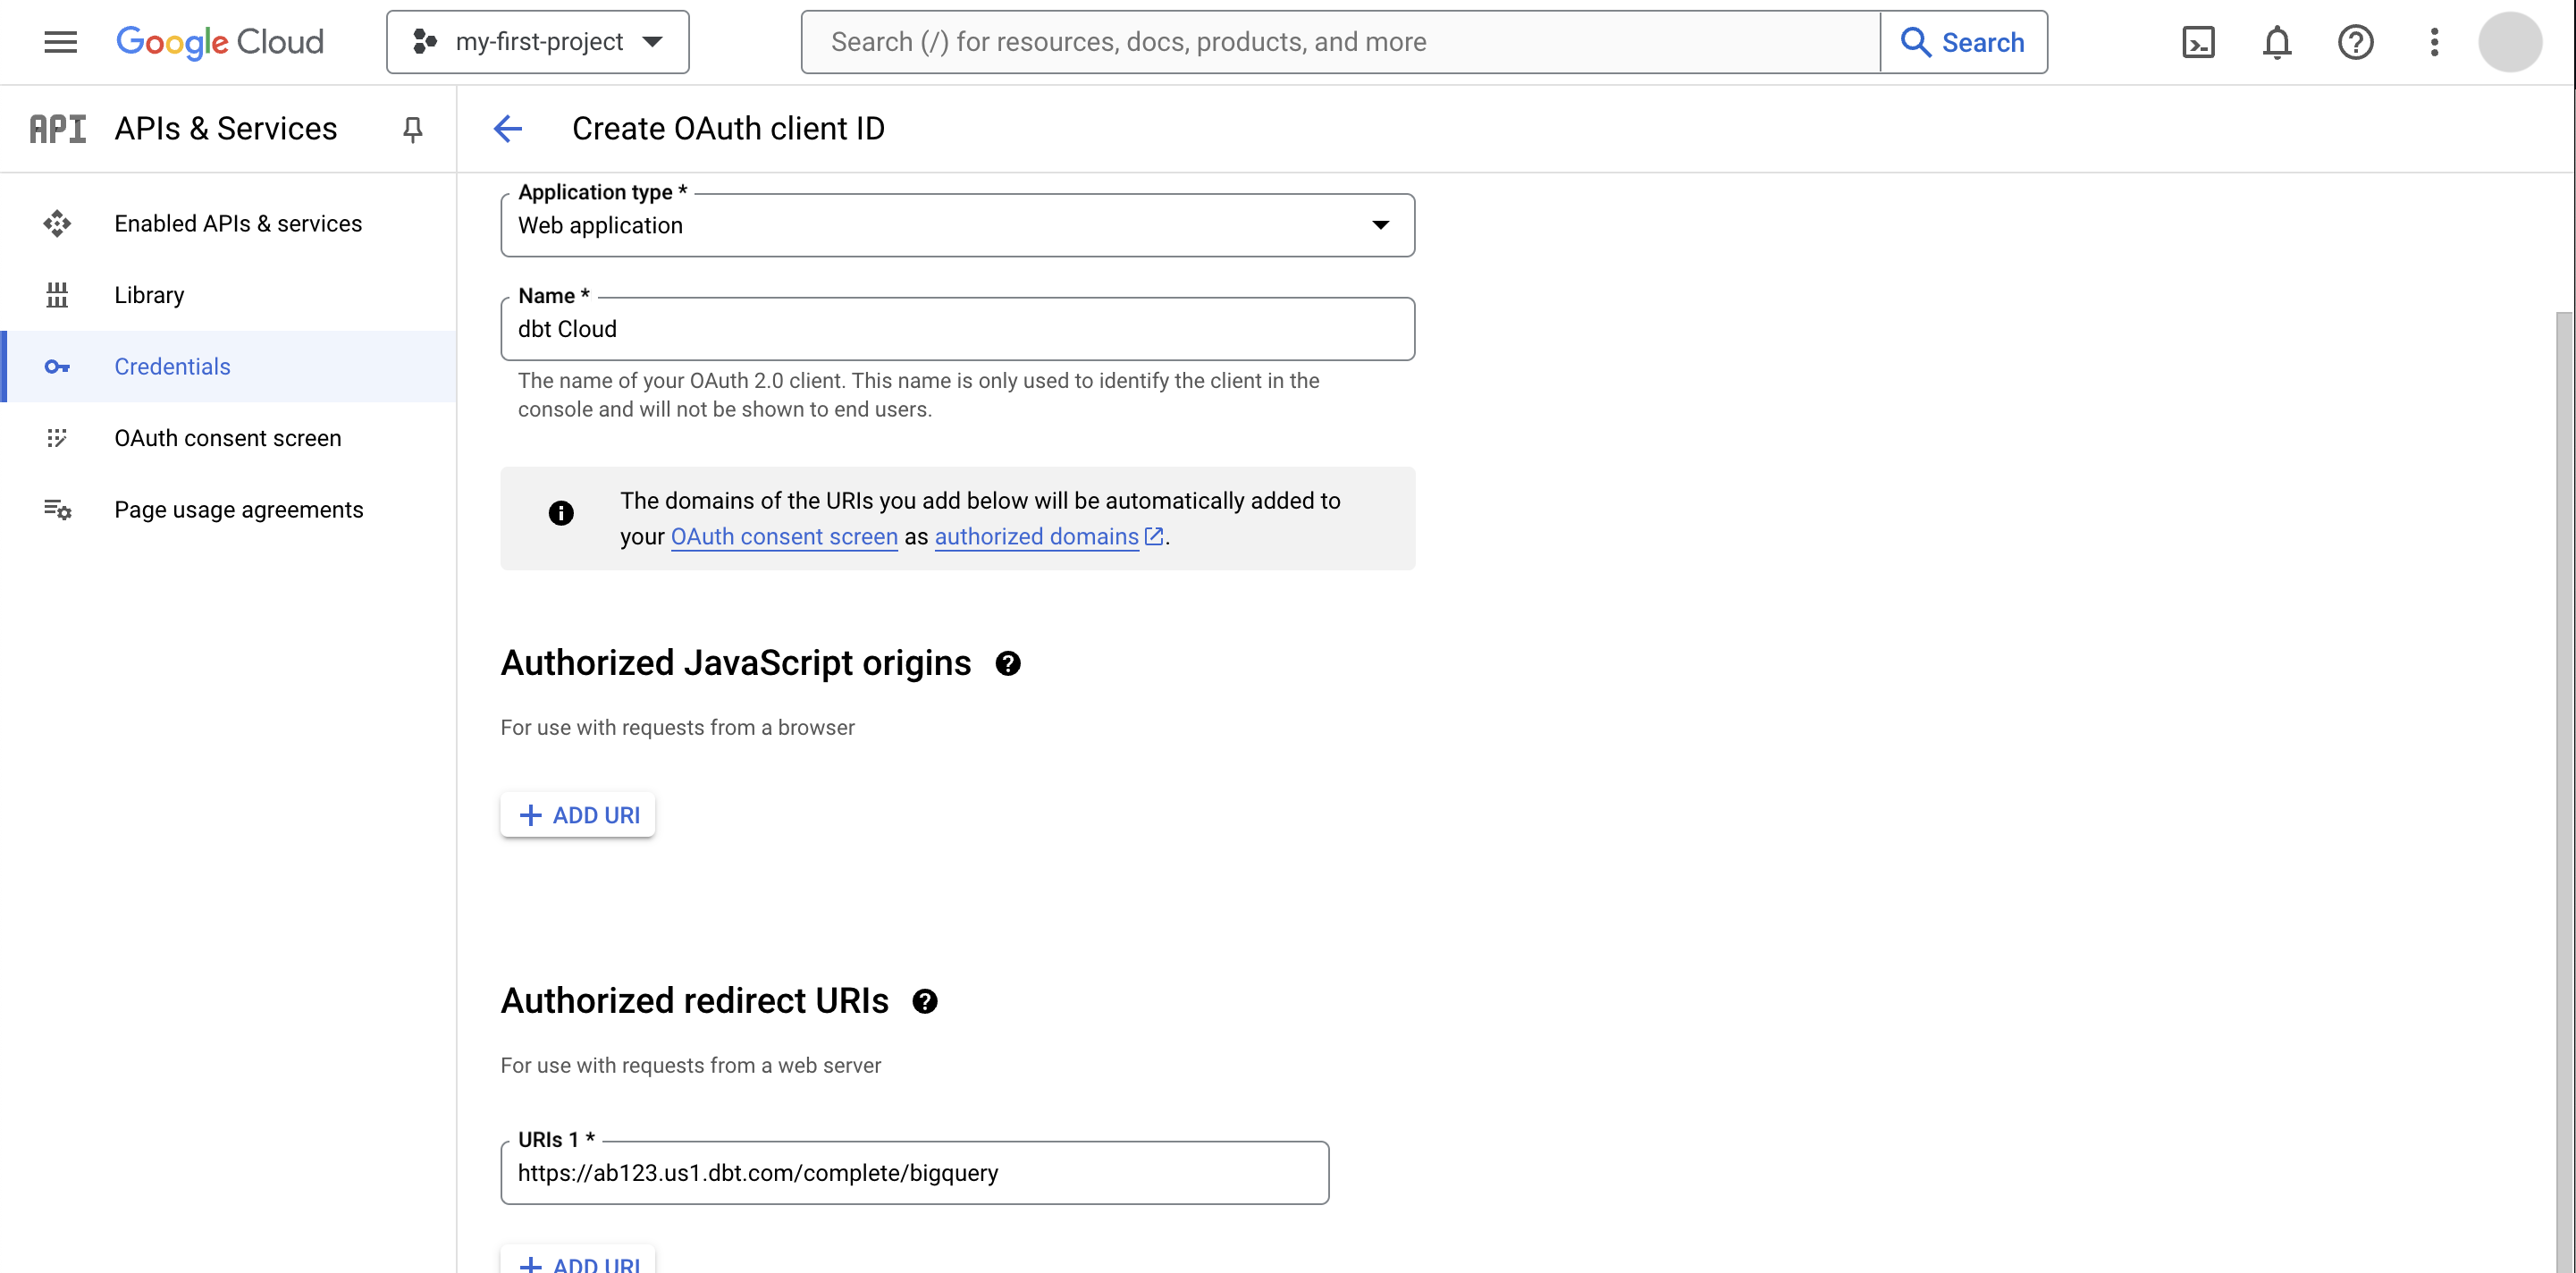
Click + Create Credentials at the top of the page and select OAuth client ID.
-
Fill in the client ID configuration. Authorized JavaScript Origins are not applicable.
-
Add an item to Authorized redirect URIs and replace
REDIRECT_URIwith the value you copied to your clipboard earlier from the connection's OAuth 2.0 Settings section in the dbt platform:
| Loading table... |
- Click Create to create the BigQuery OAuth app and see the app client ID and secret values. These values are available even if you close the app screen, so this isn't the only chance you have to save them.
Configure the Connection in dbt
Now that you have an OAuth app set up in BigQuery, you'll need to add the client ID and secret to the dbt platform. To do so:
- Navigate back to the Connection details page, as described in Locate the redirect URI value.
- Add the client ID and secret from the BigQuery OAuth app under the OAuth 2.0 Settings section.
- Enter the BigQuery token URI. The default value is
https://oauth2.googleapis.com/token.
Authenticating to BigQuery
Once the BigQuery OAuth app is set up for a dbt platform project, each dbt platformuser will need to authenticate with BigQuery in order to use the Studio IDE. To do so:
- Navigate to your account name, above your profile icon on the left side panel.
- Select Account settings from the menu.
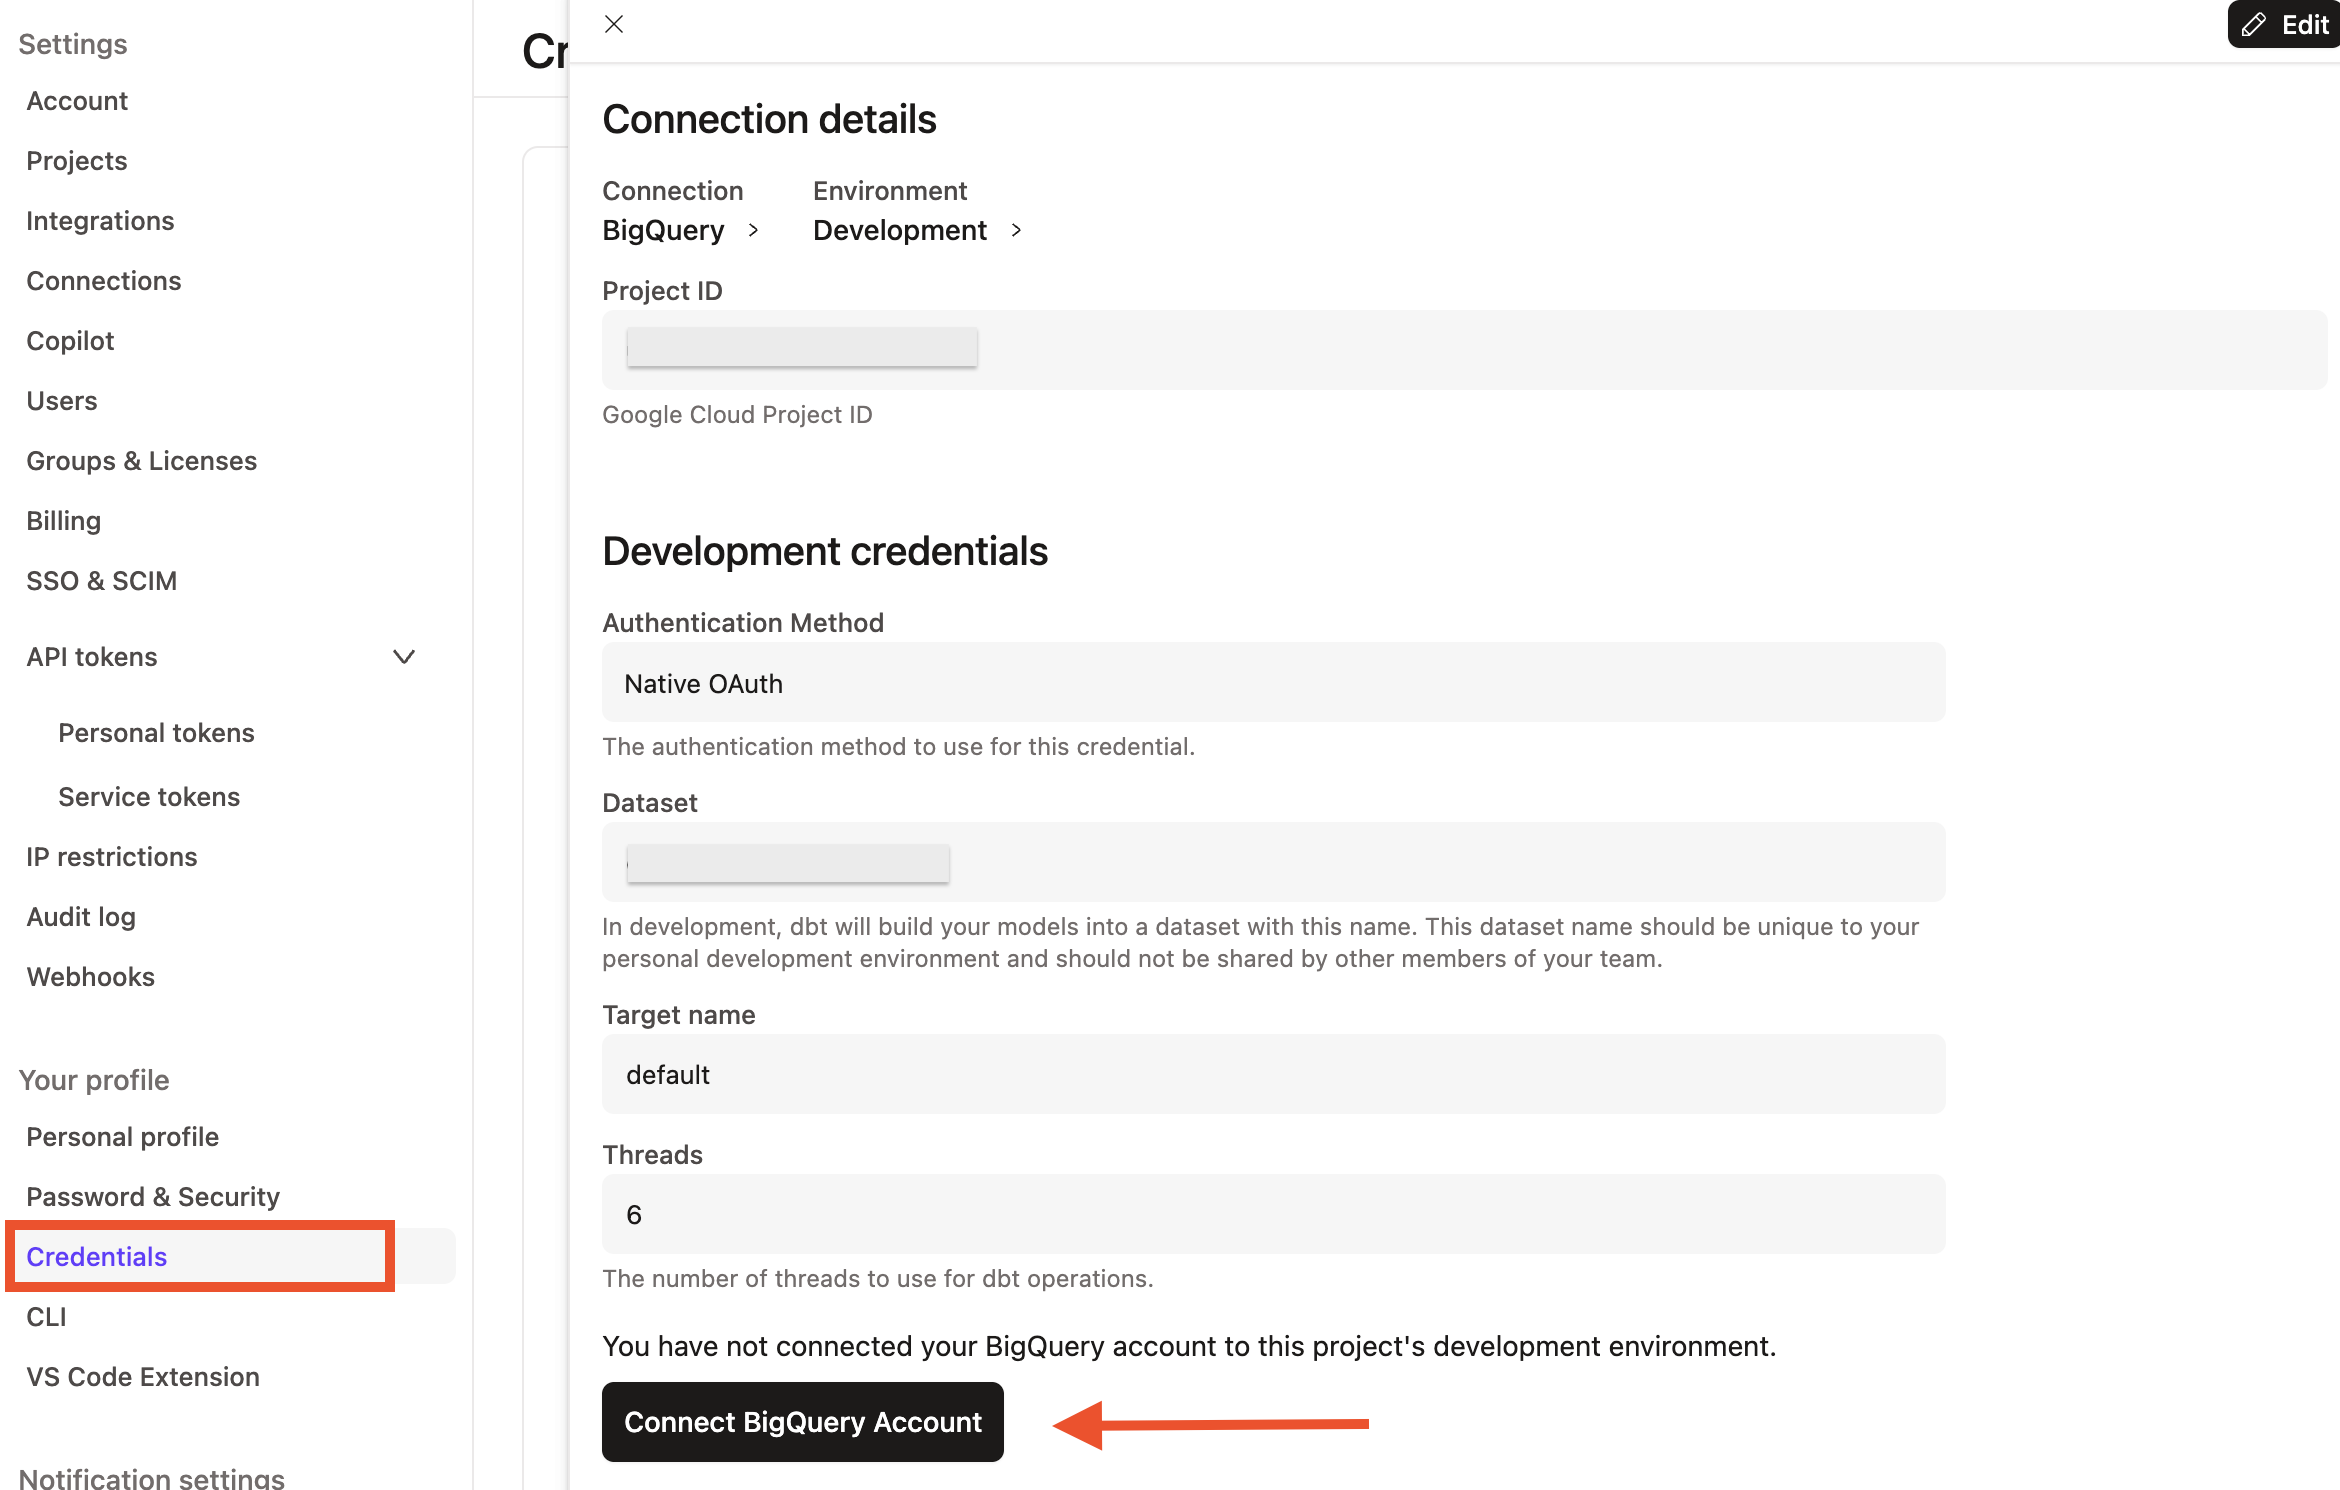
- From the left sidebar, select Credentials.
- Choose the project from the list.
- Ensure the Authentication Method is set to Native OAuth.
- Select Connect to BigQuery.
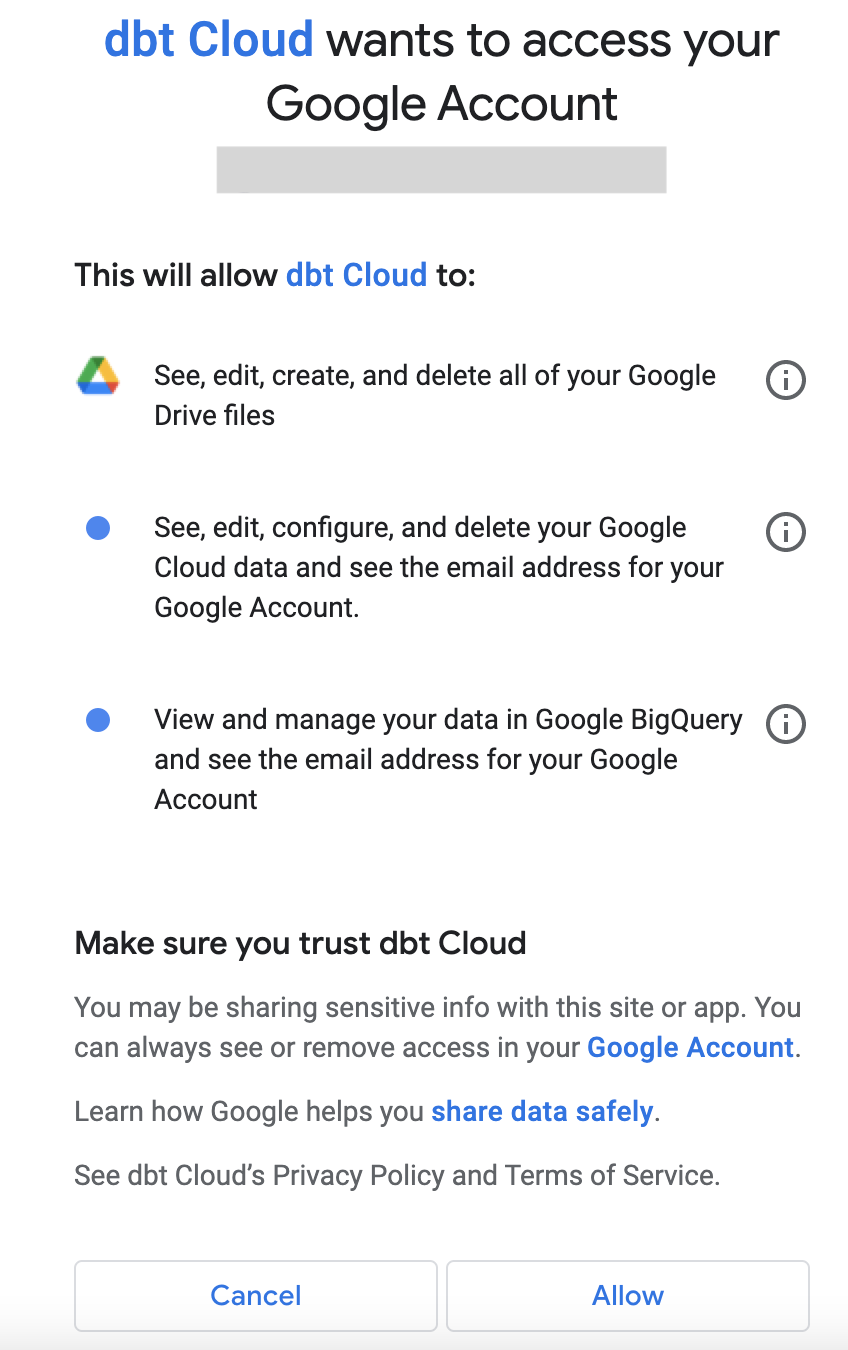
You will then be redirected to BigQuery and asked to approve the drive, cloud platform, and BigQuery scopes, unless the connection is less privileged.
Select Allow. This redirects you back to the dbt platform. You are now an authenticated BigQuery user and can begin accessing dbt development tools.
Set up BigQuery Workload Identity Federation EnterprisePreview
Workload Identity Federation (WIF) allows application workloads, running externally to the dbt platform, to act as a service account without the need to manage service accounts or other keys for deployment environments. The following instructions will enable you to authenticate your BigQuery connection in the dbt platform using WIF. Currently, Microsoft Entra ID is the only supported identity provider (IdP). If you need additional IdP support, please contact your account team.
1. Set up Entra ID
Create an app in Entra where dbt will request access tokens when authenticating to BigQuery via the workload identity pool:
-
From the app registrations screen, click New registration.
-
Give the app a name that makes it easily identifiable.
-
Ensure Supported account types are set to “Accounts in this organizational directory only (Org name - Single Tenant).”
-
Click Register to see the application’s overview screen.
-
From the app overview, click Expose an API in the left menu.
-
Click Add next to Application ID URI. The field will automatically populate.
-
Click Save.
-
(Optional) To include the
subclaim in tokens issued by this application, configure optional claims in Entra ID.
Thesub(subject) claim uniquely identifies the user or service principal for whom the token is issued.
When you configure service account impersonation in GCP, the Workload Identity Federation mapping uses thissubvalue to verify the identity of the calling Entra application. -
(Optional but recommended) Test your Entra ID configuration by requesting a token:
Run the following command, replacing
<client-id>,<client-secret>,<application-ID-URI>, and<tenant-id>with your actual values:curl -X POST -H "Content-Type: application/x-www-form-urlencoded" \
-d 'client_id=<client-id> \
&scope=<application-ID-URI>/.default \
&client_secret=<client-secret> \
&grant_type=client_credentials' \
'https://login.microsoftonline.com/<tenant-id>/oauth2/v2.0/token'The response will include an
access_token. You can decode this token using jwt.io to view thesubclaim value.
Workload Identity Federation utilizes a machine-to-machine OAuth flow that is unattended by the user; as such, a redirect URI won't need to be set for the application. Step 3 in this section is crucial because it determines the audience for tokens issued from the app and informs the workpool in GCP whether the calling application has permission to access the resources guarded by the workpool.
- Related documentation: GCP — Prepare your external identity provider
2. Create a Workpool and Workpool Provider in GCP
- In your GCP account's main menu, navigate to IAM & Admin and click the Workload Identity Federation option (not to be confused with the Work_force_ Identity Federation option directly adjacent).
- If you haven’t created a workpool yet, click Get started or create a new workpool (use button near the top of the page).
- Give the workpool a name and description. Per the GCP documentation, a new pool should be created for each non-Google Cloud environment that needs to access Google Cloud resources, such as development, staging, or production environments. The workpool should be named accordingly to make it easily identifiable in the future.
- When creating your provider:
- Set the type of the provider to OpenID Connect (OIDC).
- Name the provider something identifiable, like
Entra ID. - Set the URL to https://sts.windows.net/YOUR_TENANT_ID/. This can be found in the token itself, if you decode it via jwt.io. You can also see a reference to the expected issuer URL for Entra in the GCP documentation for WIF.
- Replace
YOUR_TENANT_IDwith your tenant ID. - The tenant (provider) ID can be found in the app registration created in section 1 of these instructions; it's called Directory (tenant) ID and can be found in the overview section for the application.
- Replace
- For Audiences, select Allowed Audiences and set the value to the Application ID URI that was defined for your Entra ID app.
- Click Continue.
- Under Configure provider attributes, set the mapping for
google.subjecttoassertion.sub. - Click Save.
3. Service Account Impersonation
A workpool either uses a service account or is granted direct resource access to determine which resources a caller can access. The GCP documentation provides more detailed information on configuring both for your workpool. We chose the service account approach in our implementation because it offered greater flexibility.
If you haven’t already, create a new service account:
- From the main menu, select IAM & Admin
- Click Service Accounts.
- Click Create service account. Google recommends creating a service account per workload.
- Assign the relevant roles you would like this service account to have. In our experience,
BigQuery Adminis the default role with required access.
Once you've created the service account, navigate back to the workpool you created in the previous step:
-
Click the Grant Access option at the top of the page.
-
Select Grant access using Service Account Impersonation.
-
Select the service account you just created.
-
Under Select Principals, set
subjectas the Attribute Name. For the Attribute Value, set it to thesub(subject) claim value from the Entra ID access token.
4. Set up dbt
To configure a BigQuery connection to use WIF authentication in the dbt platform, you must set up a custom OAuth integration configured with details from the Entra application used as your workpool provider in GCP. dbt platform:
- Navigate to Account settings --> Integrations
- Scroll down to the section for Custom OAuth Integrations and create a new integration,
- Fill out all fields with the appropriate information from your IdP environment.
- The Application ID URI should be set to the expected audience claim on tokens issued from the Entra application. It will be the same URI your workpool provider has been configured to expect.
- You do not have to add the Redirect URI to your Entra application
5. Create connections in dbt
To get started, create a new connection in the dbt platform:
- Navigate to Account settings --> Connections.
- Click New connection and select BigQuery as the connection type. You will then see the option to select BigQuery or BigQuery (Legacy). Select BigQuery.
- For the Deployment Environment Authentication Method, select Workload Identity Federation.
- Fill out the Google Cloud Project ID and any optional settings you need.
- Select the OAuth Configuration you created in the previous section from the drop-down.
- Configure your development connection:
- BigQuery OAuth (recommended).
- Set this up in the same connection as the one you're using for WIF under
OAuth2.0 settings
- Set this up in the same connection as the one you're using for WIF under
- Service JSON.
- You must create a separate connection with the Service JSON configuration.
- BigQuery OAuth (recommended).
6. Set up project
To connect a new project to your WIF configuration:
- Navigate to Account settings --> Projects.
- Click New project.
- Give your project a name and (optional) subdirectory path and click Continue.
- Select the Connection with the WIF configuration.
- Configure the remainder of the project with the appropriate fields.
7. Set up deployment environment
Create a new or updated environment to use the WIF connection.
When you set your environment connection to the WIF configuration, you will then see two fields appear under the Deployment credentials section:
- Workload pool provider path: This field is required for all WIF configurations.
Example:
//iam.googleapis.com/projects/<numeric_project_id>/locations/global/workloadIdentityPools/<workpool_name>/providers/<workpool_providername> - Service account impersonation URL: Used only if you’ve configured your workpool to use a service account impersonation for accessing your BigQuery resources (as opposed to granting the workpool direct resource access to the BigQuery resources).
Example:
https://iamcredentials.googleapis.com/v1/projects/-/serviceAccounts<serviceaccountemail>:generateAccessToken
If you don’t already have a job based on the deployment environment with a connection set up for WIF, you should create one now. Once you’ve configured it with the preferred settings, run the job.
FAQs
Was this page helpful?
This site is protected by reCAPTCHA and the Google Privacy Policy and Terms of Service apply.
