Customizing CI/CD with custom pipelines
Introduction
One of the core tenets of dbt is that analytic code should be version controlled. This provides a ton of benefit to your organization in terms of collaboration, code consistency, stability, and the ability to roll back to a prior version. There’s an additional benefit that is provided with your code hosting platform that is often overlooked or underutilized. Some of you may have experience using dbt’s webhook functionality to run a job when a PR is created. This is a fantastic capability, and meets most use cases for testing your code before merging to production. However, there are circumstances when an organization needs additional functionality, like running workflows on every commit (linting), or running workflows after a merge is complete. In this article, we will show you how to setup custom pipelines to lint your project and trigger a dbt job via the API.
A note on parlance in this article since each code hosting platform uses different terms for similar concepts. The terms pull request (PR) and merge request (MR) are used interchangeably to mean the process of merging one branch into another branch.
What are pipelines?
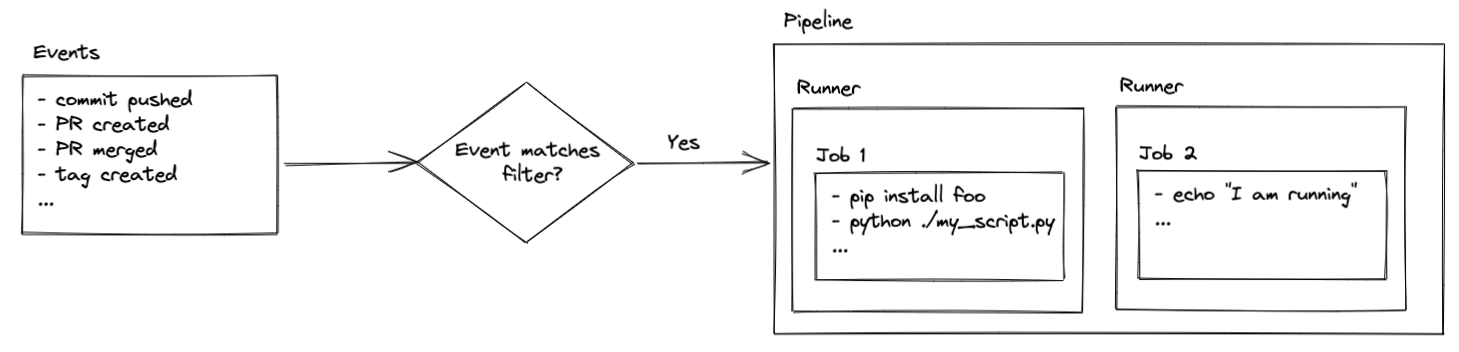
Pipelines (which are known by many names, such as workflows, actions, or build steps) are a series of pre-defined jobs that are triggered by specific events in your repository (PR created, commit pushed, branch merged, etc). Those jobs can do pretty much anything your heart desires assuming you have the proper security access and coding chops.
Jobs are executed on runners, which are virtual servers. The runners come pre-configured with Ubuntu Linux, macOS, or Windows. That means the commands you execute are determined by the operating system of your runner. You’ll see how this comes into play later in the setup, but for now just remember that your code is executed on virtual servers that are, typically, hosted by the code hosting platform.
Please note, runners hosted by your code hosting platform provide a certain amount of free time. After that, billing charges may apply depending on how your account is setup. You also have the ability to host your own runners. That is beyond the scope of this article, but checkout the links below for more information if you’re interested in setting that up:
- Repo-hosted runner billing information:
- Self-hosted runner information:
Additionally, if you’re using the free tier of GitLab you can still follow this guide, but it may ask you to provide a credit card to verify your account. You’ll see something like this the first time you try to run a pipeline:

How to setup pipelines
This guide provides details for multiple code hosting platforms. Where steps are unique, they are presented without a selection option. If code is specific to a platform (i.e. GitHub, GitLab, Bitbucket) you will see a selection option for each.
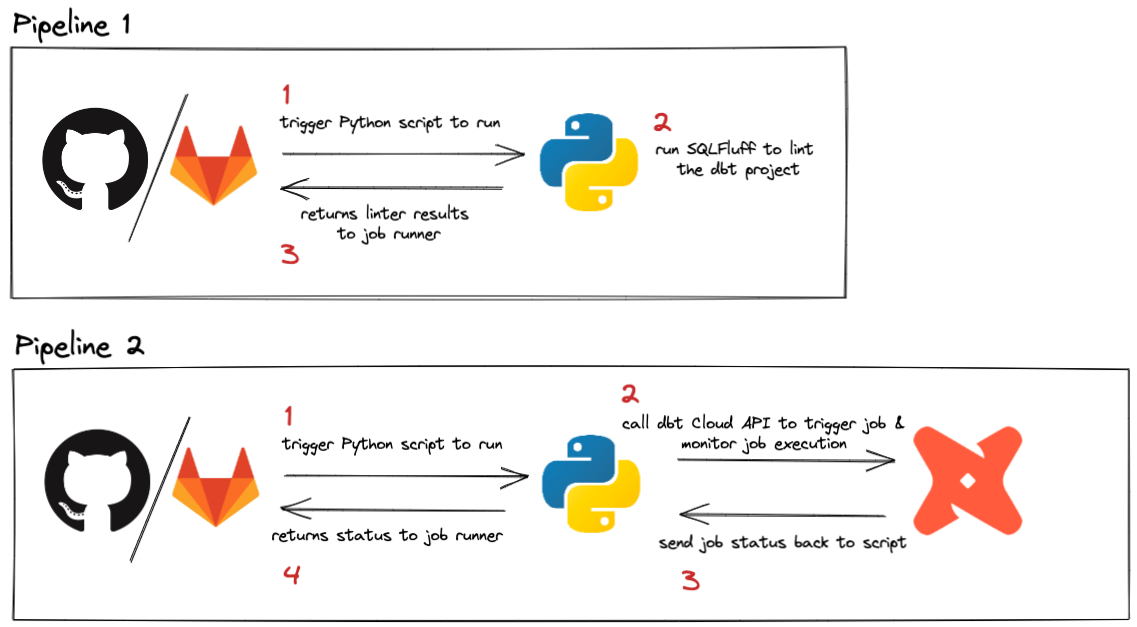
Pipelines can be triggered by various events. The dbt webhook process already triggers a run if you want to run your jobs on a merge request, so this guide focuses on running pipelines for every push and when PRs are merged. Since pushes happen frequently in a project, we’ll keep this job super simple and fast by linting with SQLFluff. The pipeline that runs on merge requests will run less frequently, and can be used to call the dbt API to trigger a specific job. This can be helpful if you have specific requirements that need to happen when code is updated in production, like running a --full-refresh on all impacted incremental models.
Here’s a quick look at what this pipeline will accomplish:
Run a dbt job on merge
This job will take a bit more to setup, but is a good example of how to call the dbt API from a CI/CD pipeline. The concepts presented here can be generalized and used in whatever way best suits your use case.
If your Git provider has a native integration with dbt, you can take advantage of setting up Merge jobs in the UI.
The setup below shows how to call the dbt API to run a job every time there's a push to your default branch.
1. Get your dbt API key
When running a CI/CD pipeline you’ll want to use a service token instead of any individual’s API key. There are detailed docs available on this, but below is a quick rundown (this must be performed by an Account Admin):
- Log in to your dbt account.
- Click your account name at the bottom left-hand menu and go to Account settings.
- Click Service tokens on the left.
- Click + Create service token to create a new token specifically for CI/CD API calls.
- Name your token something like “CICD Token”.
- Click the +Add permission button under Access, and grant this token the Job Admin permission.
- Click Save and you’ll see a grey box appear with your token. Copy that and save it somewhere safe (this is a password, and should be treated as such).
 View of the dbt page where service tokens are created
 Creating a new service token
2. Put your dbt API key into your repo
Adding you dbt API key to your repo happens in your code hosting platform. You need to save your API key from the previous section as a repository secret so the job we create can access it. Never save passwords or API keys in your code. The following steps ensure that your key stays secure, but is still usable for your pipelines.
- GitHub
- GitLab
- Azure DevOps
- Bitbucket
- CodeCommit
- Open up your repository where you want to run the pipeline (the same one that houses your dbt project).
- Click Settings to open up the repository options.
- On the left click the Secrets and variables dropdown in the Security section.
- From that list, click on Actions.
- Towards the middle of the screen, click the New repository secret button.
- It will ask you for a name, so let’s call ours
DBT_API_KEY.- It’s very important that you copy/paste this name exactly because it’s used in the scripts below.
- In the Secret section, paste in the key you copied from dbt.
- Click Add secret and you’re all set!
** A quick note on security: while using a repository secret is the most straightforward way to setup this secret, there are other options available to you in GitHub. They’re beyond the scope of this guide, but could be helpful if you need to create a more secure environment for running actions. Checkout GitHub’s documentation on secrets here.*
Here’s a video showing these steps:
-
Open up your repository where you want to run the pipeline (the same one that houses your dbt project).
-
Click Settings > CI/CD.
-
Under the Variables section, click Expand, then click Add variable.
-
It will ask you for a name, so let’s call ours
DBT_API_KEY.- It’s very important that you copy/paste this name exactly because it’s used in the scripts below.
-
In the Value section, paste in the key you copied from dbt.
-
Make sure the check box next to Protect variable is unchecked, and the box next to Mask variable is selected (see below).
- “Protected” means that the variable is only available in pipelines that run on protected branches or protected tags - that won’t work for us because we want to run this pipeline on multiple branches. “Masked” means that it will be available to your pipeline runner, but will be masked in the logs.
 [View of the GitLab window for entering DBT_API_KEY
Here’s a video showing these steps:
In Azure:
- Open up your Azure DevOps project where you want to run the pipeline (the same one that houses your dbt project).
- Click on Pipelines and then Create Pipeline.
- Select where your git code is located. It should be Azure Repos Git.
- Select your git repository from the list.
- Select Starter pipeline (this will be updated later in Step 4).
- Click on Variables and then New variable.
- In the Name field, enter the
DBT_API_KEY.- It’s very important that you copy/paste this name exactly because it’s used in the scripts below.
- In the Value section, paste in the key you copied from dbt.
- Make sure the check box next to Keep this value secret is checked. This will mask the value in logs, and you won't be able to see the value for the variable in the UI.
- Click OK and then Save to save the variable.
- Save your new Azure pipeline.
 View of the Azure pipelines window for entering DBT_API_KEY
In Bitbucket:
-
Open up your repository where you want to run the pipeline (the same one that houses your dbt project).
-
In the left menu, click Repository Settings.
-
Scroll to the bottom of the left menu, and select Repository variables.
-
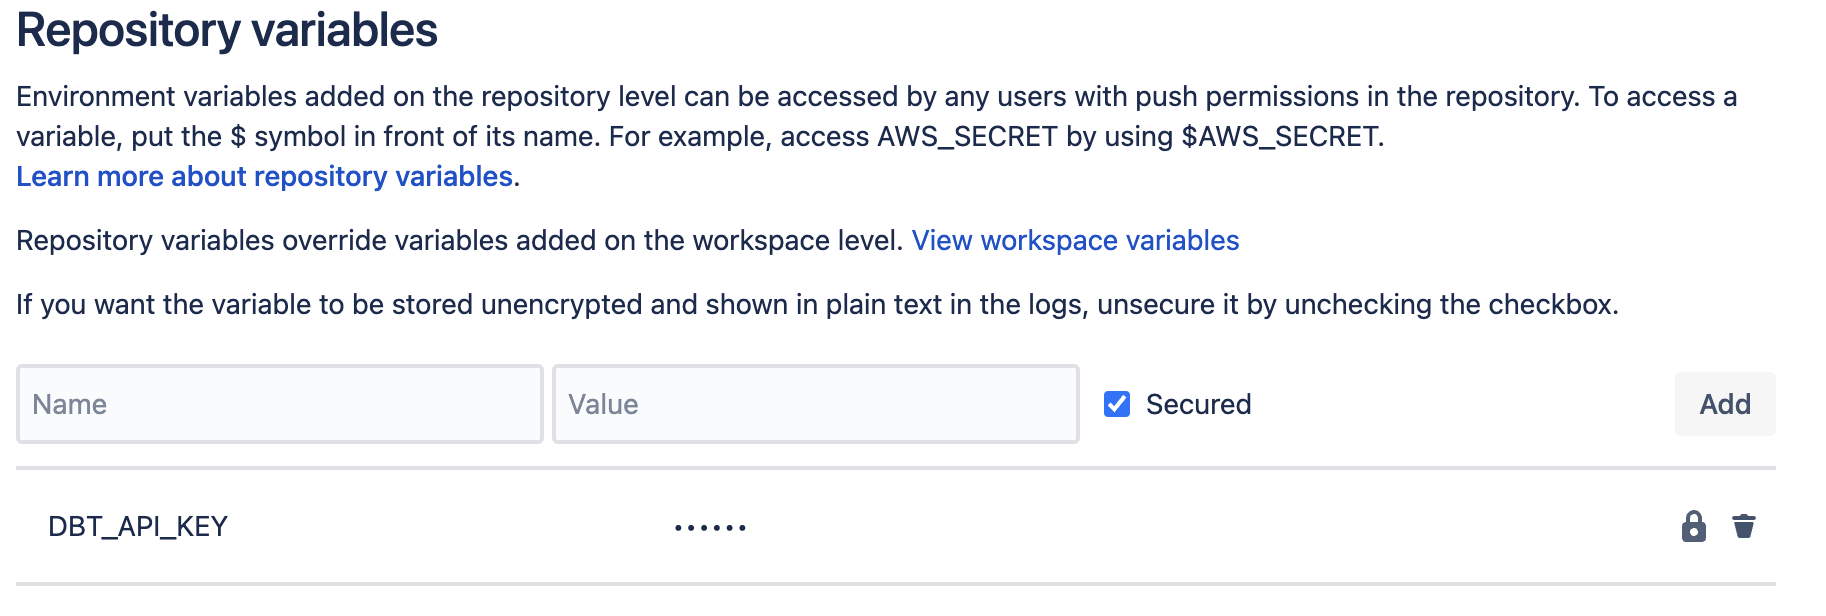
In the Name field, input
DBT_API_KEY- It’s very important that you copy/paste this name exactly because it’s used in the scripts below.
-
In the Value section, paste in the key you copied from dbt
-
Make sure the check box next to Secured is checked. This will mask the value in logs, and you won't be able to see the value for the variable in the UI.
-
Click Add to save the variable
Here’s a video showing these steps:
In AWS, store your API key in Systems Manager (SSM) Parameter Store instead of a repository secret:
- Open the AWS console and go to Systems Manager → Parameter Store.
- Click Create parameter.
- Enter a name for the parameter (for example,
DBT_API_KEY). - Set the type to SecureString and paste in your dbt service token as the value.
- Click Create parameter.
You’ll reference this parameter in the CodeBuild project environment in step 4.
3. Create script to trigger dbt job via an API call
In your project, create a new folder at the root level named python. In that folder, create a file named run_and_monitor_dbt_job.py. You'll copy/paste the contents from this gist into that file.
my_awesome_project
├── python
│   └── run_and_monitor_dbt_job.py
The following Python file has everything you need to call the dbt API, but requires a few inputs as outlined below. These inputs will be fed to this script through environment variables that will be defined in the next step.
#------------------------------------------------------------------------------
# get environment variables
#------------------------------------------------------------------------------
api_base        = os.getenv('DBT_URL', 'https://cloud.getdbt.com/') # default to multitenant url
job_cause       = os.getenv('DBT_JOB_CAUSE', 'API-triggered job') # default to generic message
git_branch      = os.getenv('DBT_JOB_BRANCH', None) # default to None
schema_override = os.getenv('DBT_JOB_SCHEMA_OVERRIDE', None) # default to None
api_key         = os.environ['DBT_API_KEY']  # no default here, just throw an error here if key not provided
account_id      = os.environ['DBT_ACCOUNT_ID'] # no default here, just throw an error here if id not provided
project_id      = os.environ['DBT_PROJECT_ID'] # no default here, just throw an error here if id not provided
job_id          = os.environ['DBT_PR_JOB_ID'] # no default here, just throw an error here if id not provided
Required input:
In order to call the dbt API, there are a few pieces of info the script needs. The easiest way to get these values is to open up the job you want to run in dbt. The URL when you’re inside the job has all the values you need:
DBT_ACCOUNT_ID- this is the number just afteraccounts/in the URLDBT_PROJECT_ID- this is the number just afterprojects/in the URLDBT_PR_JOB_ID- this is the number just afterjobs/in the URL

4. Update your project to include the new API call
- GitHub
- GitLab
- Azure DevOps
- Bitbucket
- CodeCommit
For this new job, we'll add a file for the dbt API call named dbt_run_on_merge.yml.
my_awesome_project
├── python
│   └── run_and_monitor_dbt_job.py
├── .github
│   ├── workflows
│   │   └── dbt_run_on_merge.yml
│   │   └── lint_on_push.yml
The YAML file will look pretty similar to our earlier job, but there is a new section called env that we’ll use to pass in the required variables. Update the variables below to match your setup based on the comments in the file.
It’s worth noting that we changed the on: section to now run only when there are pushes to a branch named main (for example, a pull request is merged). Have a look through GitHub documentation on these filters for additional use cases.
For information about github context property names and their use cases, refer to the GitHub documentation.
name: run dbt job on push

# This filter says only run this job when there is a push to the default branch
# This works off the assumption that you've restricted this branch to only all PRs to push to the default branch
# Update the name to match the name of your default branch
on:
  push:
    branches:
      - 'main'

jobs:

  # the job calls the dbt API to run a job
  run_dbt_cloud_job:
    name: Run dbt Job
    runs-on: ubuntu-latest

  # Set the environment variables needed for the run
    env:
      DBT_ACCOUNT_ID: 00000 # enter your account id
      DBT_PROJECT_ID: 00000 # enter your project id
      DBT_PR_JOB_ID:  00000 # enter your job id
      DBT_API_KEY: ${{ secrets.DBT_API_KEY }}
      DBT_URL: https://cloud.getdbt.com # enter a URL that matches your job
      DBT_JOB_CAUSE: 'GitHub Pipeline CI Job'
      DBT_JOB_BRANCH: ${{ github.head_ref }} # Resolves to the head_ref or source branch of the pull request in a workflow run.

    steps:
      - uses: "actions/checkout@v4"
      - uses: "actions/setup-python@v5"
        with:
          python-version: "3.9"
      - name: Run dbt job
        run: "python python/run_and_monitor_dbt_job.py"
For this job, we'll set it up using the gitlab-ci.yml file as in the prior step (see Step 1 of the linting setup for more info). The YAML file will look pretty similar to our earlier job, but there is a new section called variables that we’ll use to pass in the required variables to the Python script. Update this section to match your setup based on the comments in the file.
Please note that the rules: section now says to run only when there are pushes to a branch named main, such as a PR being merged. Have a look through GitLab’s docs on these filters for additional use cases.
- Only dbt job
- Lint and dbt job
image: python:3.9

variables:
  DBT_ACCOUNT_ID: 00000 # enter your account id
  DBT_PROJECT_ID: 00000 # enter your project id
  DBT_PR_JOB_ID:  00000 # enter your job id
  DBT_API_KEY: $DBT_API_KEY # secret variable in gitlab account
  DBT_URL: https://cloud.getdbt.com
  DBT_JOB_CAUSE: 'GitLab Pipeline CI Job'
  DBT_JOB_BRANCH: $CI_COMMIT_BRANCH

stages:
  - build

# this job calls the dbt API to run a job
run-dbt-cloud-job:
  stage: build
  rules:
    - if: $CI_PIPELINE_SOURCE == "push" && $CI_COMMIT_BRANCH == 'main'
  script:
    - python python/run_and_monitor_dbt_job.py
image: python:3.9

variables:
  DBT_ACCOUNT_ID: 00000 # enter your account id
  DBT_PROJECT_ID: 00000 # enter your project id
  DBT_PR_JOB_ID:  00000 # enter your job id
  DBT_API_KEY: $DBT_API_KEY # secret variable in gitlab account
  DBT_URL: https://cloud.getdbt.com
  DBT_JOB_CAUSE: 'GitLab Pipeline CI Job'
  DBT_JOB_BRANCH: $CI_COMMIT_BRANCH

stages:
  - pre-build
  - build

# this job runs SQLFluff with a specific set of rules
# note the dialect is set to Snowflake, so make that specific to your setup
# details on linter rules: https://docs.sqlfluff.com/en/stable/rules.html
lint-project:
  stage: pre-build
  rules:
    - if: $CI_PIPELINE_SOURCE == "push" && $CI_COMMIT_BRANCH != 'main'
  script:
    - python -m pip install sqlfluff==0.13.1
    - sqlfluff lint models --dialect snowflake --rules L019,L020,L021,L022

# this job calls the dbt API to run a job
run-dbt-cloud-job:
  stage: build
  rules:
    - if: $CI_PIPELINE_SOURCE == "push" && $CI_COMMIT_BRANCH == 'main'
  script:
    - python python/run_and_monitor_dbt_job.py
For this new job, open the existing Azure pipeline you created above and select the Edit button. We'll want to edit the corresponding Azure pipeline YAML file with the appropriate configuration, instead of the starter code, along with including a variables section to pass in the required variables.
Copy the below YAML file into your Azure pipeline and update the variables below to match your setup based on the comments in the file. It's worth noting that we changed the trigger section so that it will run only when there are pushes (for example, when a PR is merged) to main, but you should use the name of your default branch.
Read through Azure's docs on these filters for additional use cases.
name: Run dbt Job

trigger: [ main ] # runs on pushes to main

variables:
  DBT_URL:                 https://cloud.getdbt.com # no trailing backslash, adjust this accordingly for single-tenant deployments
  DBT_JOB_CAUSE:           'Azure Pipeline CI Job' # provide a descriptive job cause here for easier debugging down the road
  DBT_ACCOUNT_ID:          00000 # enter your account id
  DBT_PROJECT_ID:          00000 # enter your project id
  DBT_PR_JOB_ID:           00000 # enter your job id

steps:
  - task: UsePythonVersion@0
    inputs:
      versionSpec: '3.7'
    displayName: 'Use Python 3.7'

  - script: |
      python -m pip install requests
    displayName: 'Install python dependencies'

  - script: |
      python -u ./python/run_and_monitor_dbt_job.py
    displayName: 'Run dbt job '
    env:
      DBT_API_KEY: $(DBT_API_KEY) # Set these values as secrets in the Azure pipelines Web UI
For this job, we'll set it up using the bitbucket-pipelines.yml file as in the prior step (see Step 1 of the linting setup for more info). The YAML file will look pretty similar to our earlier job, but we’ll pass in the required variables to the Python script using export statements. Update this section to match your setup based on the comments in the file.
- Only job
- Lint and dbt job
image: python:3.11.1


pipelines:
  branches:
    'main': # override if your default branch doesn't run on a branch named "main"
      - step:
          name: 'Run dbt Job'
          script:
            - export DBT_URL="https://cloud.getdbt.com" # if you have a single-tenant deployment, adjust this accordingly
            - export DBT_JOB_CAUSE="Bitbucket Pipeline CI Job"
            - export DBT_ACCOUNT_ID=00000 # enter your account id here
            - export DBT_PROJECT_ID=00000 # enter your project id here
            - export DBT_PR_JOB_ID=00000 # enter your job id here
            - python python/run_and_monitor_dbt_job.py
image: python:3.11.1


pipelines:
  branches:
    '**': # this sets a wildcard to run on every branch unless specified by name below
      - step:
          name: Lint dbt project
          script:
            - python -m pip install sqlfluff==0.13.1
            - sqlfluff lint models --dialect snowflake --rules L019,L020,L021,L022

    'main': # override if your default branch doesn't run on a branch named "main"
      - step:
          name: 'Run dbt Job'
          script:
            - export DBT_URL="https://cloud.getdbt.com" # if you have a single-tenant deployment, adjust this accordingly
            - export DBT_JOB_CAUSE="Bitbucket Pipeline CI Job"
            - export DBT_ACCOUNT_ID=00000 # enter your account id here
            - export DBT_PROJECT_ID=00000 # enter your project id here
            - export DBT_PR_JOB_ID=00000 # enter your job id here
            - python python/run_and_monitor_dbt_job.py
For CodeCommit, you'll configure a CodeBuild project and an EventBridge rule to trigger a dbt job every time code is pushed to your default branch (for example, when a pull request is merged to main).
Add the following files to your dbt project:
my_awesome_project
├── ci-configuration
│   └── buildspec-merge.yml
├── python
│   └── run_and_monitor_dbt_cloud_job.py
Create python/run_and_monitor_dbt_cloud_job.py with the following content:
import requests
import os
import time

api_base        = os.getenv('DBT_URL', 'https://cloud.getdbt.com')
job_cause       = os.getenv('DBT_JOB_CAUSE', 'API-triggered job')
git_branch      = os.getenv('DBT_JOB_BRANCH', None)
schema_override = os.getenv('DBT_JOB_SCHEMA_OVERRIDE', None)
api_key         = os.environ['DBT_API_KEY']
account_id      = os.environ['DBT_ACCOUNT_ID']
project_id      = os.environ['DBT_PROJECT_ID']
job_id          = os.environ['DBT_PR_JOB_ID']

print(f"""
Configuration:
api_base: {api_base}
job_cause: {job_cause}
git_branch: {git_branch}
schema_override: {schema_override}
account_id: {account_id}
project_id: {project_id}
job_id: {job_id}
""")

req_auth_header = {'Authorization': f'Token {api_key}'}
req_job_url = f'{api_base}/api/v2/accounts/{account_id}/jobs/{job_id}/run/'
run_status_map = {
  1:  'Queued',
  2:  'Starting',
  3:  'Running',
  10: 'Success',
  20: 'Error',
  30: 'Cancelled',
}

def run_job(url, headers, cause, branch=None, schema_override=None) -> int:
  req_payload = {'cause': cause}
  if branch:
    req_payload['git_branch'] = branch.replace('refs/heads/', '')
  if schema_override:
    req_payload['schema_override'] = schema_override.replace('-', '_')
  print(f'Triggering job:\n\turl: {url}\n\tpayload: {req_payload}')
  run_job_resp = requests.post(url, headers=headers, data=req_payload).json()
  return run_job_resp['data']['id']

def get_run_status(url, headers) -> str:
  req_status_resp = requests.get(url, headers=headers).json()
  run_status_code = req_status_resp['data']['status']
  return run_status_map[run_status_code]

def main():
  print('Beginning request for job run...')
  try:
    run_id = run_job(req_job_url, req_auth_header, job_cause, git_branch, schema_override)
  except Exception as e:
    print(f'ERROR! - Could not trigger job:\n {e}')
    raise

  req_status_url = f'{api_base}/api/v2/accounts/{account_id}/runs/{run_id}/'
  run_status_link = f'{api_base}/#/accounts/{account_id}/projects/{project_id}/runs/{run_id}/'
  print(f'Job running! See job status at {run_status_link}')

  time.sleep(30)
  while True:
    status = get_run_status(req_status_url, req_auth_header)
    print(f'Run status -> {status}')
    if status in ['Error', 'Cancelled']:
      raise Exception(f'Run failed or canceled. See why at {run_status_link}')
    if status == 'Success':
      print(f'Job completed successfully! See details at {run_status_link}')
      return
    time.sleep(10)

if __name__ == "__main__":
    main()
Create ci-configuration/buildspec-merge.yml with the following content:
Replace the placeholder values with your actual dbt account details:
YOUR_DBT_ACCOUNT_ID: The number afteraccounts/in your dbt job URLYOUR_DBT_PROJECT_ID: The number afterprojects/in your dbt job URLYOUR_DBT_MERGE_JOB_ID: The number afterjobs/in the URL of the dbt job you want to run on mergeYOUR_SSM_PARAMETER_NAME: The name of the SSM parameter you created in step 2 (for example,DBT_API_KEY)
version: 0.2

env:
  variables:
    DBT_ACCOUNT_ID: YOUR_DBT_ACCOUNT_ID
    DBT_PROJECT_ID: YOUR_DBT_PROJECT_ID
    DBT_PR_JOB_ID: YOUR_DBT_MERGE_JOB_ID
    DBT_URL: https://cloud.getdbt.com
    DBT_JOB_CAUSE: 'CodeCommit Merge CI Job'
  parameter-store:
    DBT_API_KEY: "YOUR_SSM_PARAMETER_NAME"

phases:
  install:
    commands:
      - apt-get update -y
      - python -m pip install --upgrade pip
      - pip install requests
  build:
    commands:
      - python -u ./python/run_and_monitor_dbt_cloud_job.py
Create a CodeBuild project
Follow the AWS CodeBuild documentation to create a project. Configure the following settings:
- Source: Select AWS CodeCommit, set the reference type to Branch, and select your main branch
- Environment: Select Ubuntu as the operating system
- Buildspec: Select Use a buildspec file and enter
ci-configuration/buildspec-merge.ymlas the path
Note the service role name shown in the Environment section. In IAM, find that role and add an inline policy granting permission to read and decrypt the SSM parameter:
{
  "Version": "2012-10-17",
  "Statement": [
    {
      "Effect": "Allow",
      "Action": ["ssm:GetParameter", "ssm:GetParameters"],
      "Resource": "arn:aws:ssm:YOUR_AWS_REGION:YOUR_AWS_ACCOUNT_ID:parameter/YOUR_SSM_PARAMETER_NAME"
    },
    {
      "Effect": "Allow",
      "Action": ["kms:Decrypt"],
      "Resource": "arn:aws:kms:YOUR_AWS_REGION:YOUR_AWS_ACCOUNT_ID:key/alias/aws/ssm"
    }
  ]
}
Create an EventBridge rule
- In the AWS console, go to Amazon EventBridge → Rules → Create rule
- Give the rule a name (for example,
dbt-run-on-merge) - Under Event pattern, select Custom pattern and paste the following JSON. Substitute
YOUR_AWS_ACCOUNT_ID,YOUR_AWS_REGION, andYOUR_CODECOMMIT_REPO_NAMEwith your values:
{
  "source": ["aws.codecommit"],
  "account": ["YOUR_AWS_ACCOUNT_ID"],
  "region": ["YOUR_AWS_REGION"],
  "detail-type": ["CodeCommit Repository State Change"],
  "resources": ["arn:aws:codecommit:YOUR_AWS_REGION:YOUR_AWS_ACCOUNT_ID:YOUR_CODECOMMIT_REPO_NAME"],
  "detail": {
    "event": ["referenceUpdated"],
    "referenceType": ["branch"],
    "referenceName": ["main"]
  }
}
- Under Target, select AWS service → CodeBuild and choose the project you created above
- When prompted, allow EventBridge to create a new IAM role for the target automatically
- Save the rule
5. Test your new action
Now that you have a shiny new action, it’s time to test it out! Since this change is setup to only run on merges to your default branch, you’ll need to create and merge this change into your main branch. Once you do that, you’ll see a new pipeline job has been triggered to run the dbt job you assigned in the variables section.
Additionally, you’ll see the job in the run history of dbt. It should be fairly easy to spot because it will say it was triggered by the API, and the INFO section will have the branch you used for this guide.
- GitHub
- GitLab
- Azure DevOps
- Bitbucket
- CodeCommit
 dbt run on merge job in GitHub
 dbt job showing it was triggered by GitHub
 dbt run on merge job in GitLab
 dbt job showing it was triggered by GitLab
 dbt run on merge job in ADO
 ADO-triggered job in dbt
 dbt run on merge job in Bitbucket
 dbt job showing it was triggered by Bitbucket
To test the pipeline, merge a pull request (or push a commit directly) to your main branch. You should see a new build start in your CodeBuild project within a few seconds. You can monitor the run in the CodeBuild console under Build history.
 Find new build under build history of CodeBuild console
In dbt, the job will appear in your run history with a cause of "CodeCommit Merge CI Job".
 Check dbt run history for CodeCommit build triggered
Run a dbt job on pull request
If your git provider is not one with a native integration with dbt, but you still want to take advantage of CI builds, you've come to the right spot! With just a bit of work it's possible to setup a job that will run a dbt job when a pull request (PR) is created.
If your git provider has a native integration with dbt, you can take advantage of the setup instructions. This section is only for those projects that connect to their git repository using an SSH key.
The setup for this pipeline will use the same steps as the prior page. Before moving on, make sure you follow steps 1-5 from the previous page.
1. Create a pipeline job that runs when PRs are created
- Bitbucket
- CodeCommit
For this job, we’ll set it up using the bitbucket-pipelines.yml file as in the prior step. The YAML file will look pretty similar to our earlier job, but we’ll pass in the required variables to the Python script using export statements. Update this section to match your setup based on the comments in the file.
What is this pipeline going to do?
The setup below will trigger a dbt job to run every time a PR is opened in this repository. It will also run a fresh version of the pipeline for every commit that is made on the PR until it is merged.
For example, if you open a PR, it will run the pipeline. If you then decide additional changes are needed, and commit/push to the PR branch, a new pipeline will run with the updated code.
The following variables control this job:
DBT_JOB_BRANCH: Tells the dbt job to run the code in the branch that created this PRDBT_JOB_SCHEMA_OVERRIDE: Tells the dbt job to run this into a custom target schema- The format of this will look like:
DBT_CLOUD_PR_{REPO_KEY}_{PR_NUMBER}
- The format of this will look like:
image: python:3.11.1


pipelines:
  # This job will run when pull requests are created in the repository
  pull-requests:
    '**':
      - step:
          name: 'Run dbt PR Job'
          script:
            # Check to only build if PR destination is master (or other branch).
            # Comment or remove line below if you want to run on all PR’s regardless of destination branch.
            - if [ "${BITBUCKET_PR_DESTINATION_BRANCH}" != "main" ]; then printf ‘PR Destination is not master, exiting.’; exit; fi
            - export DBT_URL="https://cloud.getdbt.com"
            - export DBT_JOB_CAUSE="Bitbucket Pipeline CI Job"
            - export DBT_JOB_BRANCH=$BITBUCKET_BRANCH
            - export DBT_JOB_SCHEMA_OVERRIDE="DBT_CLOUD_PR_"$BITBUCKET_PROJECT_KEY"_"$BITBUCKET_PR_ID
            - export DBT_ACCOUNT_ID=00000 # enter your account id here
            - export DBT_PROJECT_ID=00000 # enter your project id here
            - export DBT_PR_JOB_ID=00000 # enter your job id here
            - python python/run_and_monitor_dbt_job.py
The setup for CodeCommit follows the same steps as the prior page. Before moving on, follow steps 1–5 from the prior page to store your API key, add the Python script to your repository, and configure the merge pipeline.
Before proceeding, make sure you have also:
- Connected your dbt project to CodeCommit by following the CodeCommit integration guide
- Configured the pull request URL template for CodeCommit in your dbt project settings
- Created a CI job in dbt — do not configure it to trigger on pull requests, since this pipeline will trigger it through the API
The pull request pipeline uses a separate CodeBuild project from the merge pipeline, because it runs a different dbt job (your CI job) and requires branch and schema values that are dynamically passed at build time from the pull request event.
1. Add ci-configuration/buildspec.yml to your project
This is separate from the buildspec-merge.yml you created in the prior step. It references your CI job and leaves DBT_JOB_BRANCH and DBT_JOB_SCHEMA_OVERRIDE empty — a Lambda function will pass those values at build time.
Replace the placeholder values with your actual dbt account details:
YOUR_DBT_ACCOUNT_ID: The number afteraccounts/in your dbt job URLYOUR_DBT_PROJECT_ID: The number afterprojects/in your dbt job URLYOUR_DBT_PR_JOB_ID: The number afterjobs/in the URL of your CI jobYOUR_SSM_PARAMETER_NAME: The name of the SSM parameter you created in step 2 of the prior page (for example,DBT_API_KEY)
version: 0.2

env:
  variables:
    DBT_ACCOUNT_ID: YOUR_DBT_ACCOUNT_ID
    DBT_PROJECT_ID: YOUR_DBT_PROJECT_ID
    DBT_PR_JOB_ID: YOUR_DBT_PR_JOB_ID
    DBT_URL: https://cloud.getdbt.com
    DBT_JOB_CAUSE: 'CodeCommit Pipeline CI Job'
    DBT_JOB_BRANCH: ''
    DBT_JOB_SCHEMA_OVERRIDE: ''
  parameter-store:
    DBT_API_KEY: "YOUR_SSM_PARAMETER_NAME"

phases:
  install:
    commands:
      - apt-get update -y
      - python -m pip install --upgrade pip
      - pip install requests
  build:
    commands:
      - python -u ./python/run_and_monitor_dbt_cloud_job.py
2. Create a CodeBuild project for pull requests
Follow the AWS CodeBuild documentation to create a second project (separate from the one you created for merge). Configure the following settings:
- Source: Select AWS CodeCommit, set the reference type to Branch, and select your main branch
- Environment: Select Ubuntu as the operating system
- Buildspec: Select Use a buildspec file and enter
ci-configuration/buildspec.ymlas the path
Note the service role name shown in the Environment section. In IAM, find that role and add an inline policy granting permission to read and decrypt the SSM parameter:
{
  "Version": "2012-10-17",
  "Statement": [
    {
      "Effect": "Allow",
      "Action": ["ssm:GetParameter", "ssm:GetParameters"],
      "Resource": "arn:aws:ssm:YOUR_AWS_REGION:YOUR_AWS_ACCOUNT_ID:parameter/YOUR_SSM_PARAMETER_NAME"
    },
    {
      "Effect": "Allow",
      "Action": ["kms:Decrypt"],
      "Resource": "arn:aws:kms:YOUR_AWS_REGION:YOUR_AWS_ACCOUNT_ID:key/alias/aws/ssm"
    }
  ]
}
3. Create a Lambda trigger function
The Lambda function receives the pull request event from EventBridge, extracts the PR branch and PR ID, then starts CodeBuild with those values as environment variable overrides. This is what ensures the dbt CI job runs against your PR branch with a PR-specific schema.
- In the AWS console, go to Lambda → Create function
- Select Author from scratch, name the function (for example,
dbt-ci-trigger), and choose Python 3.12 as the runtime - Click Create function, then replace the default code with the following:
import boto3

def lambda_handler(event, context):
    cb = boto3.client('codebuild')

    source_ref = event['detail']['sourceReference']
    pr_id = event['detail']['pullRequestId']
    repo_name = event['detail']['repositoryNames'][0]

    branch = source_ref.replace('refs/heads/', '')
    schema_override = f'DBT_CLOUD_PR_{repo_name}_{pr_id}'.replace('-', '_').upper()

    print(f'Triggering CodeBuild for branch: {branch}, schema_override: {schema_override}')

    cb.start_build(
        projectName='YOUR_CODEBUILD_PROJECT_NAME',
        environmentVariablesOverride=[
            {'name': 'DBT_JOB_BRANCH', 'value': branch, 'type': 'PLAINTEXT'},
            {'name': 'DBT_JOB_SCHEMA_OVERRIDE', 'value': schema_override, 'type': 'PLAINTEXT'}
        ]
    )
Replace YOUR_CODEBUILD_PROJECT_NAME with the name of the CodeBuild project you created above, then click Deploy.
- Go to Configuration → Permissions → click the execution role name to open IAM
- Add an inline policy granting permission to start the CodeBuild project:
{
  "Version": "2012-10-17",
  "Statement": [
    {
      "Effect": "Allow",
      "Action": "codebuild:StartBuild",
      "Resource": "arn:aws:codebuild:YOUR_AWS_REGION:YOUR_AWS_ACCOUNT_ID:project/YOUR_CODEBUILD_PROJECT_NAME"
    }
  ]
}
4. Create an EventBridge rule
-
In the AWS console, go to Amazon EventBridge → Rules → Create rule
-
Give the rule a name (for example,
dbt-ci-on-pr-created) -
Under Event pattern, select Custom pattern and paste the following JSON. Substitute
YOUR_AWS_ACCOUNT_ID,YOUR_AWS_REGION, andYOUR_CODECOMMIT_REPO_NAMEwith your values:{
"source": ["aws.codecommit"],
"account": ["YOUR_AWS_ACCOUNT_ID"],
"region": ["YOUR_AWS_REGION"],
"detail-type": ["CodeCommit Pull Request State Change"],
"resources": ["arn:aws:codecommit:YOUR_AWS_REGION:YOUR_AWS_ACCOUNT_ID:YOUR_CODECOMMIT_REPO_NAME"],
"detail": {
"event": ["pullRequestCreated"],
"repositoryNames": ["YOUR_CODECOMMIT_REPO_NAME"]
}
} -
Under Target, select AWS service → Lambda function, and choose the Lambda function you created above
-
Save the rule
2. Confirm the pipeline runs
Now that you have a new pipeline, it's time to run it and make sure it works. Since this only triggers when a PR is created, you'll need to create a new PR on a branch that contains the code above. Once you do that, you should see a pipeline that looks like this:
- Bitbucket
- CodeCommit
Bitbucket pipeline:
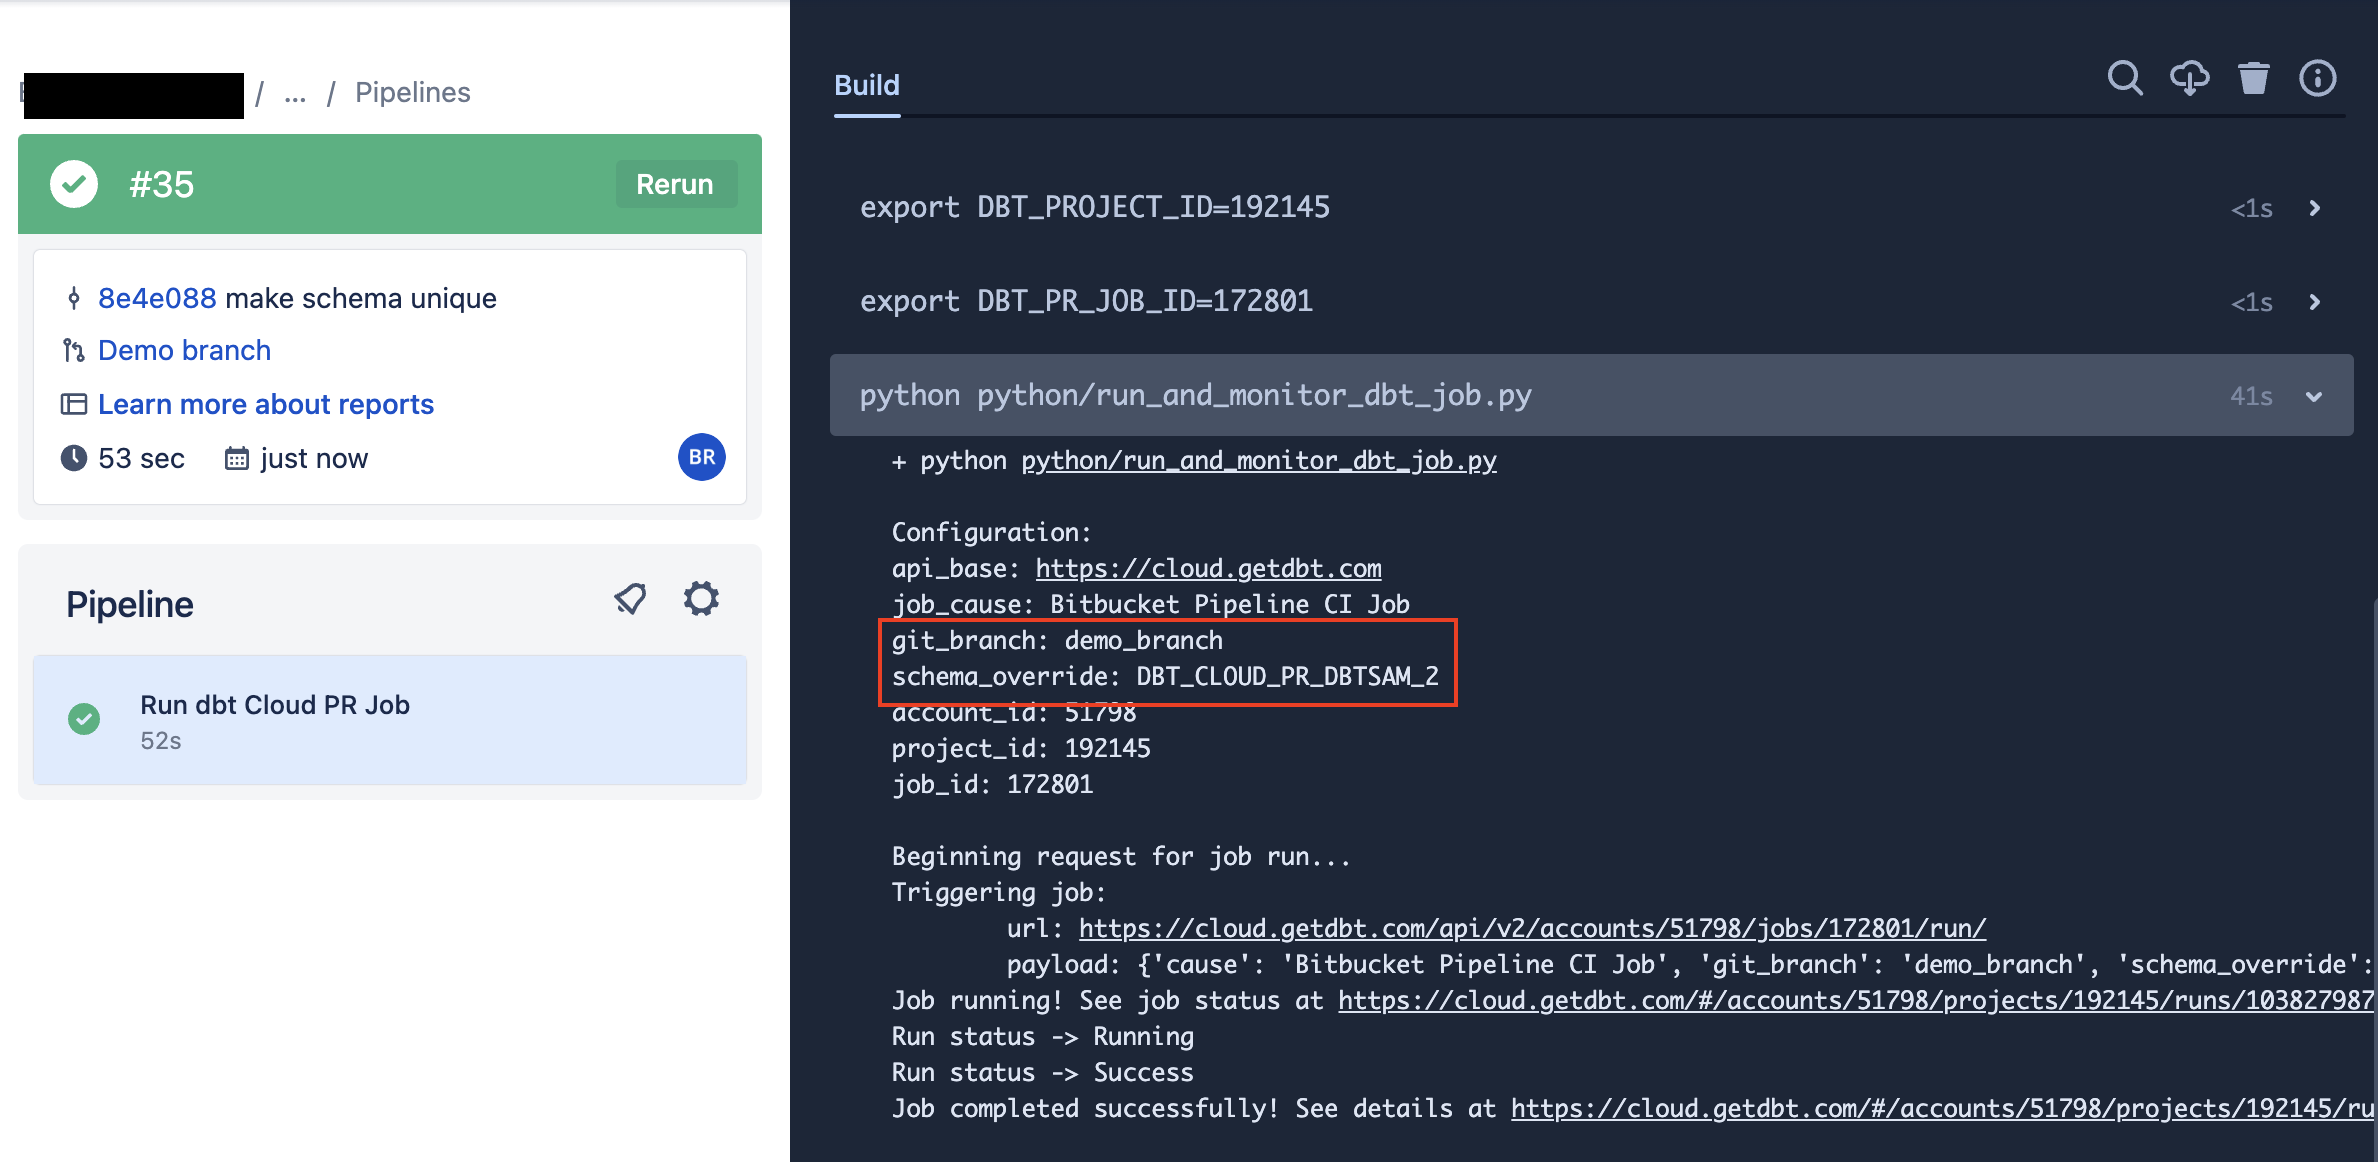
dbt job:
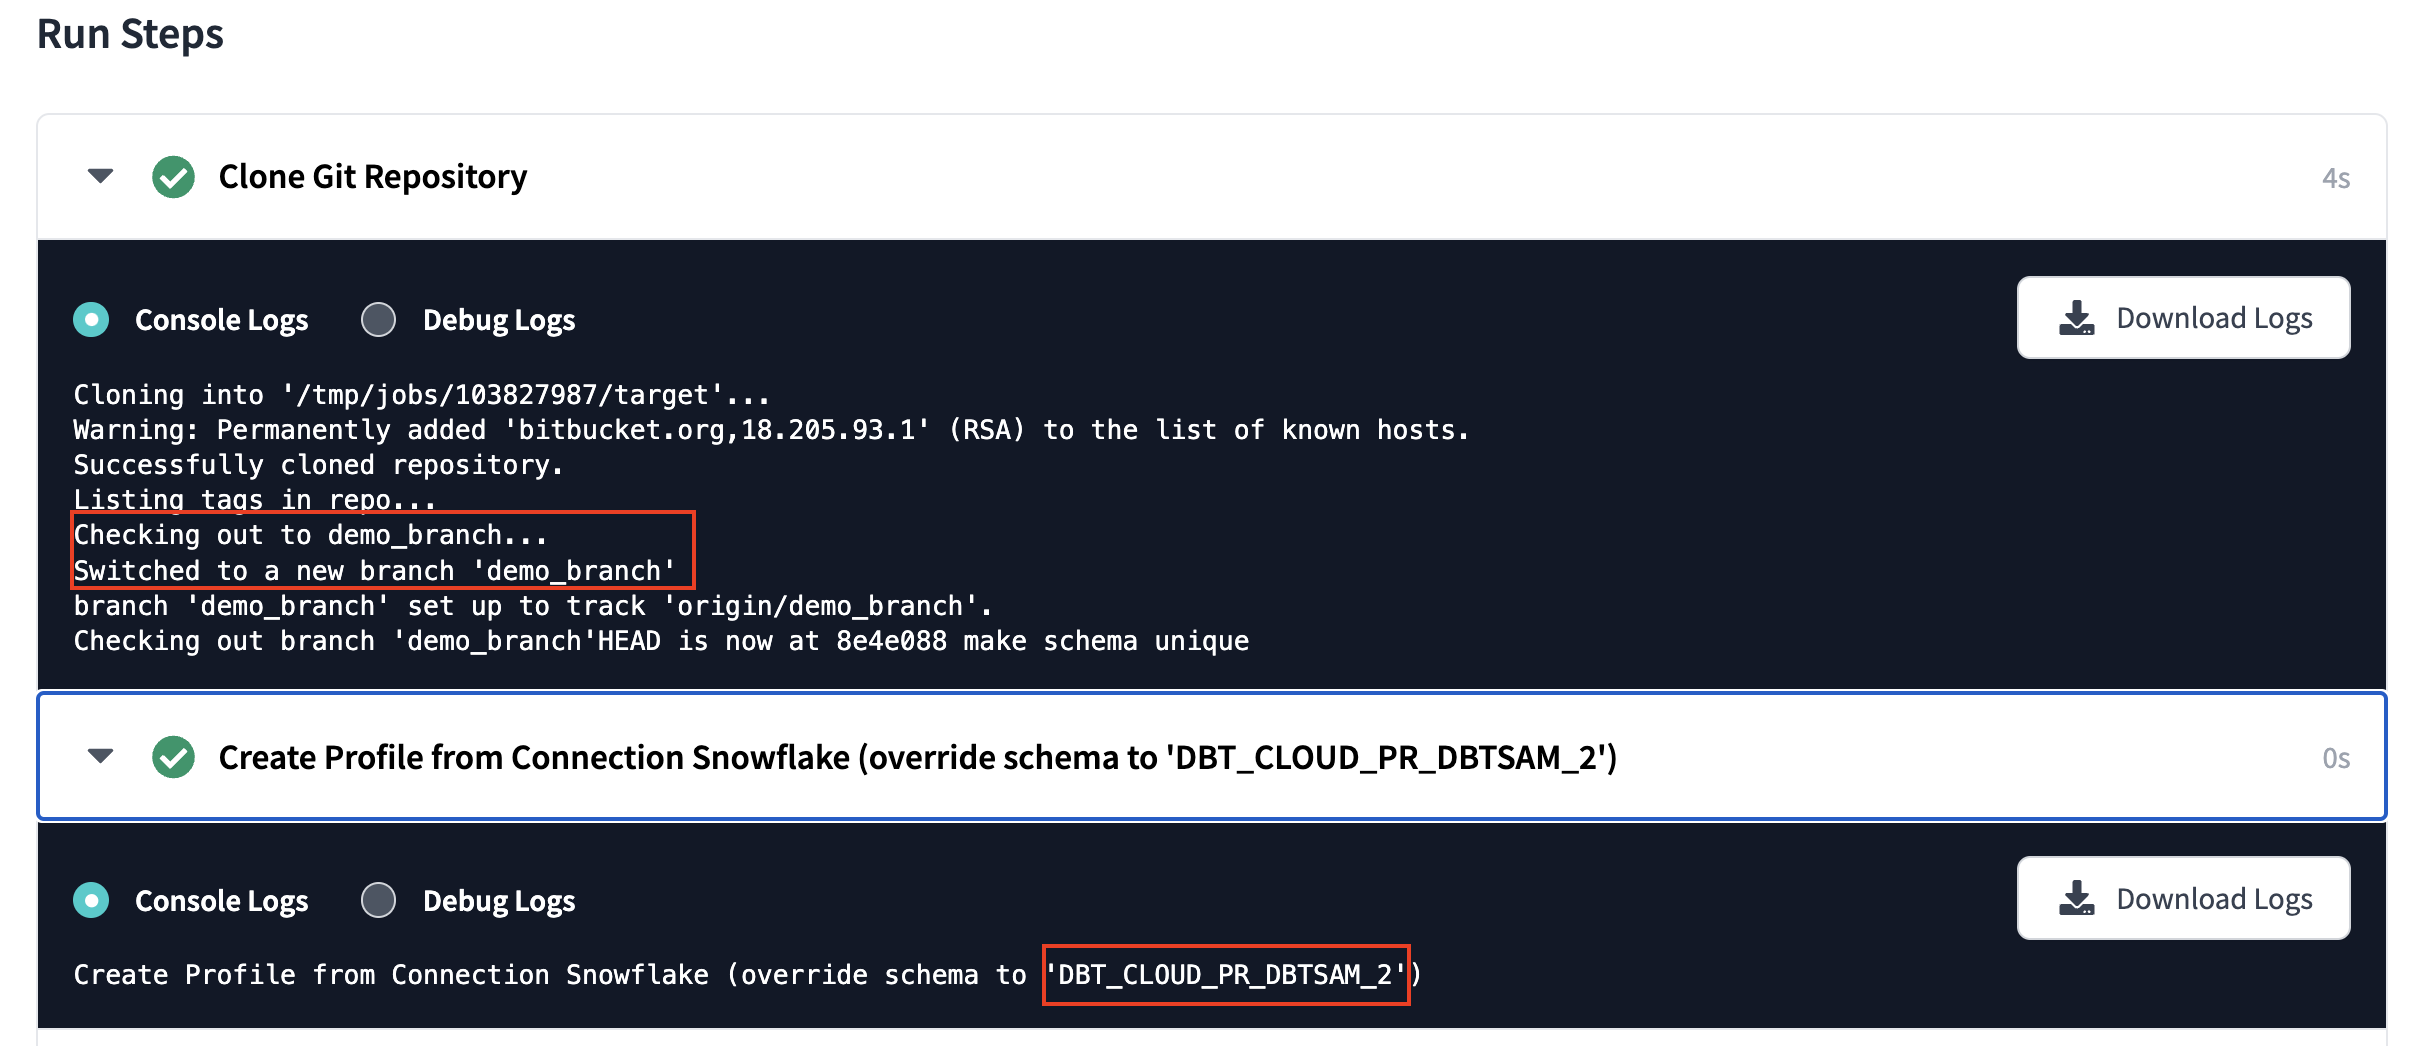
To test the pipeline, create a new pull request in your CodeCommit repository on a branch that contains the files you added above. Once you open the pull request, the EventBridge rule fires, Lambda extracts the branch and PR ID, and CodeBuild starts automatically.
CodeBuild run:
CodeBuild run triggered by a CodeCommit pull requestIn dbt, the job run appears in your run history. It will show the PR branch and a schema override in the format DBT_CLOUD_PR_{REPO_NAME}_{PR_NUMBER}:
dbt job showing it was triggered by a CodeCommit pull request3. Handle those extra schemas in your database
As noted above, when the PR job runs it will create a new schema based on the PR. To avoid having your database overwhelmed with PR schemas, consider adding a "cleanup" job to your dbt account. This job can run on a scheduled basis to cleanup any PR schemas that haven't been updated/used recently.
Add this as a macro to your project. It takes 2 arguments that lets you control which schema get dropped:
age_in_days: The number of days since the schema was last altered before it should be dropped (default 10 days)database_to_clean: The name of the database to remove schemas from
{#
    This macro finds PR schemas older than a set date and drops them
    The macro defaults to 10 days old, but can be configured with the input argument age_in_days
    Sample usage with different date:
        dbt run-operation pr_schema_cleanup --args "{'database_to_clean': 'analytics','age_in_days':'15'}"
#}
{% macro pr_schema_cleanup(database_to_clean, age_in_days=10) %}

    {% set find_old_schemas %}
        select
            'drop schema {{ database_to_clean }}.'||schema_name||';'
        from {{ database_to_clean }}.information_schema.schemata
        where
            catalog_name = '{{ database_to_clean | upper }}'
            and schema_name ilike 'DBT_CLOUD_PR%'
            and last_altered <= (current_date() - interval '{{ age_in_days }} days')
    {% endset %}

    {% if execute %}

        {{ log('Schema drop statements:' ,True) }}

        {% set schema_drop_list = run_query(find_old_schemas).columns[0].values() %}

        {% for schema_to_drop in schema_drop_list %}
            {% do run_query(schema_to_drop) %}
            {{ log(schema_to_drop ,True) }}
        {% endfor %}

    {% endif %}

{% endmacro %}
This macro goes into a dbt job that is run on a schedule. The command will look like this (text below for copy/paste):

dbt run-operation pr_schema_cleanup --args "{ 'database_to_clean': 'development','age_in_days':15}"
Consider risk of conflicts when using multiple orchestration tools
Running dbt jobs through a CI/CD pipeline is a form of job orchestration. If you also run jobs using dbt’s built in scheduler, you now have 2 orchestration tools running jobs. The risk with this is that you could run into conflicts - you can imagine a case where you are triggering a pipeline on certain actions and running scheduled jobs in dbt, you would probably run into job clashes. The more tools you have, the more you have to make sure everything talks to each other.
That being said, if the only reason you want to use pipelines is for adding a lint check or run on merge, you might decide the pros outweigh the cons, and as such you want to go with a hybrid approach. Just keep in mind that if two processes try and run the same job at the same time, dbt will queue the jobs and run one after the other. It’s a balancing act but can be accomplished with diligence to ensure you’re orchestrating jobs in a manner that does not conflict.
Was this page helpful?
This site is protected by reCAPTCHA and the Google Privacy Policy and Terms of Service apply.