Audit_helper in dbt: Bringing data auditing to a higher level
Auditing tables is a major part of analytics engineers’ daily tasks, especially when refactoring tables that were built using SQL Stored Procedures or Alteryx Workflows. In this article, we present how the audit_helper package can (as the name suggests) help the table auditing process to make sure a refactored model provides (pretty much) the same output as the original one, based on our experience using this package to support our clients at Indicium Tech®.
Introduction
It is common for analytics engineers (AE) and data analysts to have to refactor (or translate) SQLServer® Stored Procedures, Alteryx Workflows® or other modeling tools into dbt models, or even refactor a dbt model to update its data sources. Also, many times, some business rules are applied in different models (and tools), and we as AEs may need to make sure that outputs match. However, ensuring that the values in the original table and in the refactored one match used to be a hard task that involved a lot of manual coding and some generalistic tests (such as counting the amount of rows or summing all values in a column).
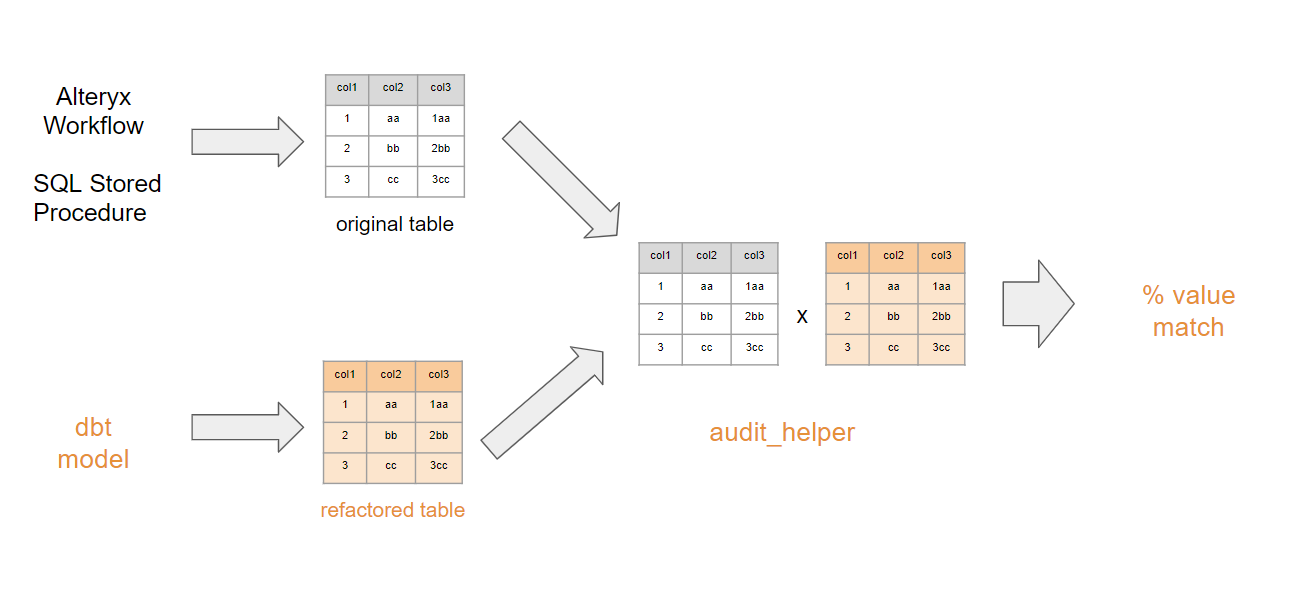
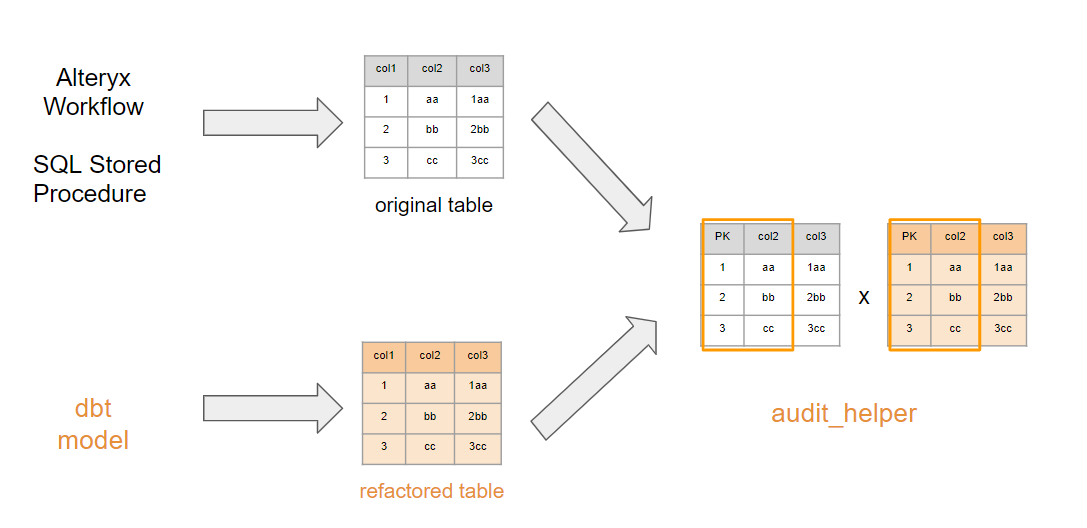
Not only is that approach time-consuming, but it is also prone to naive assumptions that values match based on aggregate measures (such as counts or sums). To provide a better, more accurate approach to auditing, dbt Labs has created the audit_helper package. audit_helper is a package for dbt whose main purpose is to audit data by comparing two tables (the original one versus a refactored model). It uses a simple and intuitive query structure that enables quickly comparing tables based on the column values, row amount, and even column types (for example, to make sure that a given column is numeric in both your table and the original one). Figure 1 graphically displays the workflow and where audit_helper is positioned in the refactoring process.
Now that it is clear where the audit_helper package is positioned in the refactoring process, it is important to highlight the benefits of using audit_helper (and ultimately, of auditing refactored models). Among the benefits, we can mention:
- Quality assurance: Assert that a refactored model is reaching the same output as the original model that is being refactored.
- Easy and intuitive code: Because audit_helper relies on dbt macros, it was designed to be an intuitive tool that runs on simple SQL queries.
- Clear output: Audit_helper provides clear output showing how much of your refactored table matches the original one.
- Visibility to a project: Audit_helper gives visibility to a refactoring process by showing how your code is delivering the same results in both row-wise and column-wise comparisons.
- Flexibility to compare rows and columns: It is simple to quickly compare the results in rows or columns through pre-made templates that just require you to place your columns’ names and the original model’s ones.
Next, we provide instructions on how to install audit_helper in your dbt project, how to run row comparison (with the compare_queries macro), column comparison (with the compare_column_values) and provide some tips for audit_helper usage.
Installation instructions
Let’s start by setting the stage for the audit_helper package to work in our project. It's important to note that the audit_helper package must run on dbt versions above or equal to 1.2.0 and below 2.0.0. Next, the two steps below will guide you on how to install and get audit_helper up and running.
-
First, add a
packages.ymlfile to your dbt project, if you don't have one already. Inside thepackages.ymlfile, add theaudit_helperpackage by copying and pasting the code below. Note that this file should be at the same level as yourdbt_project.ymlfile.packages:
- package: dbt-labs/audit_helper
version: 0.7.0 -
Run
dbt depsin the command line to install the package(s). Packages get installed in thedbt_packagesdirectory — by default this directory is ignored by git, to avoid duplicating the source code for the package.For more information on using packages in your dbt project, check out the dbt Documentation.
Now that audit_helper is installed, let’s talk about its two main macros:
compare_queries— to audit rowscompare_column_values— to audit values in columns.
Audit rows (compare_queries)
According to the audit_helper package documentation, this macro comes in handy when:
- You need to filter out records from one of the relations,
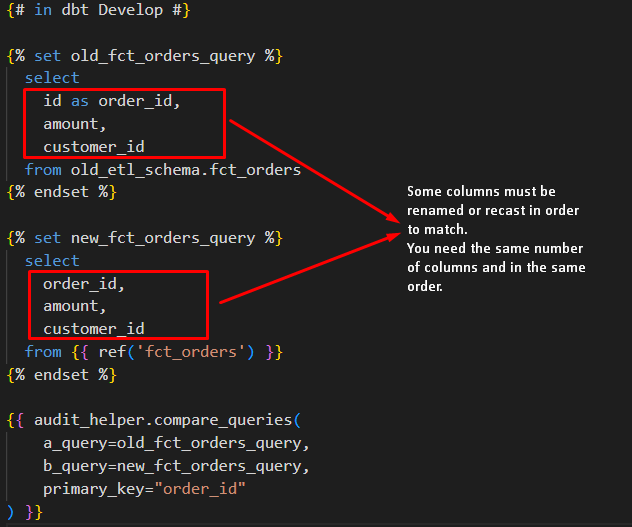
- Some columns must be renamed or recast in order to match,
- But you only want to compare a few columns, since it’s simpler to write the columns you want to compare rather than the columns you want to exclude.
How it works
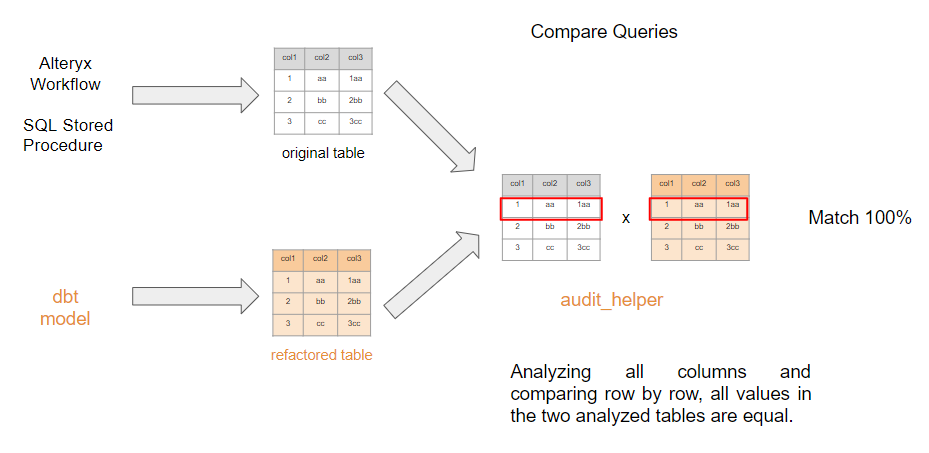
When you run the dbt audit model, it will compare all columns, row by row. To count for the match, every column in a row from one source must exactly match a row from another source, as illustrated in the example in Figure 2 below:
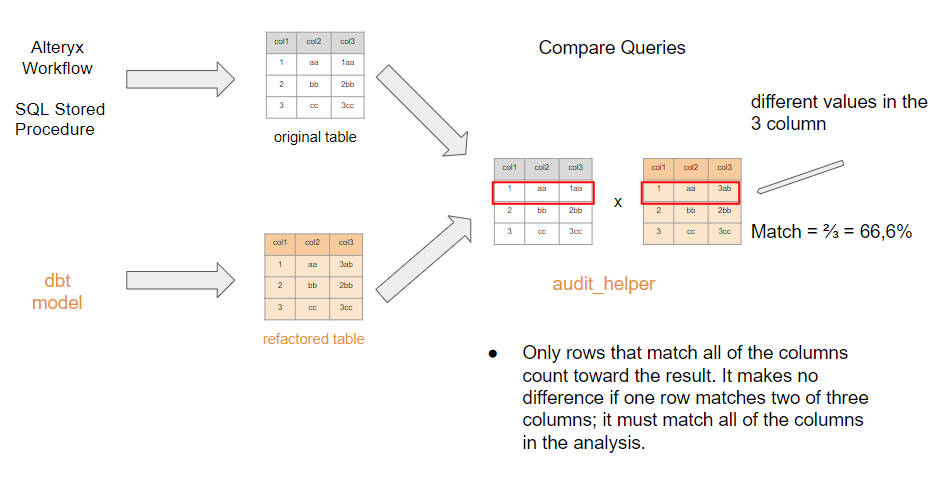
As shown in the example, the model is compared line by line, and in this case, all lines in both models are equivalent and the result should be 100%. Figure 3 below depicts a row in which two of the three columns are equal and only the last column of row 1 has divergent values. In this case, despite the fact that most of row 1 is identical, that row will not be counted towards the final result. In this example, only row 2 and row 3 are valid, yielding a 66.6% match in the total of analyzed rows.
As previously stated, for the match to be valid, all column values of a model’s row must be equal to the other model. This is why we sometimes need to exclude columns from the comparison (such as date columns, which can have a time zone difference from the original model to the refactored — we will discuss tips like these below).
The code for the compare_queries macro: Step-by-step
- Create a new
.sqlmodel in the folder of your choice - Copy and paste the following example below in the model created:
{# in dbt Develop #}


{% set old_fct_orders_query %}
select
    id as order_id,
    amount,
    customer_id
from old_etl_schema.fct_orders
{% endset %}


{% set new_fct_orders_query %}
select
    order_id,
    amount,
    customer_id
from {{ ref('fct_orders') }}
{% endset %}


{{ audit_helper.compare_queries(
    a_query=old_fct_orders_query,
    b_query=new_fct_orders_query,
    primary_key="order_id"
) }}
Let’s understand the arguments used in the compare_queries macro:
primary_key(optional): The macro accepts a primary key argument to join the results of the queries together, but if the compared queries lack one, you can create one or simply remove that line of code. Because this type of comparison evaluates all values in a row, it will not show any difference if a primary key is not specified.summarize(optional): This argument allows you to switch between a summary or detailed (verbose) view of the compared data. This argument accepts true or false values (its default is set to be true).
-
Replace the sources from the example with your own
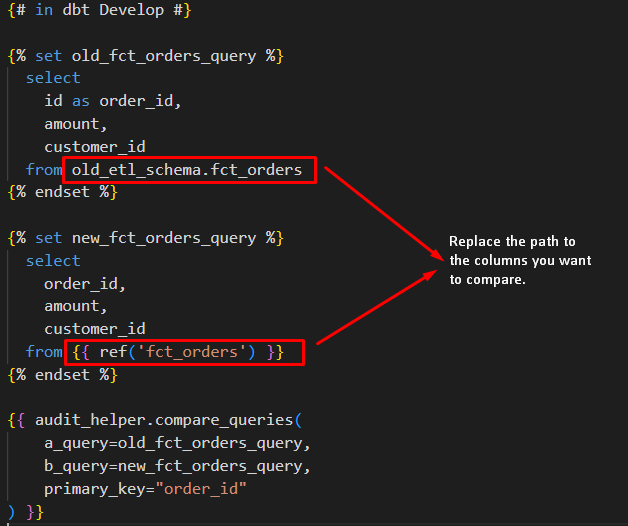
As illustrated in Figure 4, using the
refstatements allows you to easily refer to your development model, and using the full data warehouse path makes it easy to refer to the original table (which will be useful when you are refactoring a SQL Server Stored Procedure or Alteryx Workflow that is already being materialized in the data warehouse). -
Specify your comparison columns
Delete the example columns and replace them with the columns of your models, exactly as they are written in each model. You should rename/alias the columns to match, as well as ensuring they are in the same order within the
selectclauses.When there are a lot of columns in the data set, start with a few of them (say 5 columns) and run; when you get a good match, add more columns and run again. You can also easily comment the columns that you don’t want to compare!
Commonly, when comparing many columns at once and getting a bad result, it is difficult to know which column the values are different from. However, as seen above, it is enough that the values are different in one of the columns to invalidate the line as a whole. As a result, we strongly advise you to start with a few columns and gradually add more columns as you get a good match. When a new column causes a drop in the match, examine the column in both models.
-
Run the audit model as you would run any other dbt model using the command below:
dbt run --select <name of your audit model> -
Check the result by copying and pasting the code below into your development environment:
select * from <name of your audit model>

-- or select * from {{ ref('your_audit_model') }} if you're in the dbt Cloud IDE
The output will be the similar to the one shown in Figure 6 below:
The output is presented in table format, with each column explained below:
-
IN_A: Data present in model A
-
IN_B: Data present in model B
-
COUNT: Count of number of rows
-
PERCENT_OF_TOTAL: Percentage of total for all rows
In the first row we can see
TRUEin the columnIN_AandTRUEin the columnIN_B, which means that in both models, there are 1,966,215 rows with all columns matching values, accounting for 97.65% of the total. The second row shows 20,543 lines from model A that do not directly match with any row in model B, and the third row states conclusively that there are 26,720 lines from model B that do not directly match with any row in model A.
To know the difference between them (in the example above, the cumulative 2.35% difference), join both of the sources using the primary key and put the same columns side by side, and use a where clause to help you find where one column is different from model A when compared with model B. This inspection can be a first step to determine the possible cause of error. We recommend analyzing one column at a time.
Audit columns (compare_column_values)
We have talked about the compare_queries macro to audit rows, and how it can give the data analyst a nice overview of general compatibility ratio, with some flexibility to select specific column groups and apply business rules directly over the final audit query.
But, despite that being a powerful tool, it does not solve all of the problems with data auditing between legacy and refactored models.
While we can surely rely on that overview to validate the final refactored model with its legacy counterpart, it can be less useful while we are in the middle of the process of rebuilding a data workflow, where we need to track down which are exactly the columns that are causing incompatibility issues and what is wrong with them.
A really useful way to check out which specific columns are driving down the match percentage between tables is the compare_column_values macro that allows us to audit column values. This macro requires a primary key column to be set, so it can be used as an anchor to compare entries between the refactored dbt model column and the legacy table column. Figure 7 illustrates how the compare_column_values macro works.
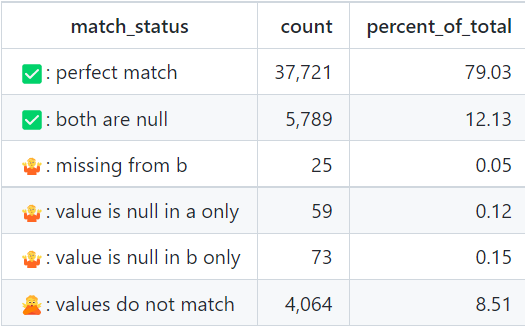
The macro’s output summarizes the status of column compatibility, breaking it down into different categories: perfect match, both are null, values do not match, value is null in A only, value is null in B only, missing from A and missing from B. This level of detailing makes it simpler for the AE or data analyst to figure out what can be causing incompatibility issues between the models. While refactoring a model, it is common that some keys used to join models are inconsistent, bringing up unwanted null values on the final model as a result, and that would cause the audit row query to fail, without giving much more detail.
With the compare_column_values macro, the report output addresses specifically that problem, pointing out to the analyst what specific data inconsistencies exist.
The code for the compare_column_values macro: Step-by-step
- Create a new
.sqlmodel in the folder of your choice in your dbt project - Copy and paste the following example below in the model created:
{# in dbt Develop #}

{% set old_etl_relation_query %}
select * from public.dim_product
where is_latest
{% endset %}


{% set new_etl_relation_query %}
select * from {{ ref('dim_product') }}
{% endset %}


{% set audit_query = audit_helper.compare_column_values(
    a_query=old_etl_relation_query,
    b_query=new_etl_relation_query,
    primary_key="product_id",
    column_to_compare="status"
) %}


{% set audit_results = run_query(audit_query) %}


{% if execute %}
    {% do audit_results.print_table() %}
{% endif %}
The arguments used by this macro are pretty much the same used by the compare_queries macro, but with the addition of the column_to_compare argument, being that responsible, as the name suggests, for declaring which column is specifically going to be tested.
The compare_columns_value macro requires the primary_key argument, which is going to be a fundamental part of correctly generating the metrics attributed to the compared column, acting as an anchor to compare every row from the refactored model with its legacy counterpart.
Also, we can see that the example code includes a table printing option enabled as default. This prints the result of the query in the terminal when the macro is run during dbt compilation step. That can be useful to quickly check out the compatibility status of a column, without leaving the code editor while refactoring SQL through dbt.
-
Replace column names and source references from the example with the respective information of the compared models.
-
Optional: Disable the
print_table()command, so the model can be materialized on your data warehouse. To disable table printing on terminal and to enable model materialization in your target data warehouse, the following can be done: replace this entire section of code, which declares the SQL model as variable and makes it printable, with the macro execution pattern.- Replace the commented code below:
- {% set audit_results = run_query(audit_query) %}
- {% if execute %}
- {% do audit_results.print_table() %}
- {% endif %}
- With the following piece of code:
{{ audit_query }} -
To get the results, you can simply run the model as you would with a regular dbt model using the following command:
dbt run --select <name of your audit model>But unlike from the
compare_queriesmacro, if you have kept the printing function enabled, you should expect a table to be printed in the command line when you run the model, as shown in Figure 8. Otherwise, it will be materialized on your data warehouse like this:The
compare_column_valuesmacro separates column auditing results in seven different labels:- Perfect match: count of rows (and relative percentage) where the column values compared between both tables are equal and not null;
- Both are null: count of rows (and relative percentage) where column values compared between both tables are null;
- Missing from A: count of rows (and relative percentage) with column values that exist in table B, but not in table A;
- Missing from B: count of rows (and relative percentage) with column values that exist in table A, but not in table B;
- Value is null in A only: count of rows (and relative percentage) with column values that are not null in table B but are null in table A;
- Value is null in B only: count of rows (and relative percentage) with column values that are not null in table A but are null in table B;
- Values do not match: count of rows (and relative percentage) where the column values compared between both tables are different and not null.
With this detailed report, it becomes easier for the AE to find out what could be going wrong with the data refactoring workflow, so the issue can be directly investigated and solved. Also, with some extra coding and orchestration, the column reports generated could be aggregated and put into a production environment, bringing data validation observability to an even higher level.
References
Below, we listed the main references we consulted while writing this article, and we recommend reading them for further information on audit_helper.
Audit_helper’s GitHub repository- dbt Labs post on data auditing "How to not lose your mind when auditing data part 1"
- dbt Labs post on data auditing "How to not lose your mind when auditing data part 2"
- dbt Labs post on how to migrate from SQL Stored Procedures to dbt models



Comments