Configure AWS PrivateLink for Redshift
This feature is available on the following dbt Enterprise tiers:
- Enterprise+
- Virtual Private
To learn more about these tiers, contact us at sales@getdbt.com.
AWS provides two different ways to create a PrivateLink VPC endpoint for a Redshift cluster that is running in another VPC:
dbt supports both types of endpoints, but there are several considerations to take into account when deciding which endpoint type to use. Redshift-managed provides a simpler setup with no additional cost, which might make it the preferred option for many, but may not be an option in all environments. Based on these criteria, determine which type is right for your system. Follow the instructions from the section below that corresponds to your chosen endpoint type.
Private connection endpoints can't connect across cloud providers (AWS, Azure, and GCP). For a private connection to work, both dbt and the server (like Redshift) must be hosted on the same cloud provider. For example, dbt hosted on AWS cannot connect to services hosted on Azure, and dbt hosted on Azure can’t connect to services hosted on GCP.
You can set up a Redshift AWS PrivateLink endpoint in two ways:
- Self-serve private endpoints: Create and manage Redshift PrivateLink endpoints directly in the dbt platform user interface. Currently in beta.
- Support-led setup: Contact dbt Support to configure your Redshift PrivateLink endpoint.
The AWS-side setup is the same for both paths. You provision your AWS resources (grant access for Redshift-managed, or create the VPC endpoint service for interface-type), then either submit the request in the UI (self-serve) or email dbt Support (support-led).
Self-serve private endpoints Beta
Self-serve private endpoints are currently in beta for Redshift on AWS, and available to all eligible customers. If you don't see Private endpoints in your account settings, use the Support-led setup instead.
With self-serve, you request a Redshift PrivateLink endpoint in dbt platform without opening a support ticket. If a request fails, you can edit the request and resubmit, or delete the endpoint and retry on your own.
dbt platform supports all three Redshift types through self-serve:
- Redshift Managed — provisioned Redshift clusters (select Redshift Managed in the UI).
- Redshift Managed Serverless — Redshift Serverless (select Redshift Managed in the UI, then choose Serverless).
- Redshift interface-type (select Redshift in the UI).
Prerequisites
- Account admin or Project creator permission sets in dbt platform. Users with an IT license can also create private endpoints.
- Completed the AWS-side setup for your endpoint type. Follow the same steps as the support-led setup — grant access for Redshift-managed, or provision the VPC endpoint service for interface-type — but stop before the Submit your request to dbt Support step and use the UI below instead.
Request a new private endpoint
-
In dbt platform, go to Account settings → Private endpoints.
-
In the Private endpoints table, review your existing endpoints. The table shows all private endpoints in your account (including non-Redshift ones) with details like Name, Connection type, URL, Connectivity status, and the number of Connections using the endpoint. You can search by Name or URL.
-
To request a new endpoint, click Request new.
-
Under Provider type, select the option that matches your endpoint type, then fill in the fields for that type:
- Redshift Managed / Serverless
- Redshift (interface-type)
Select Redshift Managed for both provisioned Redshift clusters and Redshift Serverless.
- In Step 1: Choose your deployment type, select Provisioned or Serverless. If you choose Serverless and have multiple workgroups, make sure you grant access under Granted accounts for each workgroup during the AWS-side setup. Refer to Per-workgroup authorization required.
- In Step 2: Enter your cluster details, enter your Cluster identifier and Resource owner AWS account ID.
- In Step 3: Select your AWS region, choose the AWS region where your Redshift cluster or workgroup is hosted.
- Click Submit request.
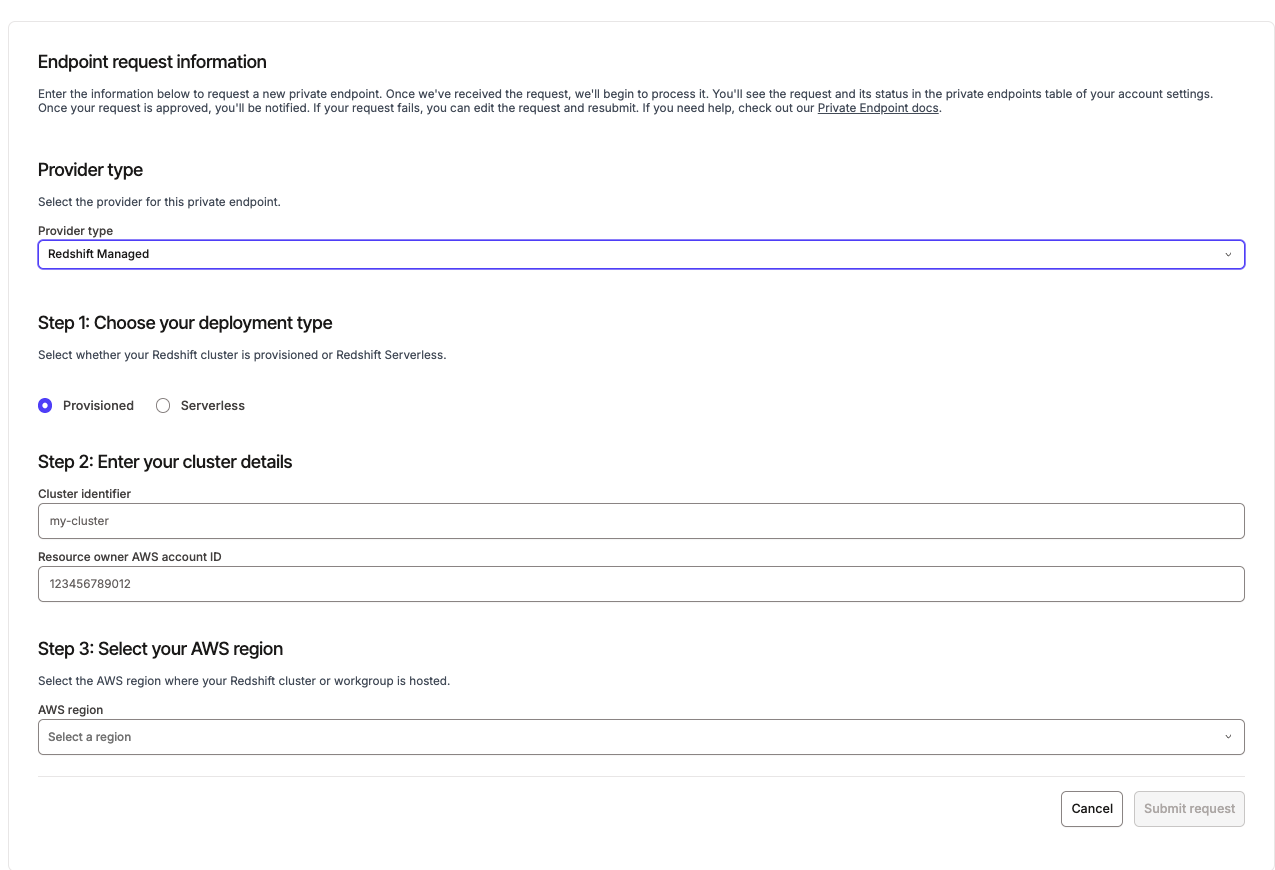 Redshift Managed endpoint request form showing deployment type, cluster details, and AWS region fields
Select Redshift for an interface-type endpoint.
- In Step 1: Enter your AWS PrivateLink service name, enter the name of the AWS VPC endpoint service you configured for your Redshift cluster (for example,
com.amazonaws.vpce.us-east-1.vpce-svc-xxxxxxxxxxxxxxxxx). - In Step 2: Name your Redshift endpoint, choose a name to identify the endpoint. This is used as the hostname prefix when it's registered.
- Click Submit request.
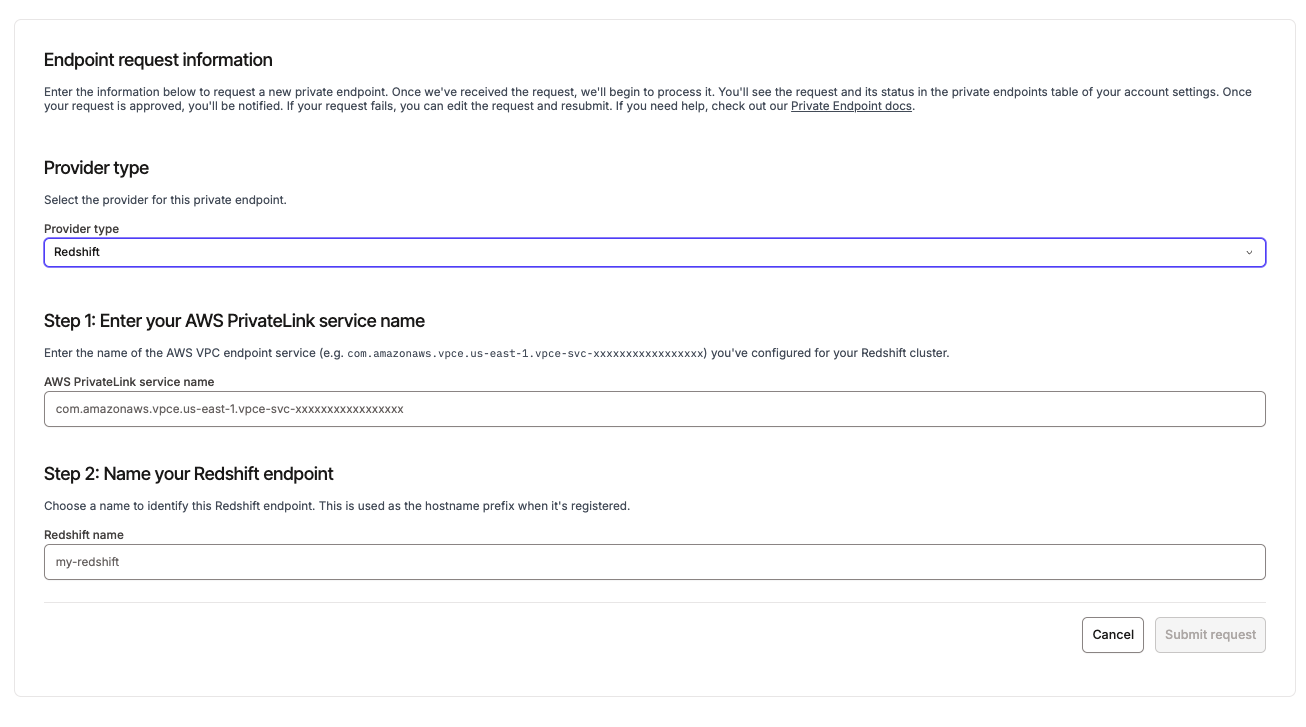 Redshift interface-type endpoint request form showing AWS PrivateLink service name and endpoint name fields
 -
After submission, you'll see the request and its status in the Private endpoints table. Once approved, you'll be notified.
-
Proceed to the Connections page and follow the steps in the Create connection in dbt section to configure PrivateLink. Once configured, the new endpoint appears under Private endpoints → Associated connections.
If the connection test fails immediately after setup, this is expected — it doesn't mean something is wrong. DNS changes can take a few minutes to propagate. Wait a few minutes, then test again before contacting support.
Troubleshooting and errors
If an endpoint request fails, dbt platform displays the error in a banner on the endpoint details page, along with details that are safe to share externally. Review the message, correct the underlying issue (for example, confirm dbt's AWS account has been granted access under the cluster's Granted accounts section), then click Retry.
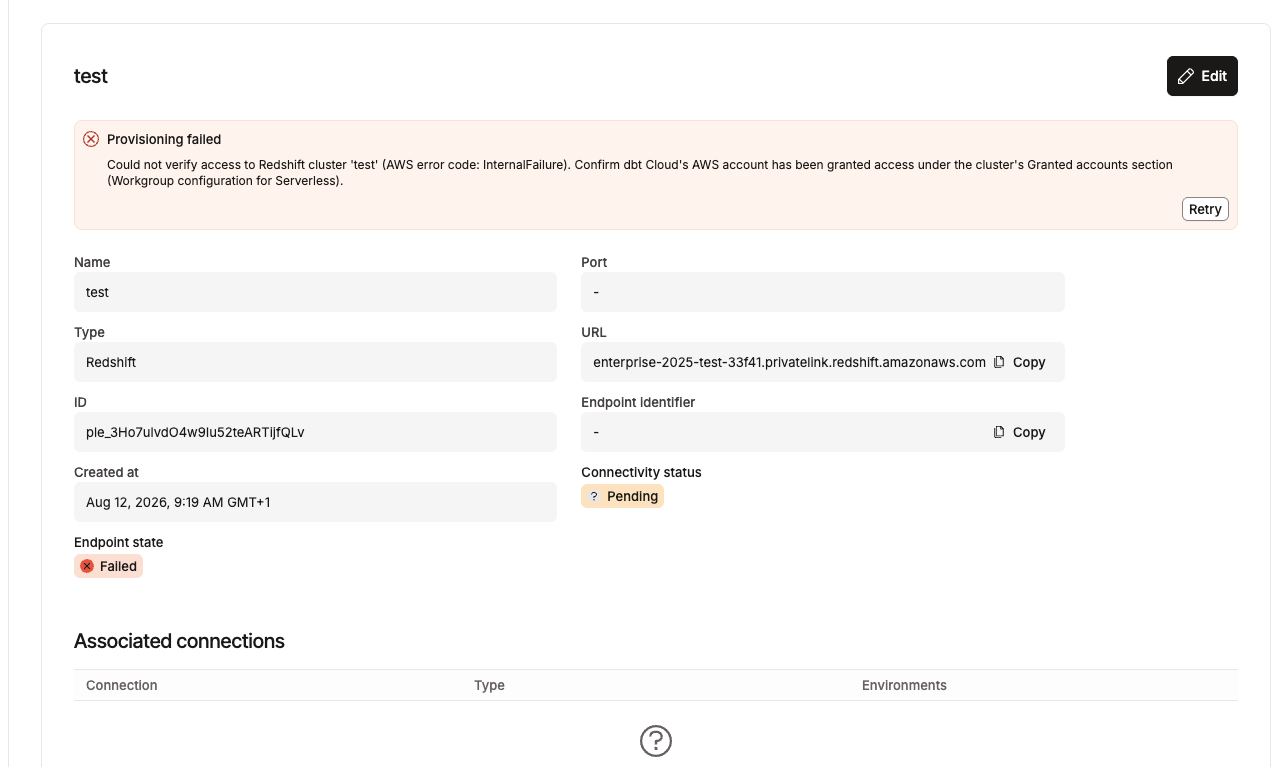 Provisioning failed banner on a Redshift endpoint details page with a Retry button
If you see a failure state without clear next steps, collect the request details (endpoint name, creation time, and status) and contact dbt Support.
Support-led setup
If Private endpoints isn't available in your account settings, configure Redshift PrivateLink by following the steps below and submitting a request to dbt Support.
Configuring Redshift-managed PrivateLink
-
Locate the Granted accounts section of the Redshift configuration
-
Standard Redshift
- On the running Redshift cluster, select the Properties tab.
 Redshift Properties tab
 -
Redshift Serverless
- On the Redshift Serverless Workgroup configuration page. If you have multiple workgroups, make sure you grant access under Granted accounts for each workgroup during the AWS-side setup. Refer to Per-workgroup authorization required.
-
-
In the Granted accounts section, click Grant access.
 Redshift granted accounts
-
Enter the AWS account ID:
346425330055- NOTE: This account ID only applies to dbt Multi-Tenant environments. For Virtual Private/Single-Tenant account IDs please contact Support. -
Choose Grant access to all VPCs —or— (optional) contact Support for the appropriate regional VPC ID to designate in the Grant access to specific VPCs field.
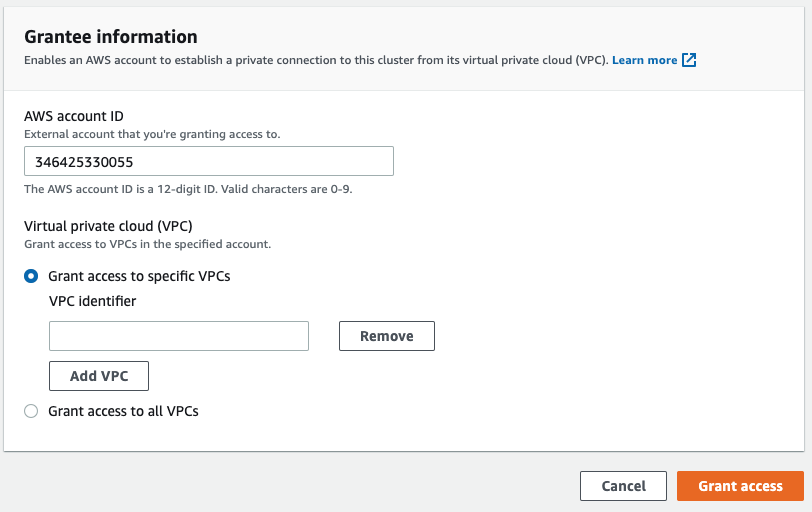 Redshift grant access
-
Add the required information to the following template, and submit your request to dbt Support:
-
Standard Redshift
-
Redshift Serverless
-
Per-workgroup authorization required
For Redshift Serverless, Granted accounts is scoped to a single workgroup. If your environment has multiple workgroups, you must grant access separately for each workgroup you want to connect to dbt.
- Authorizing one workgroup (for example, sales) doesn't extend to any other workgroup (for example, finance or product).
- Repeat steps 1 to 4 in. Configuring Redshift-managed section for each workgroup individually.
This applies whether you set up the endpoint through self-serve or support-led.
dbt Labs will work on your behalf to complete the private connection setup. Please allow 3-5 business days for this process to complete. Support will contact you when the endpoint is available.
Configuring Redshift interface-type PrivateLink
1. Provision AWS resources
Creating an Interface VPC PrivateLink connection requires creating multiple AWS resources in the account containing the Redshift cluster:
-
Security Group — If you are connecting to an existing Redshift cluster, this likely already exists, however, you may need to add or modify Security Group rules to accept traffic from the Network Load Balancer (NLB) created for this Endpoint Service.
-
Target Group — The Target Group will be attached to the NLB to tell it where to route requests. There are various target types available for NLB Target Groups, but you will use the IP address type.
-
Target Type: IP
-
Standard Redshift
- Use IP addresses from the Redshift cluster’s Network Interfaces whenever possible. While IPs listed in the Node IP addresses section will work, they are also more likely to change.
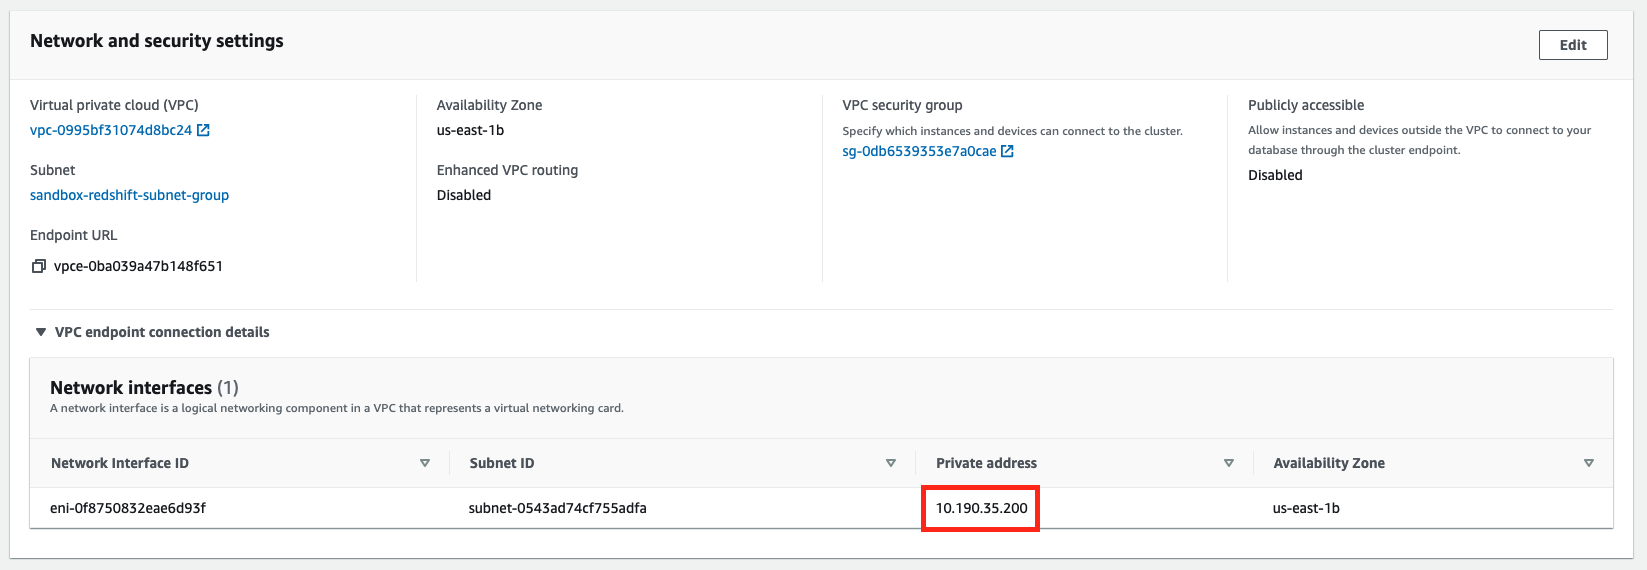 Target type: IP address
- There will likely be only one Network Interface (NI) to start, but if the cluster fails over to another availability zone (AZ), a new NI will also be created for that AZ. The NI IP from the original AZ will still work, but the new NI IP can also be added to the Target Group. If adding additional IPs, note that the NLB will also need to add the corresponding AZ. Once created, the NI(s) should stay the same (This is our observation from testing, but AWS does not officially document it).
-
Redshift Serverless
- To find the IP addresses for Redshift Serverless instance locate and copy the endpoint (only the URL listed before the port) in the Workgroup configuration section of the AWS console for the instance.
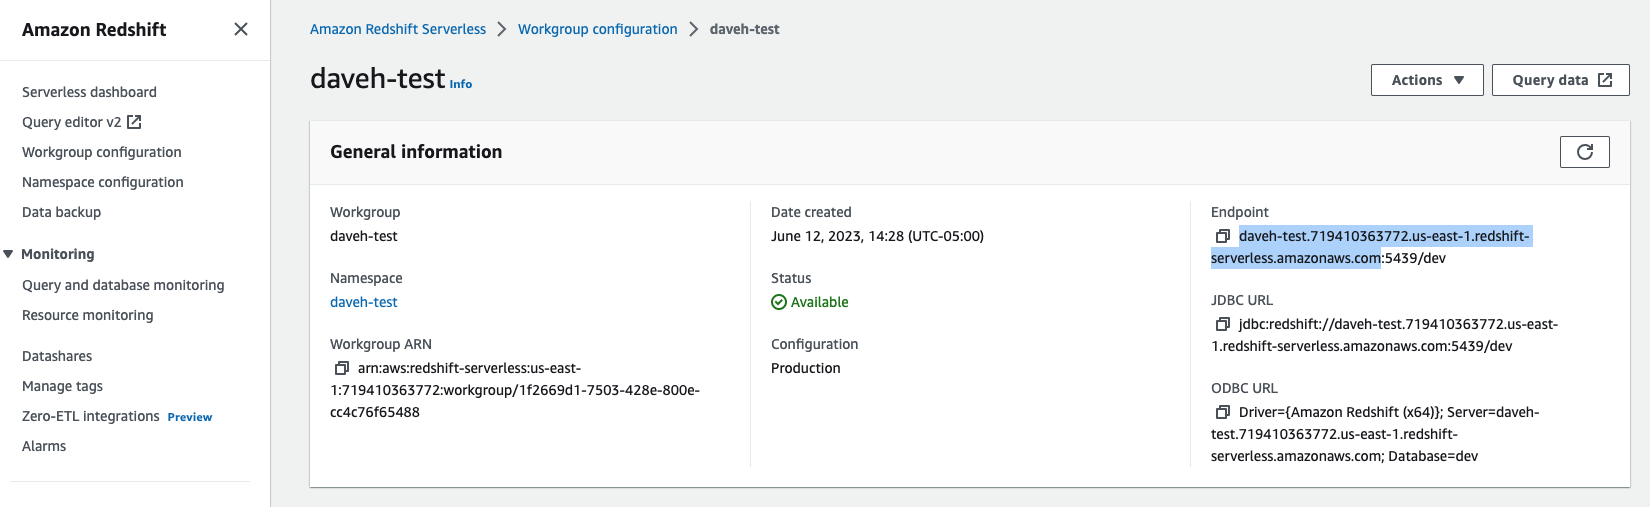 Redshift Serverless endpoint
- From a command line run the command
nslookup <endpoint>using the endpoint found in the previous step and use the associated IP(s) for the Target Group.
-
-
Target Group protocol: TCP
-
-
Network Load Balancer (NLB) — Requires creating a Listener that attaches to the newly created Target Group (port
5439is the default)- Scheme: Internal
- IP address type: IPv4
- Network mapping: Choose the VPC that the VPC Endpoint Service and NLB are being deployed in, and choose subnets from at least two Availability Zones.
- Security Groups: The Network Load Balancer (NLB) associated with the VPC endpoint service must either not have an associated security group, or the security group must have a rule that allows requests from the appropriate dbt private CIDR(s). Note that this is different than the static public IPs listed on the dbt Access, Regions, & IP addresses page. dbt Support can provide the correct private CIDR(s) upon request. If necessary, until you can refine the rule to the smaller CIDR provided by dbt, allow connectivity by temporarily adding an allow rule of
10.0.0.0/8. - Listeners: Create one listener per target group that maps the appropriate incoming port to the corresponding target group (details).
-
VPC Endpoint Service — Attach to the newly created NLB.
- Acceptance required (optional) — Requires you to accept our connection request after dbt creates the endpoint.
We highly recommend cross-zone load balancing for your NLB or Target Group; some connections may require it. Cross-zone load balancing may also improve routing distribution and connection resiliency. Note that cross-zone connectivity may incur additional data transfer charges, though this should be minimal for requests from dbt.
2. Grant dbt AWS account access to the VPC endpoint service
On the provisioned VPC endpoint service, click the Allow principals tab. Click Allow principals to grant access. Enter the ARN of the root user in the appropriate production AWS account and save your changes.
- Principal:
arn:aws:iam::346425330055:role/MTPL_Admin
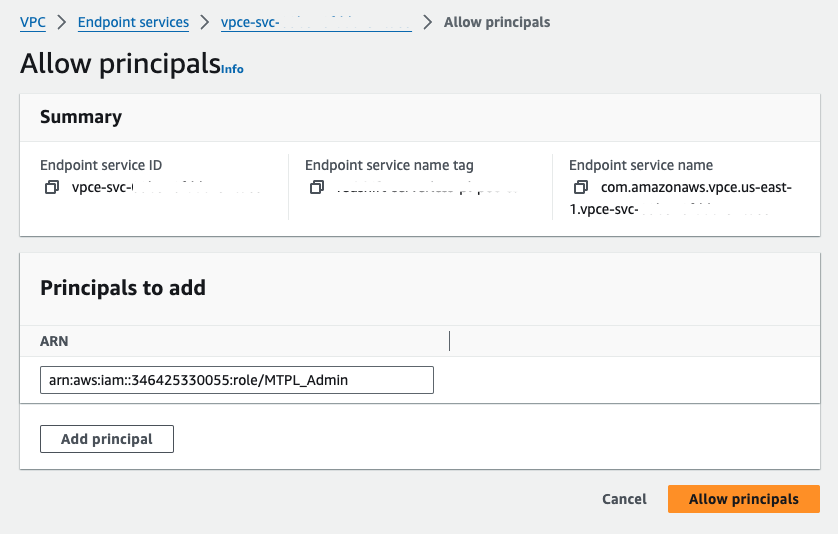 Enter ARN
3. Obtain VPC endpoint service name
Once the VPC Endpoint Service is provisioned, you can find the service name in the AWS console by navigating to VPC → Endpoint Services and selecting the appropriate endpoint service. You can copy the service name field value and include it in your communication to dbt support.
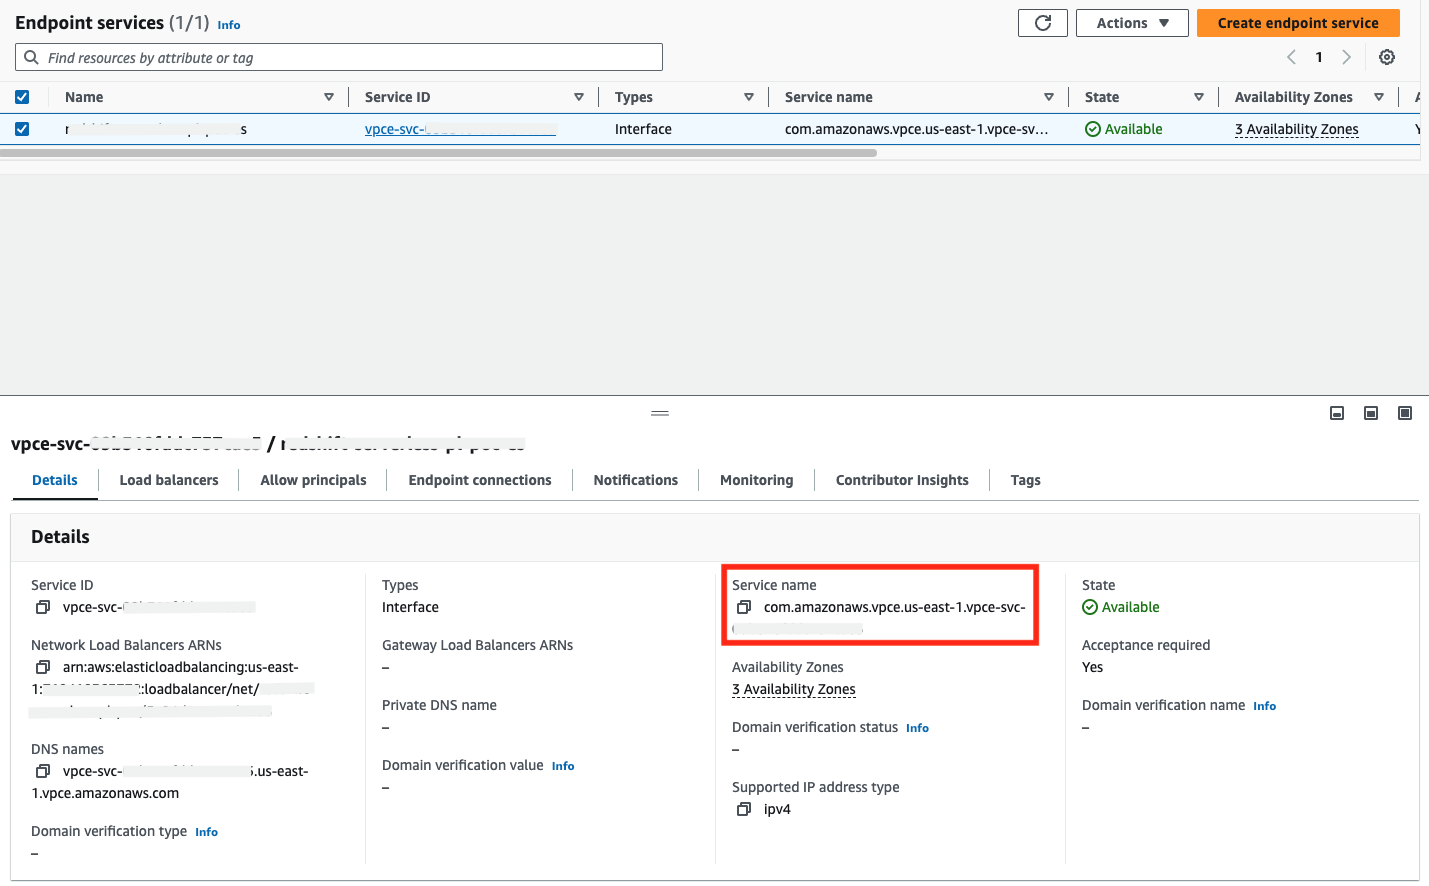 Get service name field value
4. Submit your request to dbt Support
Add the required information to the template below and submit your request to dbt Support:
dbt Labs will work on your behalf to complete the private connection setup. Please allow 3-5 business days for this process to complete. Support will contact you when the endpoint is available.
Create connection in dbt
Once dbt Support completes the configuration, you can start creating new connections using PrivateLink.
- Navigate to Account Settings → Projects → Create new project.
- Under the Configure your development environment step section, select Add new connection.
- You'll be directed to the Add new connection page, select Redshift.
- Under the Settings section, select PrivateLink Endpoint.
- Select the private endpoint from the dropdown (this automatically populates the hostname/account field).
- Configure the remaining data platform details.
- Test your connection and save it.
Troubleshooting
If the PrivateLink endpoint has been provisioned and configured in dbt but connectivity is still failing, check the following in your networking setup to ensure requests and responses can be successfully routed between dbt and the backing service.
Configuration
Start with the configuration:
Monitoring
To help isolate connection issues over a PrivateLink connection from dbt, there are a few monitoring sources that can be used to verify request activity. Requests must first be sent to the endpoint to see anything in the monitoring. Contact dbt Support to understand when connection testing occurred or request new connection attempts. Use these times to correlate with activity in the following monitoring sources.
Was this page helpful?
This site is protected by reCAPTCHA and the Google Privacy Policy and Terms of Service apply.