# Connect with Git clone
dbt platform
In dbt, you can import a git repository from any valid git URL that points to a dbt project. There are some important considerations to keep in mind when doing this.
## Git protocols
Use an SSH clone URL for your repo. dbt supports both common SSH formats:
* `git@github.com:organization/repo-name.git`
* `ssh://git@github.com/organization/repo-name.git`
Don't use `https://...` or other HTTP URLs. dbt clones repos over SSH and can't clone repos that use the HTTP protocol.
### Converting SSH URLs to ssh://
Git providers often show SSH clone URLs in SCP-style format, with a colon between the host and repo path (usually found under **Code** -> **Clone** -> **SSH**).
Example of SCP-style with a colon:
```text
git@github.com:organization/repo-name.git
user@custom-host.example.com:organization/repo-name.git
```
If you prefer a `ssh://` URL instead, you can rewrite it as follows. The equivalent ssh:// format uses a slash after the host:
```text
ssh://git@github.com/organization/repo-name.git
ssh://user@custom-host.example.com/organization/repo-name.git
```
## Availability of features by Git provider
* If your git provider has a [native dbt integration](./configure-git.md), you can seamlessly set up [continuous integration (CI)](../../deploy/ci-jobs.md) jobs directly within dbt.
* For providers without native integration, you can still use the [Git clone method](./import-a-project-by-git-url.md) to import your git URL and leverage the [dbt Administrative API](../../dbt-apis/admin-api.md) to trigger a CI job to run.
The following table outlines the available integration options and their corresponding capabilities.
| **Git provider** | **Native dbt integration** | **Automated CI job** | **Git clone** | **Information** | **Supported plans** |
| -------------------------------------------------------------------------------------------------------------------------------------------------------------------------------------------------------------------------------------------------------------------------------------------------------------------------------------------- | -------------------------- | -------------------- | ------------- | ------------------------------------------------------------------------------------------------------------------------------------------------------------------------------------------------ | ----------------------- |
| [Azure DevOps](./connect-azure-devops.md)
| ✅ | ✅ | ✅ | Organizations on the Starter and Developer plans can connect to Azure DevOps using a deploy key. Note, you won’t be able to configure automated CI jobs but you can still develop. | Enterprise, Enterprise+ |
| [GitHub](./connect-github.md)
| ✅ | ✅ | ✅ | | All dbt plans |
| [GitLab](./connect-gitlab.md)
| ✅ | ✅ | ✅ | | All dbt plans |
| All other git providers using [Git clone](./import-a-project-by-git-url.md) ([BitBucket](./import-a-project-by-git-url.md#bitbucket), [AWS CodeCommit](./import-a-project-by-git-url.md#aws-codecommit), and others) | ❌ | ❌ | ✅ | Refer to the [Customizing CI/CD with custom pipelines](../../../guides/custom-cicd-pipelines.md?step=1) guide to set up continuous integration and continuous deployment (CI/CD). | |
## Managing deploy keys
After importing a project by Git URL, dbt will generate a Deploy Key for your repository. To find the deploy key in dbt:
1. From dbt, click on your account name in the left side menu and select **Account settings**.
2. Go to **Projects** and select a project.
3. Click the **Repository** link to the repository details page.
4. Copy the key under the **Deploy Key** section.
You must provide this Deploy Key in the Repository configuration of your Git host. Configure this Deploy Key to allow *read and write access* to the specified repositories.
**Note**: Each dbt project will generate a different deploy key when connected to a repo, even if two projects are connected to the same repo. You will need to supply both deploy keys to your Git provider.
## Troubleshooting clone errors
If dbt can't clone your repository after you connect it using a git URL, the issue is usually one of the following:
* **The URL is invalid**: Confirm the repo path is correct, the repo exists, and you are using an SSH clone URL (`git@...` or `ssh://...`). Do not use `https://...` or other HTTP URLs.
* **Your git provider is unavailable**: Check your provider's status page (for example, GitHub, GitLab, Bitbucket, Azure DevOps) and retry after service is restored.
* **SSH access isn't configured correctly**: Make sure the deploy key generated by dbt is added to your repository with the required access (including write access where applicable). If your organization restricts SSH keys, coordinate with your admins to allow deploy keys for the repository.
If you still can't connect, [contact dbt Support](mailto:support@getdbt.com) and include the repository URL you're using and the time the error occurred.
## GitHub
Use GitHub?
If you use GitHub, you can import your repo directly using [dbt's GitHub Application](./connect-github.md). Connecting your repo via the GitHub Application [enables Continuous Integration](../../deploy/continuous-integration.md).
### Locate your SSH URL
1. Navigate to your repository on GitHub.
2. Click the **Code** button.
3. Select the **SSH** tab to view the SSH clone URL.
4. Copy the URL from the **SSH** tab. SCP-style (`git@...`) and `ssh://...` URLs are both supported. If you want the `ssh://` form, refer to [Converting SSH URLs to ssh://](#converting-ssh-urls-to-ssh).
### Add a deploy key
To add a deploy key to a GitHub account, navigate to the Deploy keys tab of the settings page in your GitHub repository.
* After supplying a name for the deploy key and pasting in your deploy key (generated by dbt), be sure to check the **Allow write access** checkbox.
* After adding this key, dbt will be able to read and write files in your dbt project.
* Refer to [Adding a deploy key in GitHub](https://github.blog/2015-06-16-read-only-deploy-keys/)
[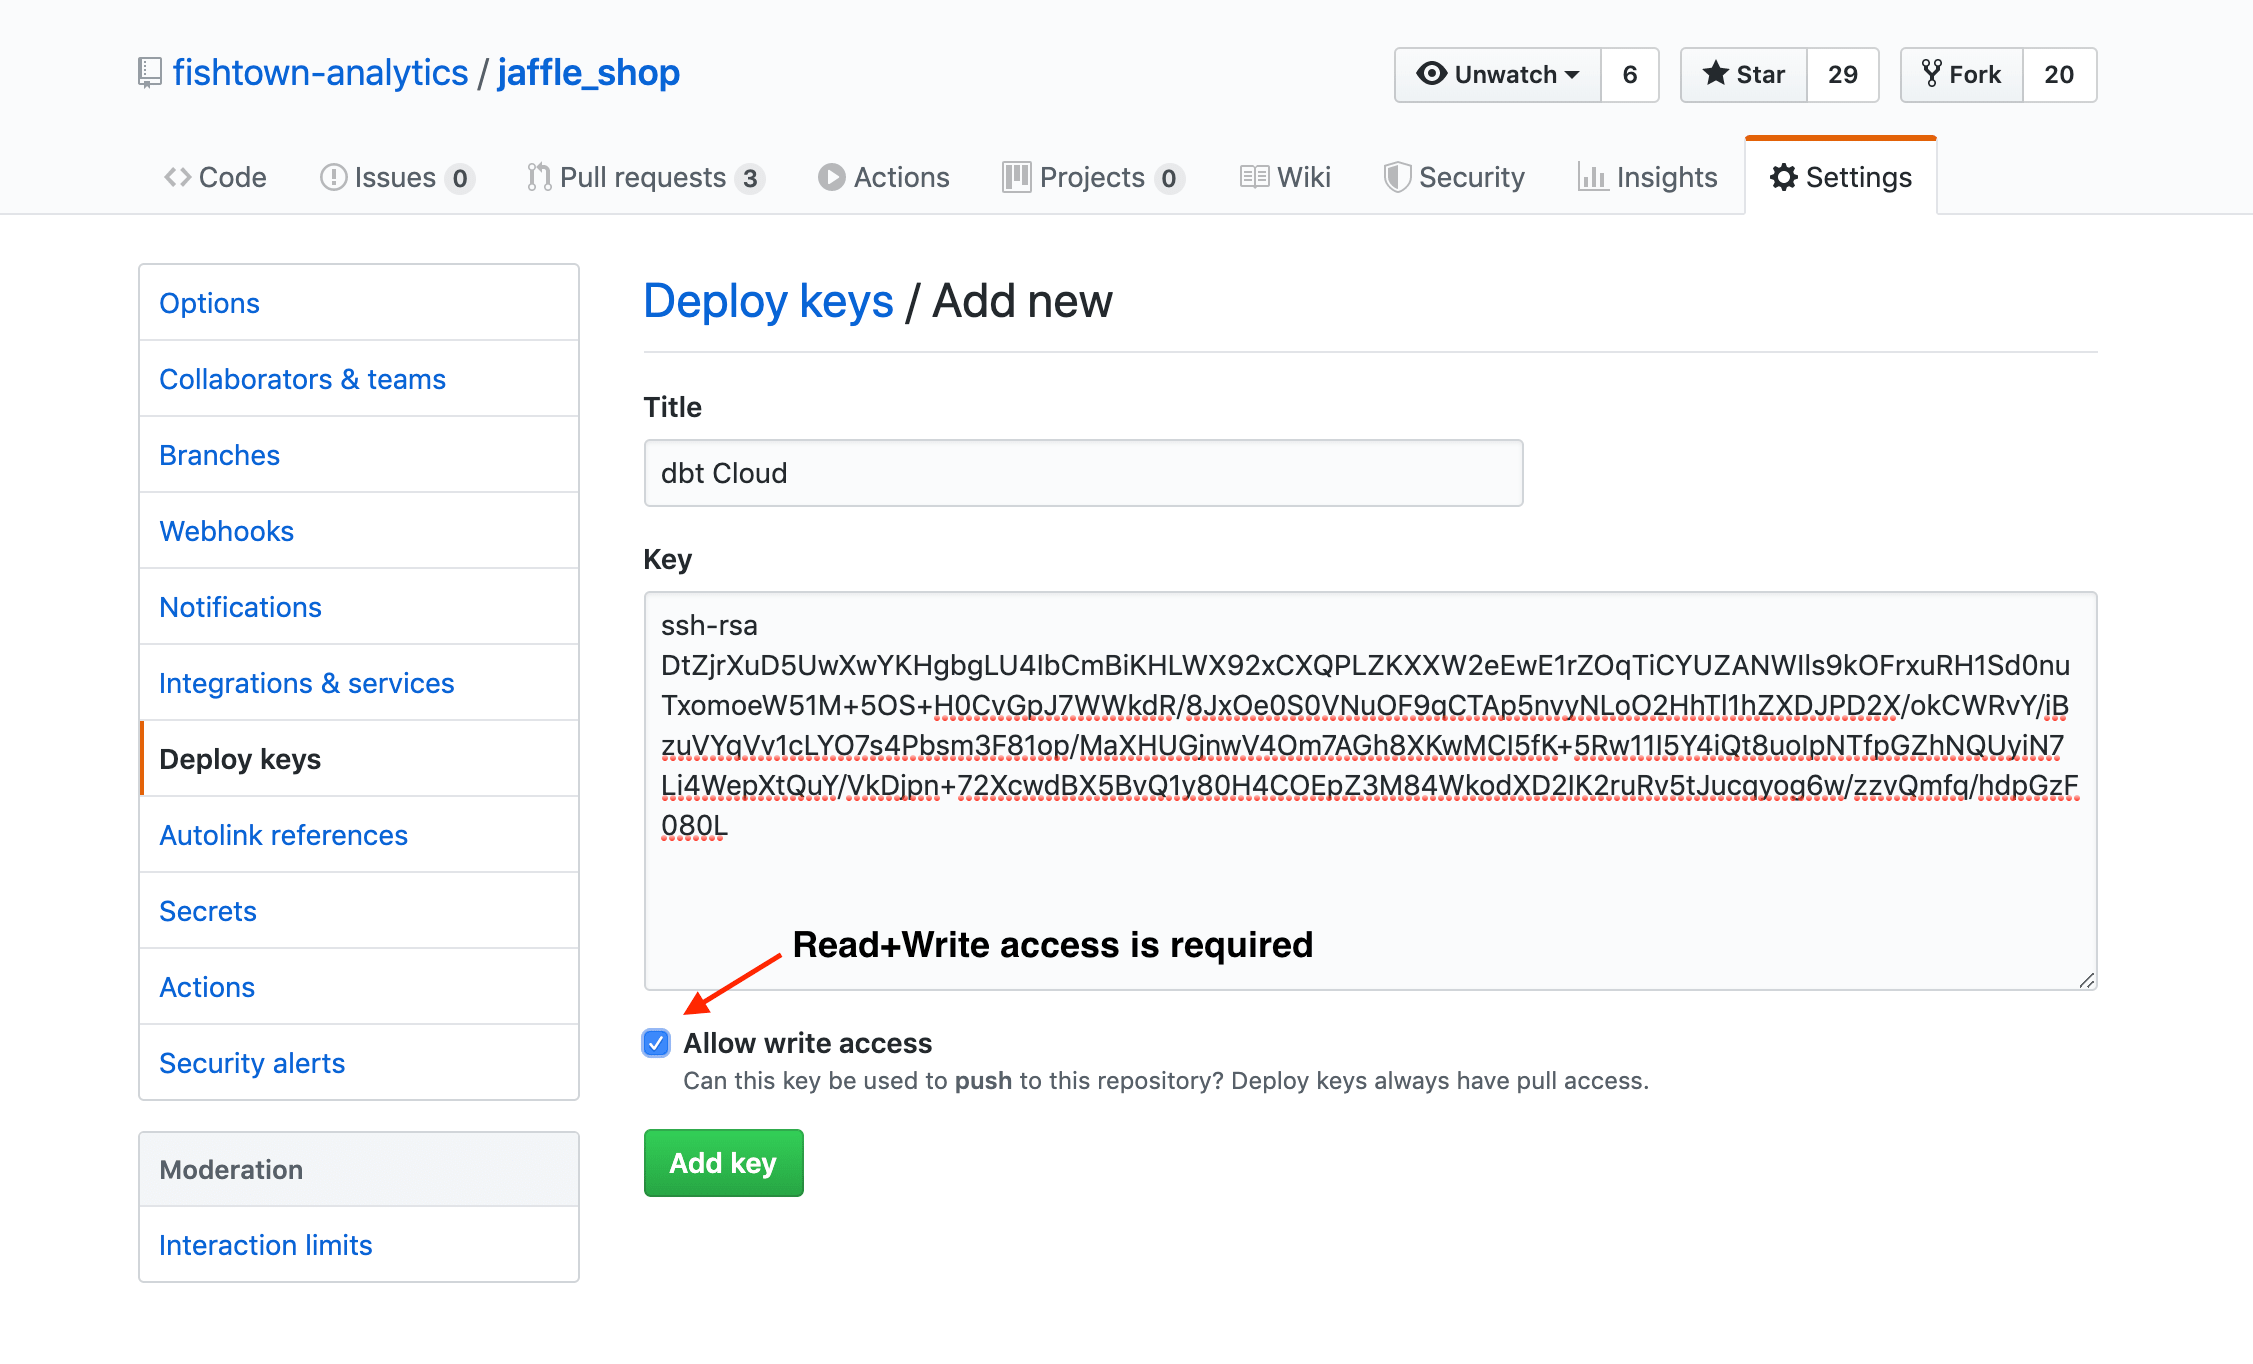](#)Configuring a GitHub Deploy Key
## GitLab
Use GitLab?
If you use GitLab, you can import your repo directly using [dbt's GitLab Application](./connect-gitlab.md). Connecting your repo via the GitLab Application [enables Continuous Integration](../../deploy/continuous-integration.md).
* To add a deploy key to a GitLab account, navigate to the [SSH keys](https://gitlab.com/profile/keys) tab in the User Settings page of your GitLab account.
* Next, paste in the deploy key generated by dbt for your repository.
* After saving this SSH key, dbt will be able to read and write files in your GitLab repository.
* Refer to [Adding a read only deploy key in GitLab](https://docs.gitlab.com/ee/user/project/deploy_keys/)
[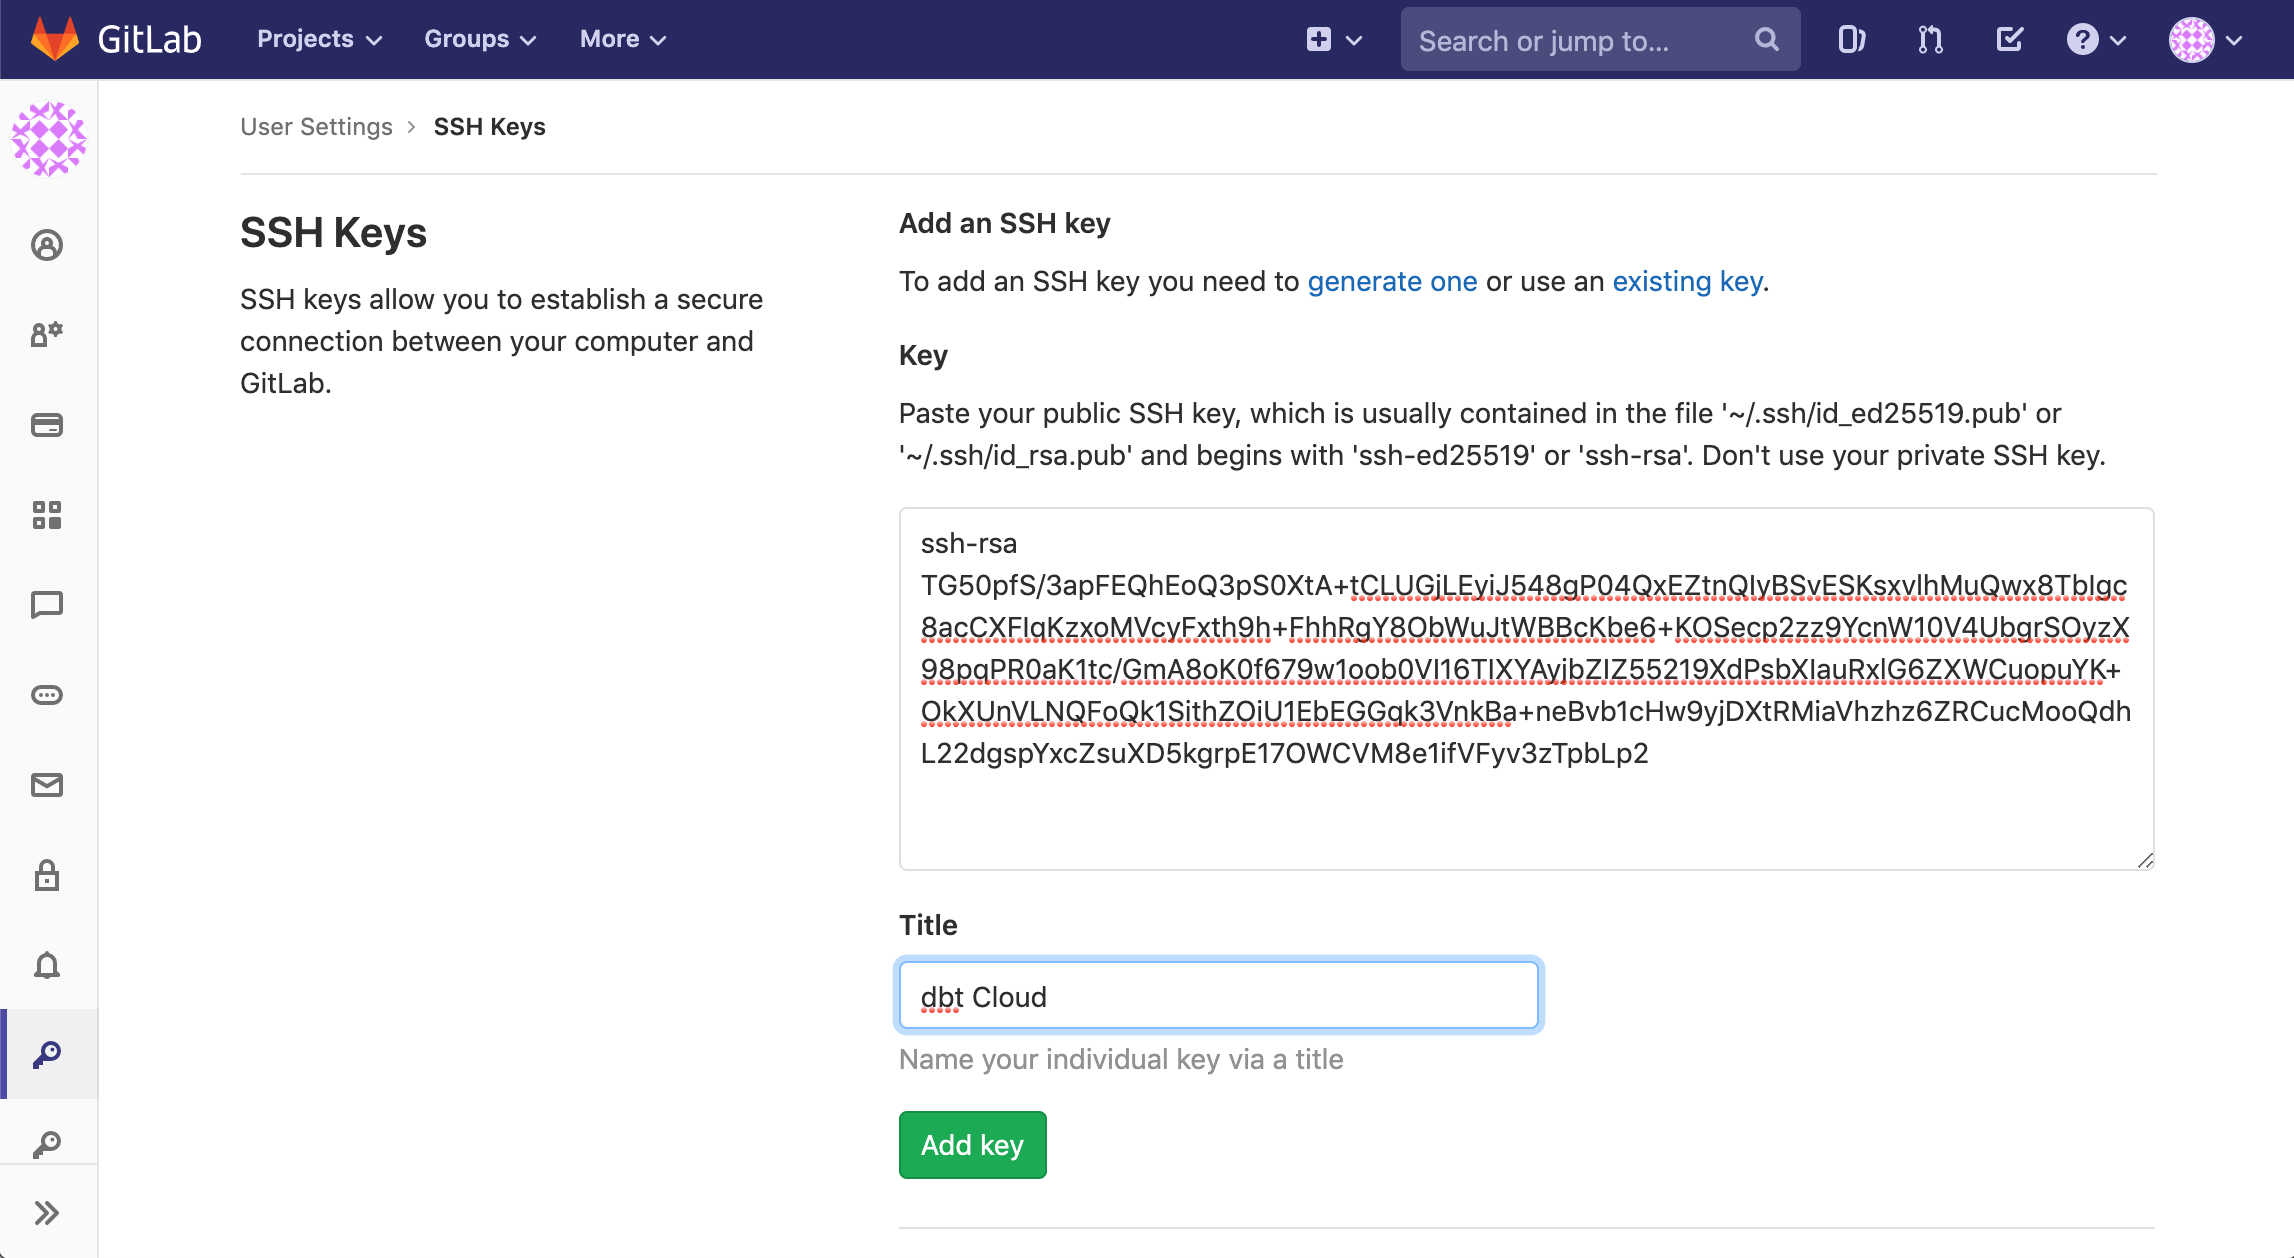](#)Configuring a GitLab SSH Key
## BitBucket
Use a deploy key to import your BitBucket repository into dbt. To preserve account security, use a service account to add the BitBucket deploy key and maintain the connection between your BitBucket repository and dbt.
BitBucket links every repository commit and other Git actions (such as opening a pull request) to the email associated with the user's BitBucket account.
To add a deploy key to a BitBucket account:
* Navigate to **SSH keys** tab in the Personal Settings page of your BitBucket account.
* Next, click the **Add key** button and paste in the deploy key generated by dbt for your repository.
* After saving this SSH key, dbt will be able to read and write files in your BitBucket repository.
[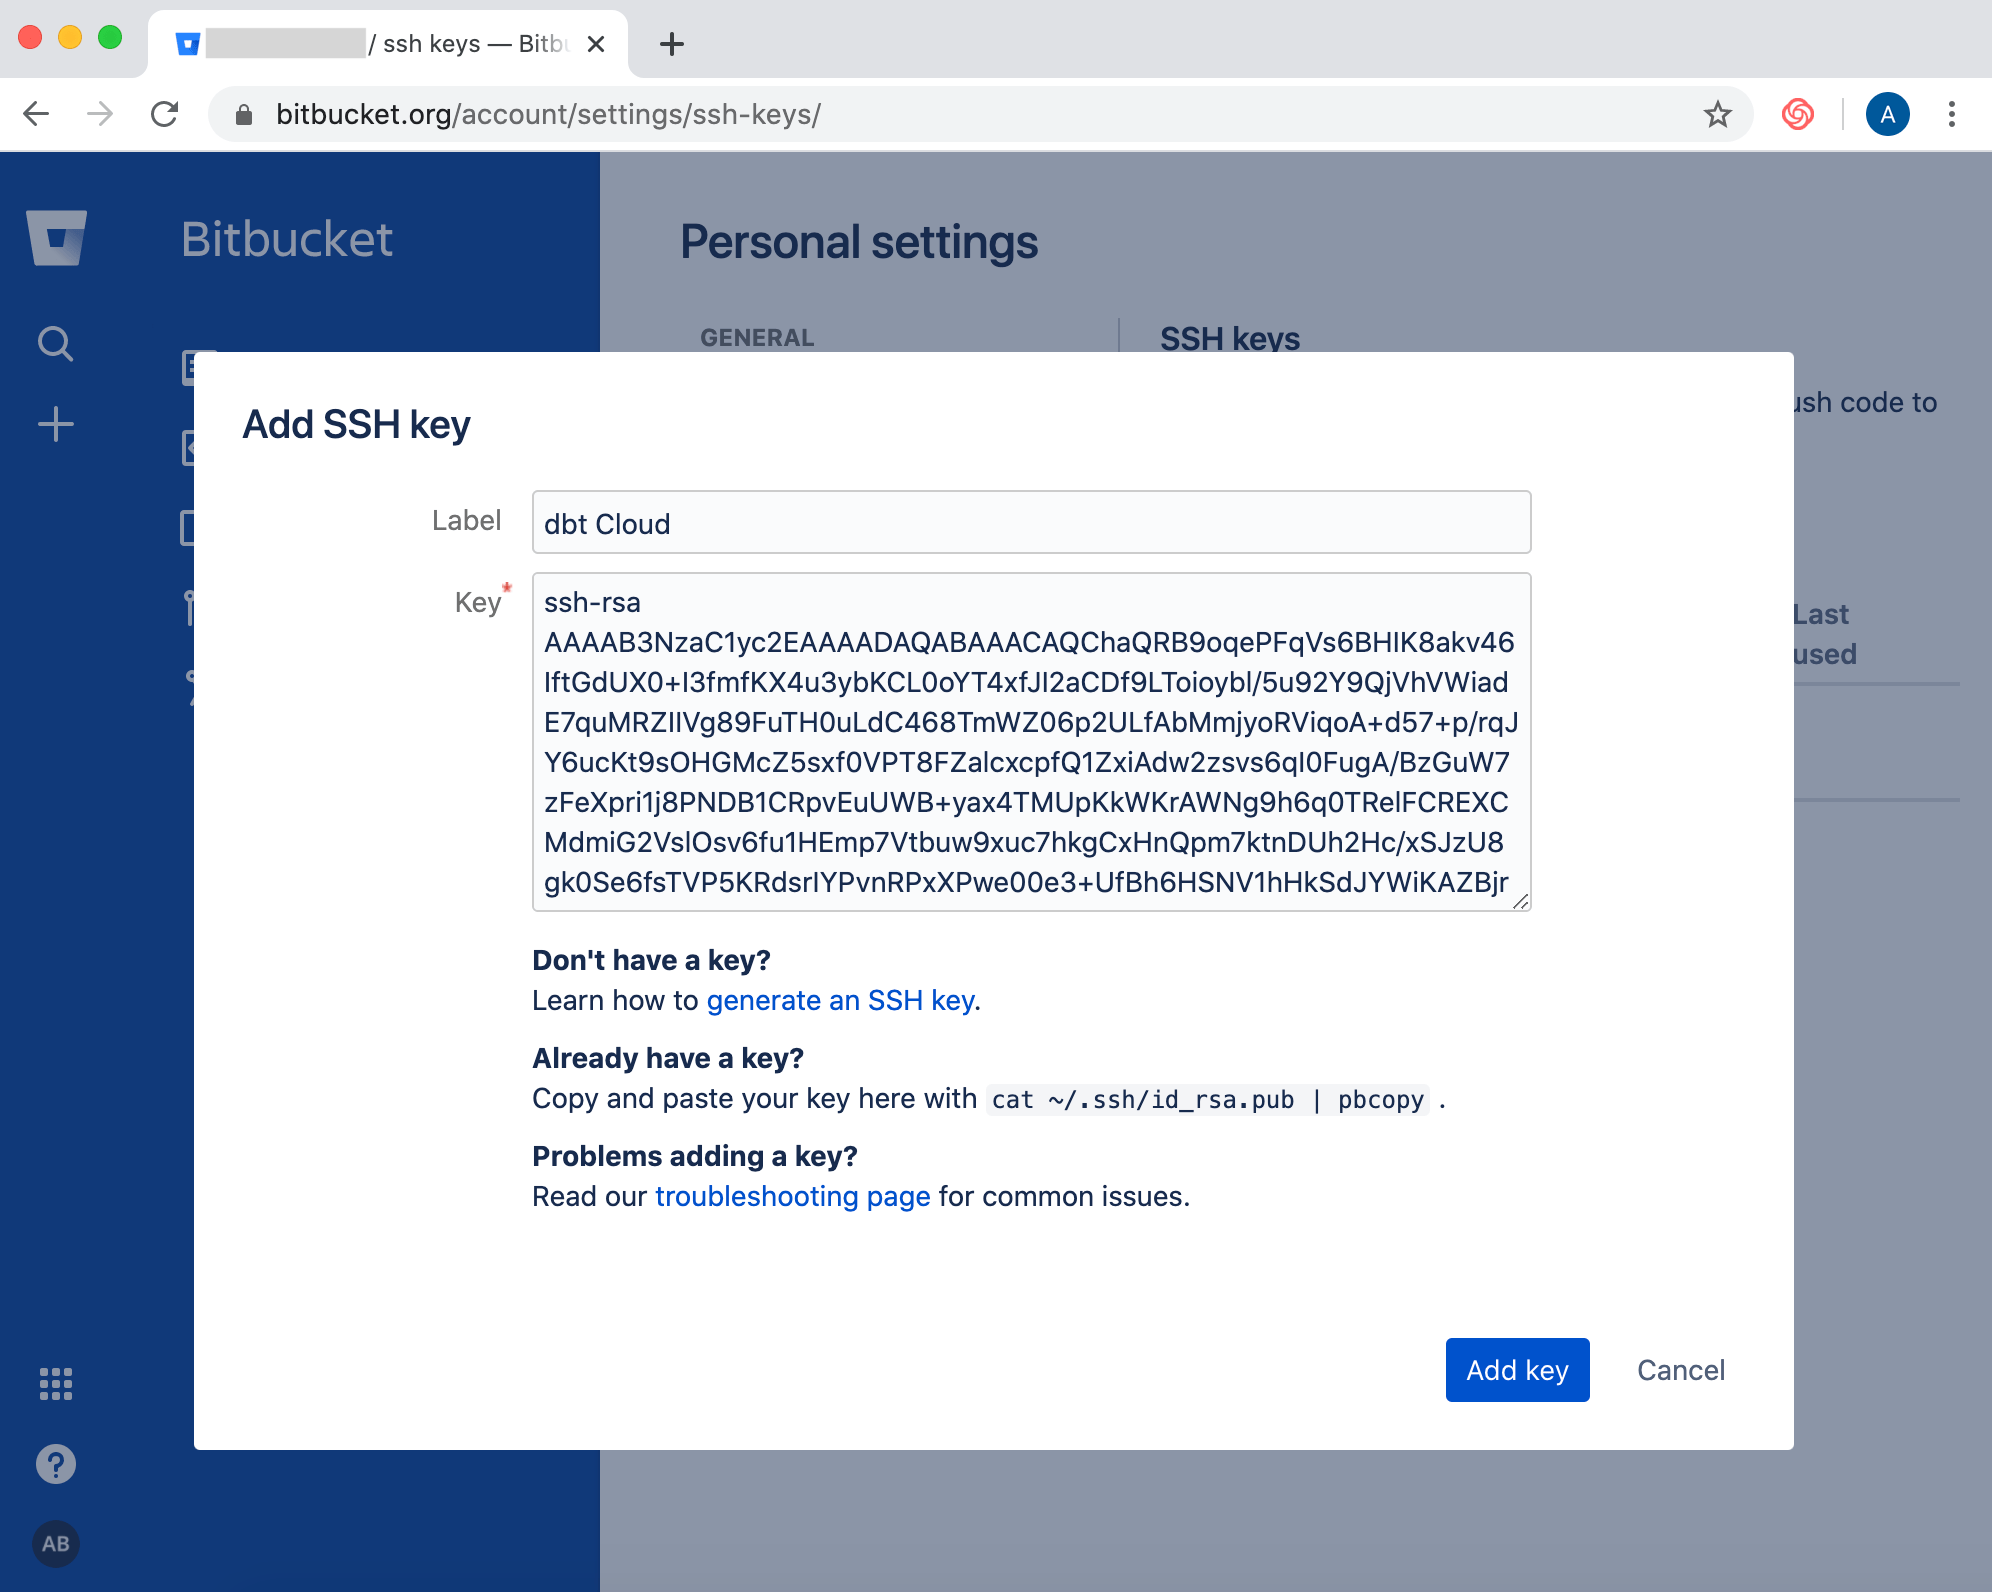](#)Configuring a BitBucket SSH Key
## AWS CodeCommit
dbt can work with dbt projects hosted on AWS CodeCommit, but there are some extra steps needed compared to GitHub or other git providers. This guide will help you connect your CodeCommit-hosted dbt project to dbt.
#### Step 1: Create an AWS User for dbt
* To give dbt access to your repository, first you'll need to create an AWS IAM user for dbt.
* Log into the AWS Console and navigate to the IAM section.
* Click **Add User**, and create a new user by entering a unique and meaningful user name.
* The user will need clone access to your repository. You can do this by adding the **AWSCodeCommitPowerUser** permission during setup.
#### Step 2: Import your repository by name
* Open the AWS CodeCommit console and choose your repository.
* Copy the SSH URL from that page.
* Next, navigate to the **New Repository** page in dbt.
* Choose the **Git Clone** tab, and paste in the SSH URL you copied from the console.
* In the newly created Repository details page, you'll see a **Deploy Key** field.
* Copy the contents of this field as you'll need it for [Step 3](#step-3-grant-dbt-cloud-aws-user-access).
**Note:** The dbt-generated public key is the only key that will work in the next step. Any other key that has been generated outside of dbt will not work.
#### Step 3: Grant dbt AWS User access
* Open up the newly created dbt user in the AWS IAM Console.
* Choose the **Security Credentials** tab and then click **Upload SSH public key**.
* Paste in the contents of the **Public Key** field from the dbt Repository page.
* Once you've created the key, you'll see an **SSH key ID** for it.
* **[Contact dbt Support](mailto:support@getdbt.com)** and share that field so that dbt Support team can complete the setup process for you.
#### Step 4: Specify a custom branch in dbt
CodeCommit uses `master` as its default branch, and to initialize your project, you'll need to specify the `master` branch as a [custom branch](../../../faqs/Environments/custom-branch-settings.md#development) in dbt.
* Go to **Deploy** -> **Environments** -> **Development**.
* Select **Settings** -> **Edit** and under **General Settings**, check the **Default to a custom branch** checkbox.
* Specify the custom branch as `master` and click **Save**.
#### Step 5: Configure pull request template URLs (Optional)
To prevent users from directly merging code changes into the default branch, configure the [PR Template URL](./pr-template.md) in the **Repository details** page for your project. Once configured, dbt will prompt users to open a new PR after committing and synching code changes on the branch in the Studio IDE, before merging any changes into the default branch.
* Go to **Account Settings** -> **Projects** -> Select the project.
* Click the repository link under **Repository**.
* In the **Repository details** page, click **Edit** in the lower right.
[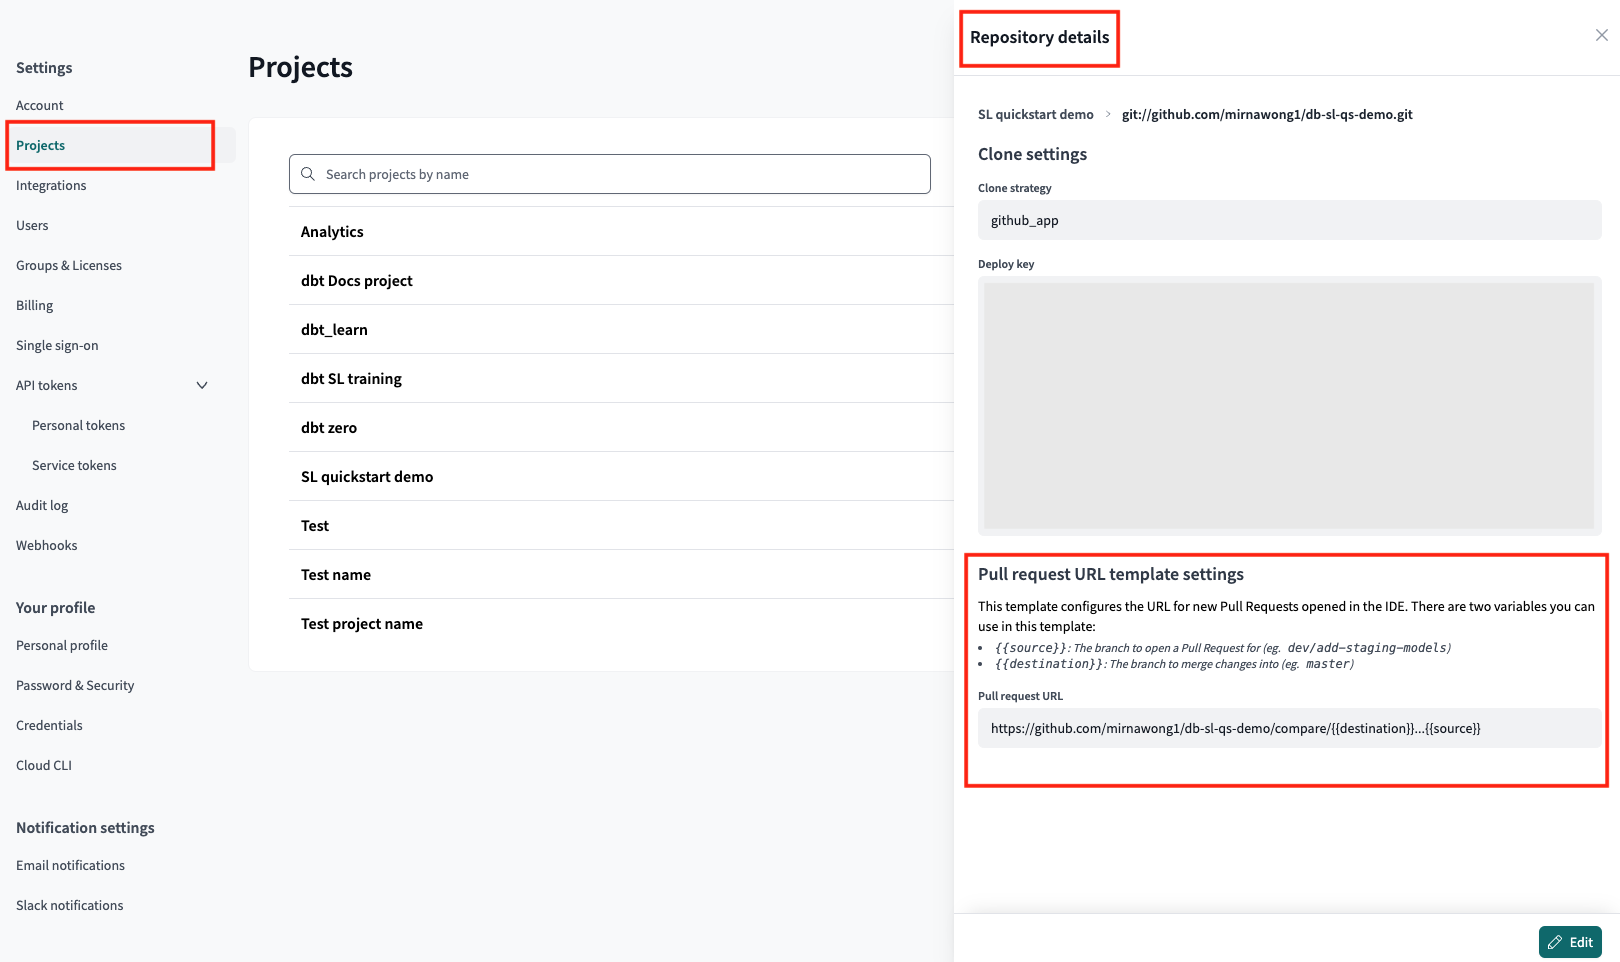](#)Configure PR template in the 'Repository details' page.
* In the **Pull request URL** field, set the URL based on the suggested [PR template format](./pr-template.md#aws-codecommit).
* Replace `` with the name of your repository (Note that it is case sensitive). In the following example, the repository name is `New_Repo`.
[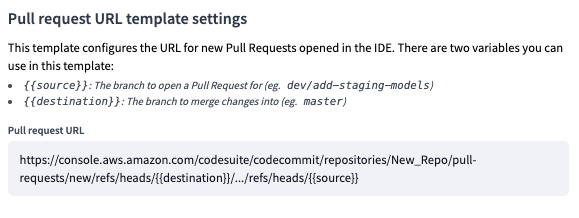](#)In the Pull request URL field example, the repository name is 'New\_Repo'.
* After filling the **Pull request URL** field, click **Save**.
🎉 **You're all set!** Once dbt Support handles your request and you've set your custom branch, your project is ready to execute dbt runs on dbt.
## Azure DevOps
Use Azure DevOps?
If you use Azure DevOps and you are on the dbt Enterprise or Enterprise+ plan, you can import your repo directly using [dbt's Azure DevOps Integration](./connect-azure-devops.md). Connecting your repo via the Azure DevOps Application [enables Continuous Integration](../../deploy/continuous-integration.md).
1. To add a deploy key to an Azure DevOps account, navigate to the **SSH public keys** page in the User Settings of your user's Azure DevOps account or a service user's account.
2. We recommend using a dedicated service user for the integration to ensure that dbt's connection to Azure DevOps is not interrupted by changes to user permissions.
[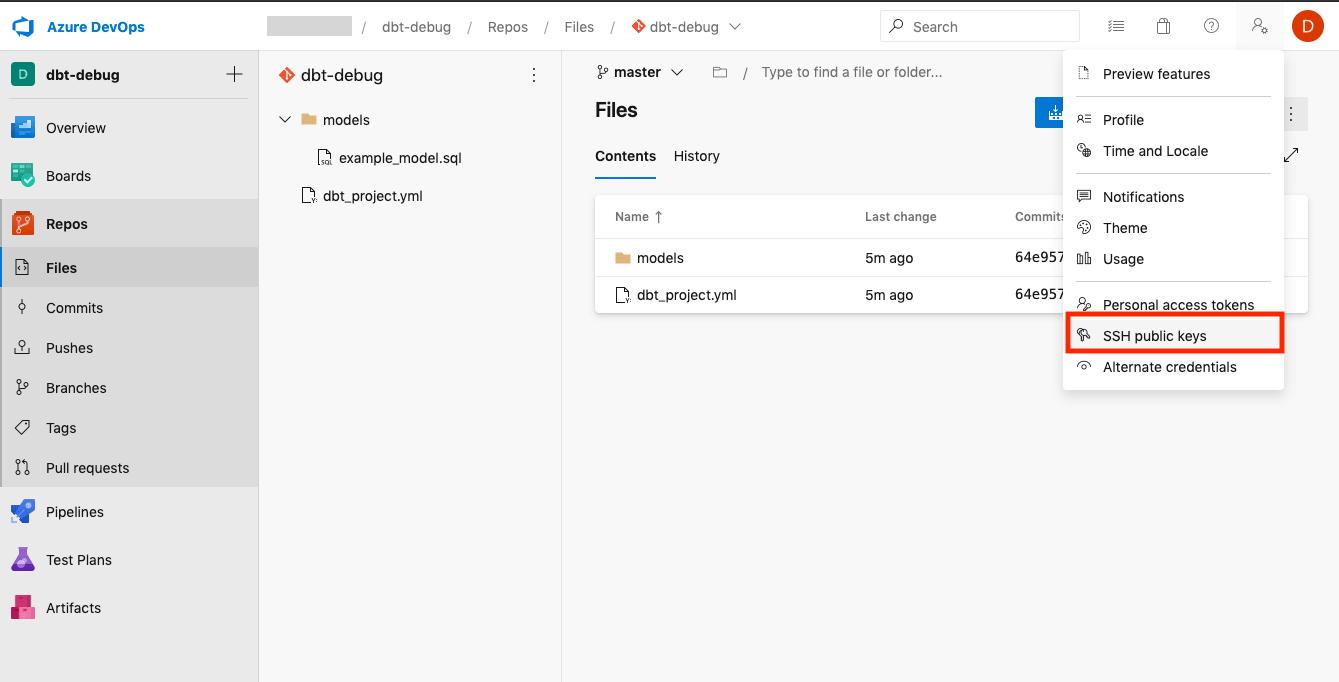](#)Navigate to the 'SSH public keys' settings page
3. Next, click the **+ New Key** button to create a new SSH key for the repository.
[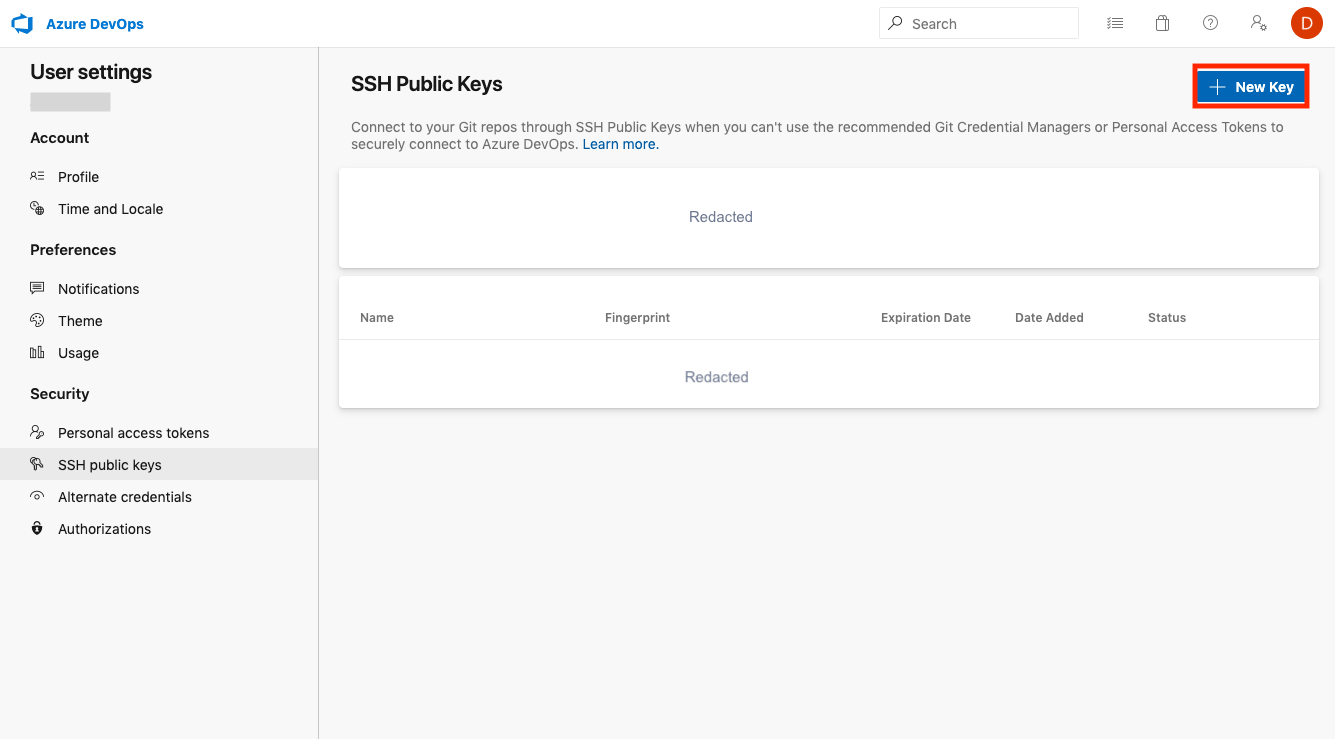](#)Click the '+ New Key' button to create a new SSH key for the repository.
4. Select a descriptive name for the key and then paste in the deploy key generated by dbt for your repository.
5. After saving this SSH key, dbt will be able to read and write files in your Azure DevOps repository.
[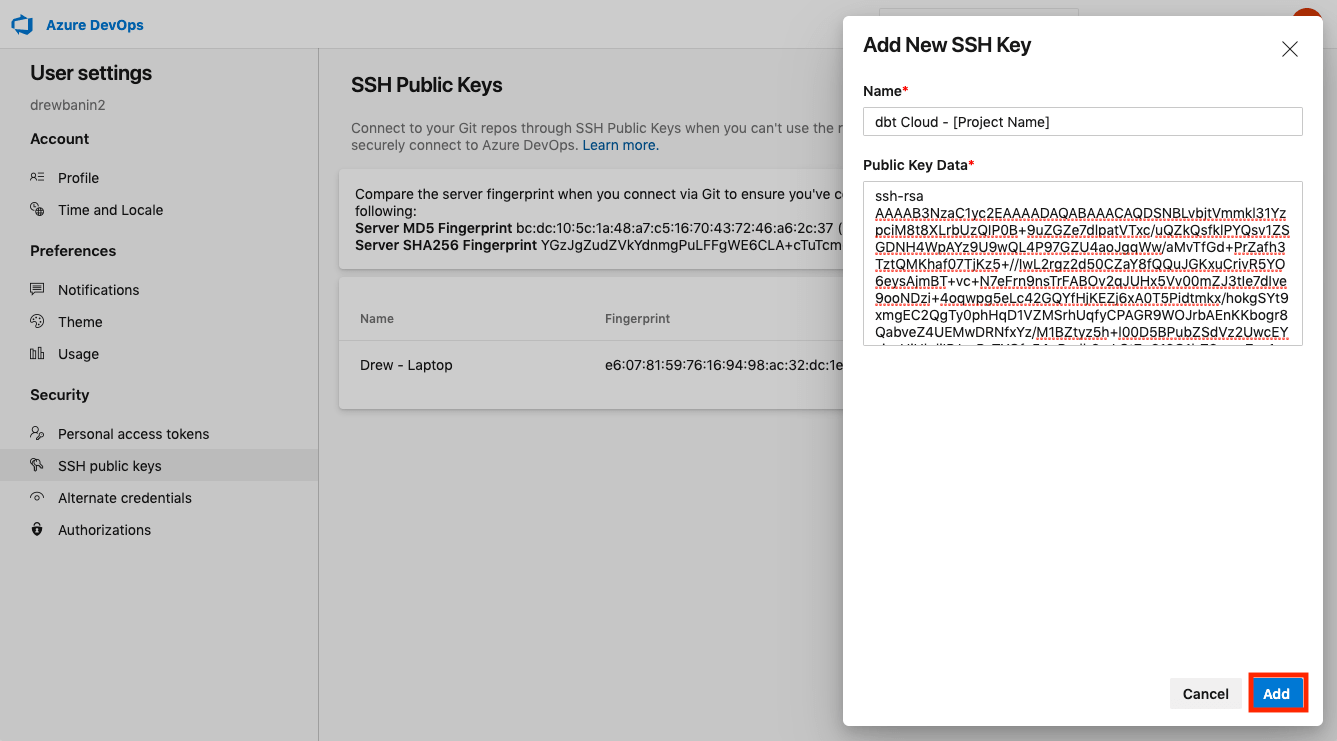](#)Enter and save the public key generated for your repository by dbt
## Other git providers
Don't see your git provider here? Please [contact dbt Support](mailto:support@getdbt.com). We're happy to help you set up dbt with any supported git provider.
## Limited integration
Some features of dbt require a tight integration with your git host, for example, updating GitHub pull requests with dbt run statuses. Importing your project by a URL prevents you from using these features. Once you give dbt access to your repository, you can continue to set up your project by adding a connection and creating and running your first dbt job.
## FAQs
How can I fix my .gitignore file?
A `.gitignore` file specifies which files git should intentionally ignore or 'untrack'. dbt indicates untracked files in the project file explorer pane by putting the file or folder name in *italics*.
If you encounter issues like problems reverting changes, checking out or creating a new branch, or not being prompted to open a pull request after a commit in the Studio IDE — this usually indicates a problem with the [.gitignore](https://github.com/dbt-labs/dbt-starter-project/blob/main/.gitignore) file. The file may be missing or lacks the required entries for dbt to work correctly.
The following sections describe how to fix the `.gitignore` file in:
Fix in the Studio IDE
To resolve issues with your `gitignore` file, adding the correct entries won't automatically remove (or 'untrack') files or folders that have already been tracked by git. The updated `gitignore` will only prevent new files or folders from being tracked. So you'll need to first fix the `gitignore` file, then perform some additional git operations to untrack any incorrect files or folders.
1. Launch the Studio IDE into the project that is being fixed, by selecting **Develop** on the menu bar.
2. In your **File Explorer**, check to see if a `.gitignore` file exists at the root of your dbt project folder. If it doesn't exist, create a new file.
3. Open the new or existing `gitignore` file, and add the following:
```bash
# ✅ Correct
target/
dbt_packages/
logs/
# legacy -- renamed to dbt_packages in dbt v1
dbt_modules/
```
* **Note** — You can place these lines anywhere in the file, as long as they're on separate lines. The lines shown are wildcards that will include all nested files and folders. Avoid adding a trailing `'*'` to the lines, such as `target/*`.
For more info on `gitignore` syntax, refer to the [Git docs](https://git-scm.com/docs/gitignore).
4. Save the changes but *don't commit*.
5. Restart the IDE by clicking on the three dots next to the **IDE Status button** on the lower right corner of the IDE screen and select **Restart IDE**.
[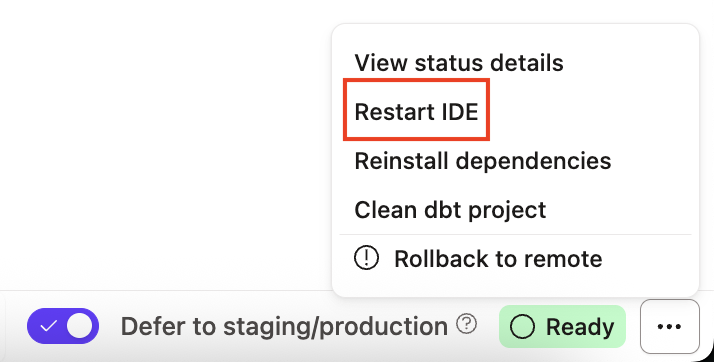](#)Restart the IDE by clicking the three dots on the lower right or click on the Status bar
6. Once the Studio IDE restarts, go to the **File Catalog** to delete the following files or folders (if they exist). No data will be lost:
* `target`, `dbt_modules`, `dbt_packages`, `logs`
7. **Save** and then **Commit and sync** the changes.
8. Restart the Studio IDE again using the same procedure as step 5.
9. Once the Studio IDE restarts, use the **Create a pull request** (PR) button under the **Version Control** menu to start the process of integrating the changes.
10. When the git provider's website opens to a page with the new PR, follow the necessary steps to complete and merge the PR into the main branch of that repository.
* **Note** — The 'main' branch might also be called 'master', 'dev', 'qa', 'prod', or something else depending on the organizational naming conventions. The goal is to merge these changes into the root branch that all other development branches are created from.
11. Return to the Studio IDE and use the **Change Branch** button, to switch to the main branch of the project.
12. Once the branch has changed, click the **Pull from remote** button to pull in all the changes.
13. Verify the changes by making sure the files/folders in the `.gitignore` file are in italics.
[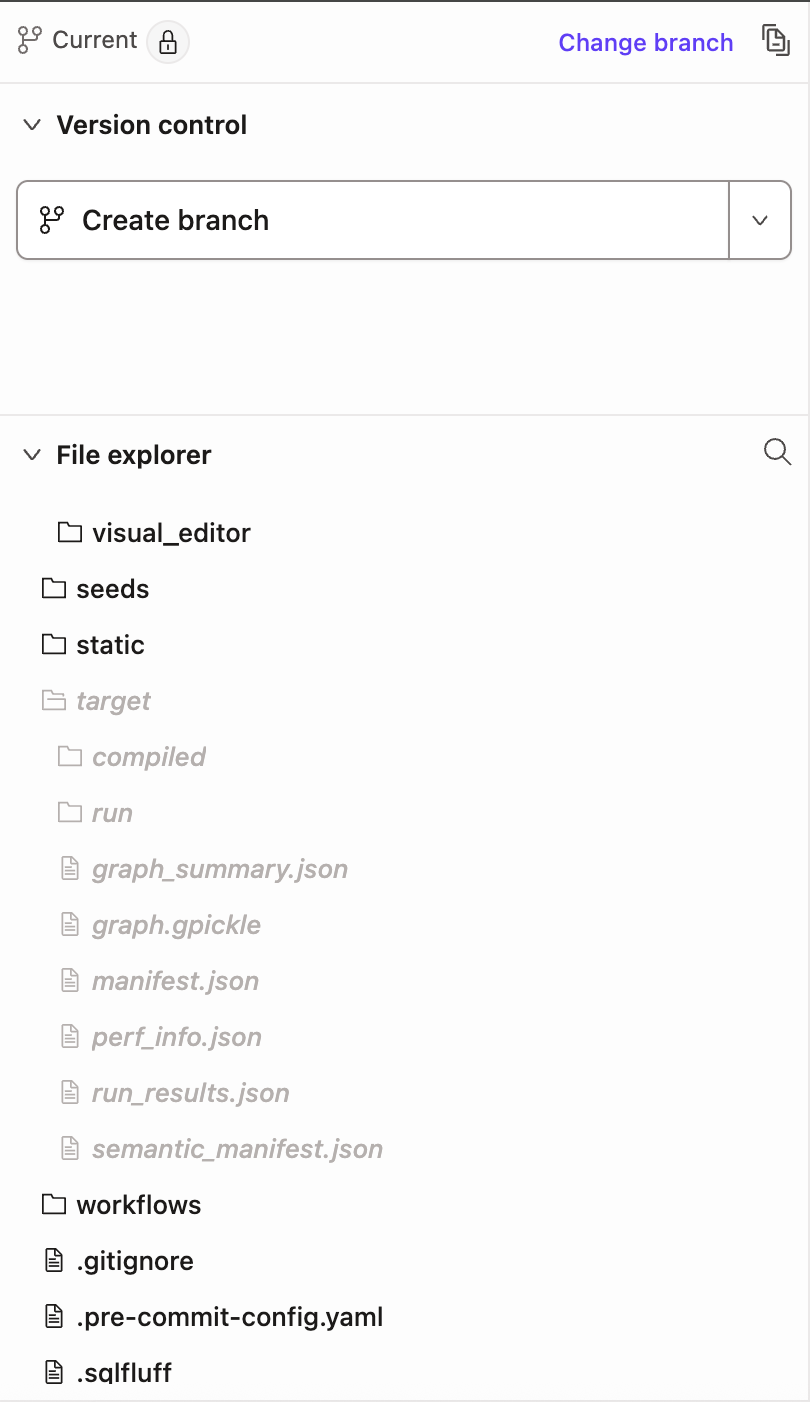](#)A dbt project on the main branch that has properly configured gitignore folders (highlighted in italics).
Fix in the Git provider
Sometimes it's necessary to use the git providers web interface to fix a broken `.gitignore` file. Although the specific steps may vary across providers, the general process remains the same.
There are two options for this approach: editing the main branch directly if allowed, or creating a pull request to implement the changes if required:
### Edit in main branch
When permissions allow it, it's possible to edit the `.gitignore` directly on the main branch of your repo. Here are the following steps:
1. Go to your repository's web interface.
2. Switch to the main branch and the root directory of your dbt project.
3. Find the `.gitignore` file. Create a blank one if it doesn't exist.
4. Edit the file in the web interface, adding the following entries:
```bash
target/
dbt_packages/
logs/
# legacy -- renamed to dbt_packages in dbt v1
dbt_modules/
```
5. Commit (save) the file.
6. Delete the following folders from the dbt project root, if they exist. No data or code will be lost:
* `target`, `dbt_modules`, `dbt_packages`, `logs`
7. Commit (save) the deletions to the main branch.
8. Switch to the Studio IDE , and open the project that you're fixing.
9. [Rollback your repo to remote](./version-control-basics.md#the-git-button-in-the-cloud-ide) in the IDE by clicking on the three dots next to the **IDE Status** button on the lower right corner of the IDE screen, then select **Rollback to remote**.
* **Note** — Rollback to remote resets your repo back to an earlier clone from your remote. Any saved but uncommitted changes will be lost, so make sure you copy any modified code that you want to keep in a temporary location outside of dbt.
10. Once you rollback to remote, open the `.gitignore` file in the branch you're working in. If the new changes aren't included, you'll need to merge the latest commits from the main branch into your working branch.
11. Go to the **File Explorer** to verify the `.gitignore` file contains the correct entries and make sure the untracked files/folders in the .gitignore file are in *italics*.
12. Great job 🎉! You've configured the `.gitignore` correctly and can continue with your development!
### Unable to edit main branch
If you can't edit the `.gitignore` directly on the main branch of your repo, follow these steps:
1. Go to your repository's web interface.
2. Switch to an existing development branch, or create a new branch just for these changes (This is often faster and cleaner).
3. Find the `.gitignore` file. Create a blank one if it doesn't exist.
4. Edit the file in the web interface, adding the following entries:
```bash
target/
dbt_packages/
logs/
# legacy -- renamed to dbt_packages in dbt v1
dbt_modules/
```
5. Commit (save) the file.
6. Delete the following folders from the dbt project root, if they exist. No data or code will be lost:
* `target`, `dbt_modules`, `dbt_packages`, `logs`
7. Commit (save) the deleted folders.
8. Open a merge request using the git provider web interface. The merge request should attempt to merge the changes into the 'main' branch that all development branches are created from.
9. Follow the necessary procedures to get the branch approved and merged into the 'main' branch. You can delete the branch after the merge is complete.
10. Once the merge is complete, go back to the Studio IDE, and open the project that you're fixing.
11. [Rollback your repo to remote](./version-control-basics.md#the-git-button-in-the-cloud-ide) in the Studio IDE by clicking on the three dots next to the **Studio IDE Status** button on the lower right corner of the Studio IDE screen, then select **Rollback to remote**.
* **Note** — Rollback to remote resets your repo back to an earlier clone from your remote. Any saved but uncommitted changes will be lost, so make sure you copy any modified code that you want to keep in a temporary location outside of dbt.
12. Once you rollback to remote, open the `.gitignore` file in the branch you're working in. If the new changes aren't included, you'll need to merge the latest commits from the main branch into your working branch.
13. Go to the **File Explorer** to verify the `.gitignore` file contains the correct entries and make sure the untracked files/folders in the .gitignore file are in *italics*.
14. Great job 🎉! You've configured the `.gitignore` correctly and can continue with your development!
For more info, refer to this [detailed video](https://www.loom.com/share/9b3b8e2b617f41a8bad76ec7e42dd014) for additional guidance.
How to migrate git providers
To migrate from one git provider to another, refer to the following steps to avoid minimal disruption:
1. Outside of dbt, you'll need to import your existing repository into your new provider. By default, connecting your repository in one account won't automatically disconnected it from another account.
As an example, if you're migrating from GitHub to Azure DevOps, you'll need to import your existing repository (GitHub) into your new Git provider (Azure DevOps). For detailed steps on how to do this, refer to your Git provider's documentation (Such as [GitHub](https://docs.github.com/en/migrations/importing-source-code/using-github-importer/importing-a-repository-with-github-importer), [GitLab](https://docs.gitlab.com/ee/user/project/import/repo_by_url.html), [Azure DevOps](https://learn.microsoft.com/en-us/azure/devops/repos/git/import-git-repository?view=azure-devops))
2. Go back to dbt and set up your [integration for the new Git provider](./configure-git.md), if needed.
3. Disconnect the old repository in dbt by going to **Account Settings** and then **Projects**.
4. Click on the **Repository** link, then click **Edit** and **Disconnect**.
[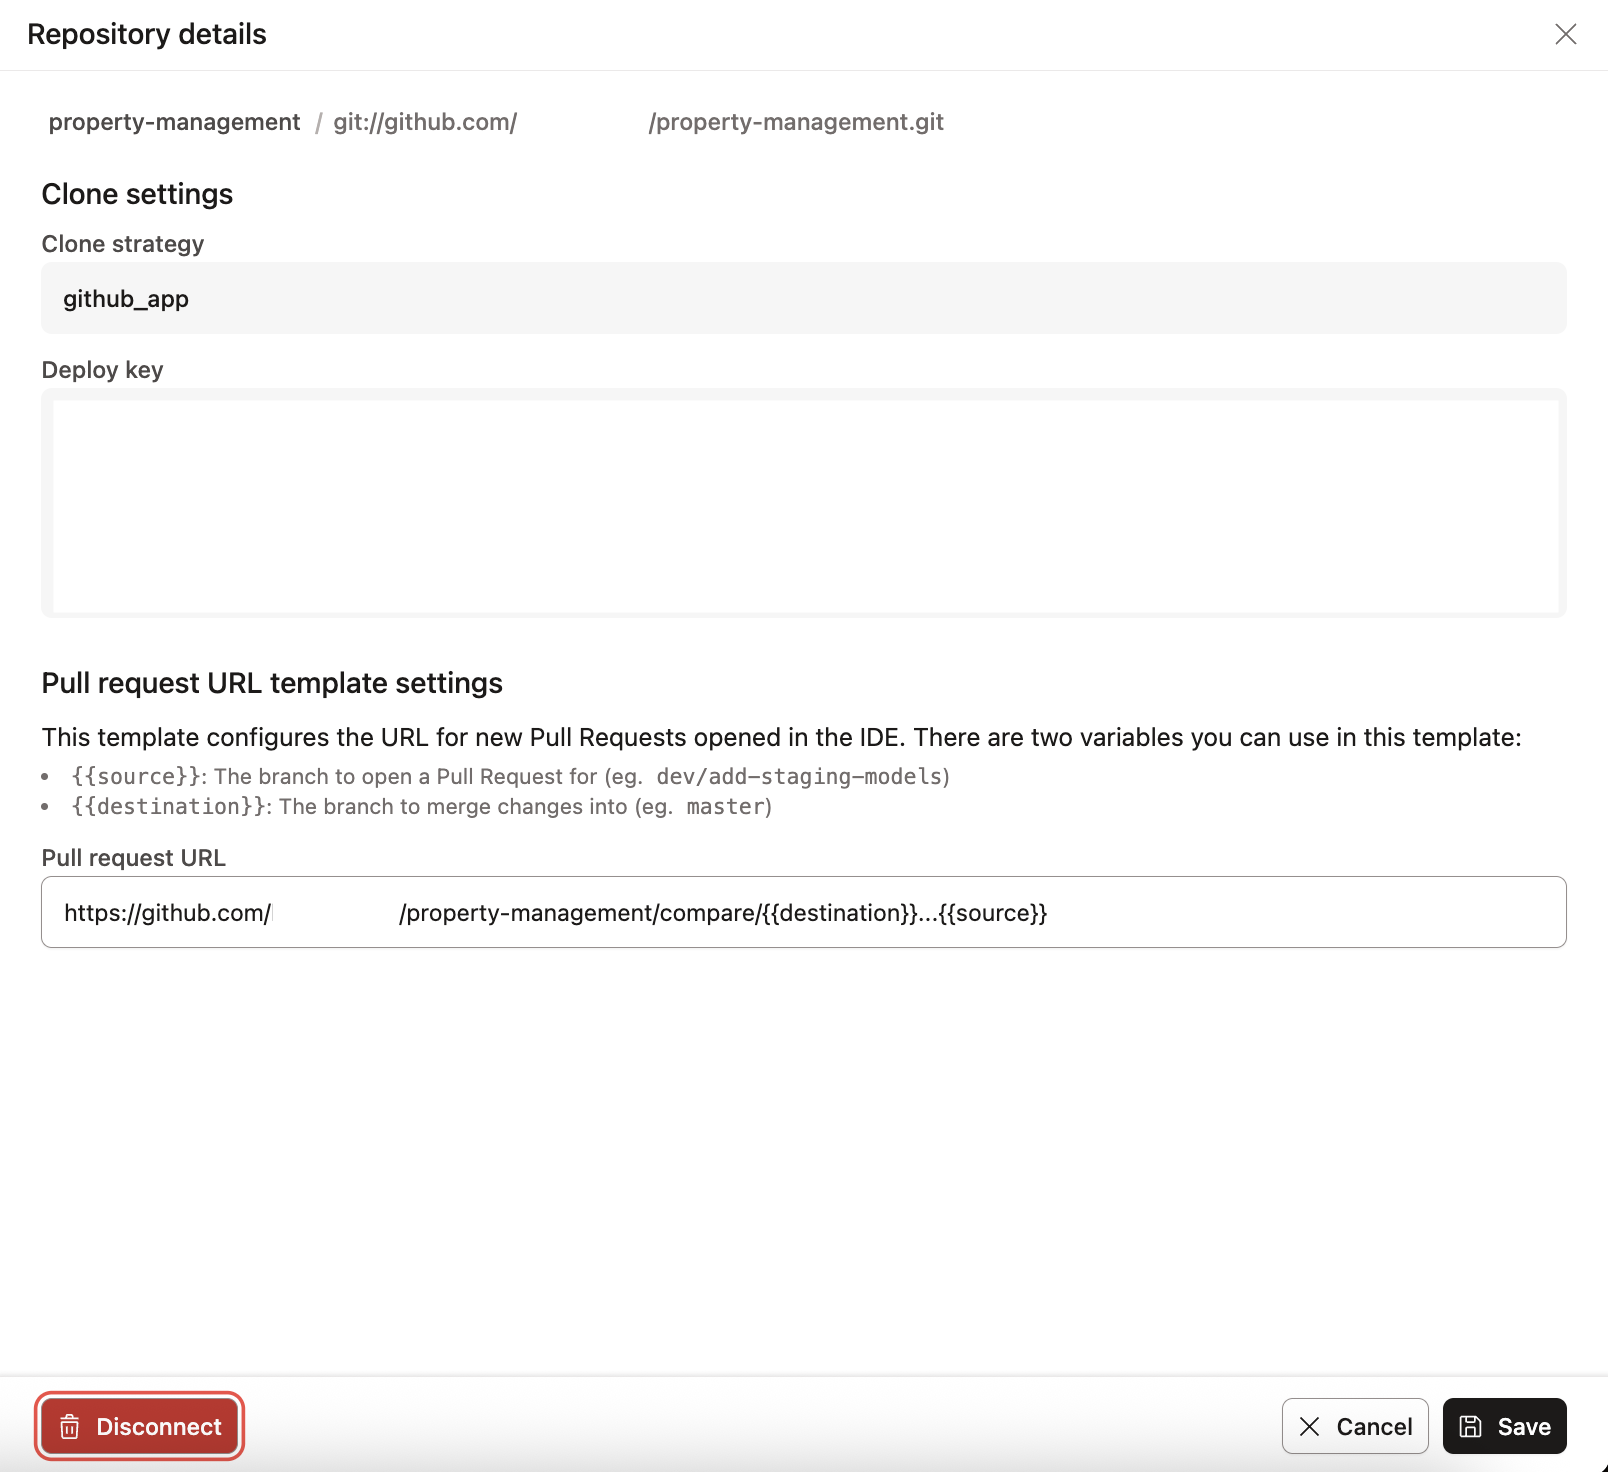](#)Disconnect and reconnect your Git repository in your dbt Account settings page.
5. Click **Confirm Disconnect**.
6. On the same page, connect to the new Git provider repository by clicking **Configure Repository**
* If you're using the native integration, you may need to OAuth to it.
7. That's it, you should now be connected to the new Git provider! 🎉
Note — As a tip, we recommend you refresh your page and Studio IDE before performing any actions.
## Was this page helpful?
YesNo
[Privacy policy](https://www.getdbt.com/cloud/privacy-policy)[Create a GitHub issue](https://github.com/dbt-labs/docs.getdbt.com/issues)
This site is protected by reCAPTCHA and the Google [Privacy Policy](https://policies.google.com/privacy) and [Terms of Service](https://policies.google.com/terms) apply.