Quickstart for dbt and Databricks
Introduction
In this quickstart guide, you'll learn how to use dbt with Databricks. It will show you how to:
- Create a Databricks workspace.
- Load sample data into your Databricks account.
- Connect dbt to Databricks.
- Take a sample query and turn it into a model in your dbt project. A model in dbt is a select statement.
- Add tests to your models.
- Document your models.
- Schedule a job to run.
You can check out dbt Fundamentals for free if you're interested in course learning with videos.
Prerequisites
- You have a dbt account.
- You have an account with a cloud service provider (such as AWS, GCP, and Azure) and have permissions to create an S3 bucket with this account. For demonstrative purposes, this guide uses AWS as the cloud service provider.
Related content
- Learn more with dbt Learn courses
- CI jobs
- Deploy jobs
- Job notifications
- Source freshness
Create a Databricks workspace
-
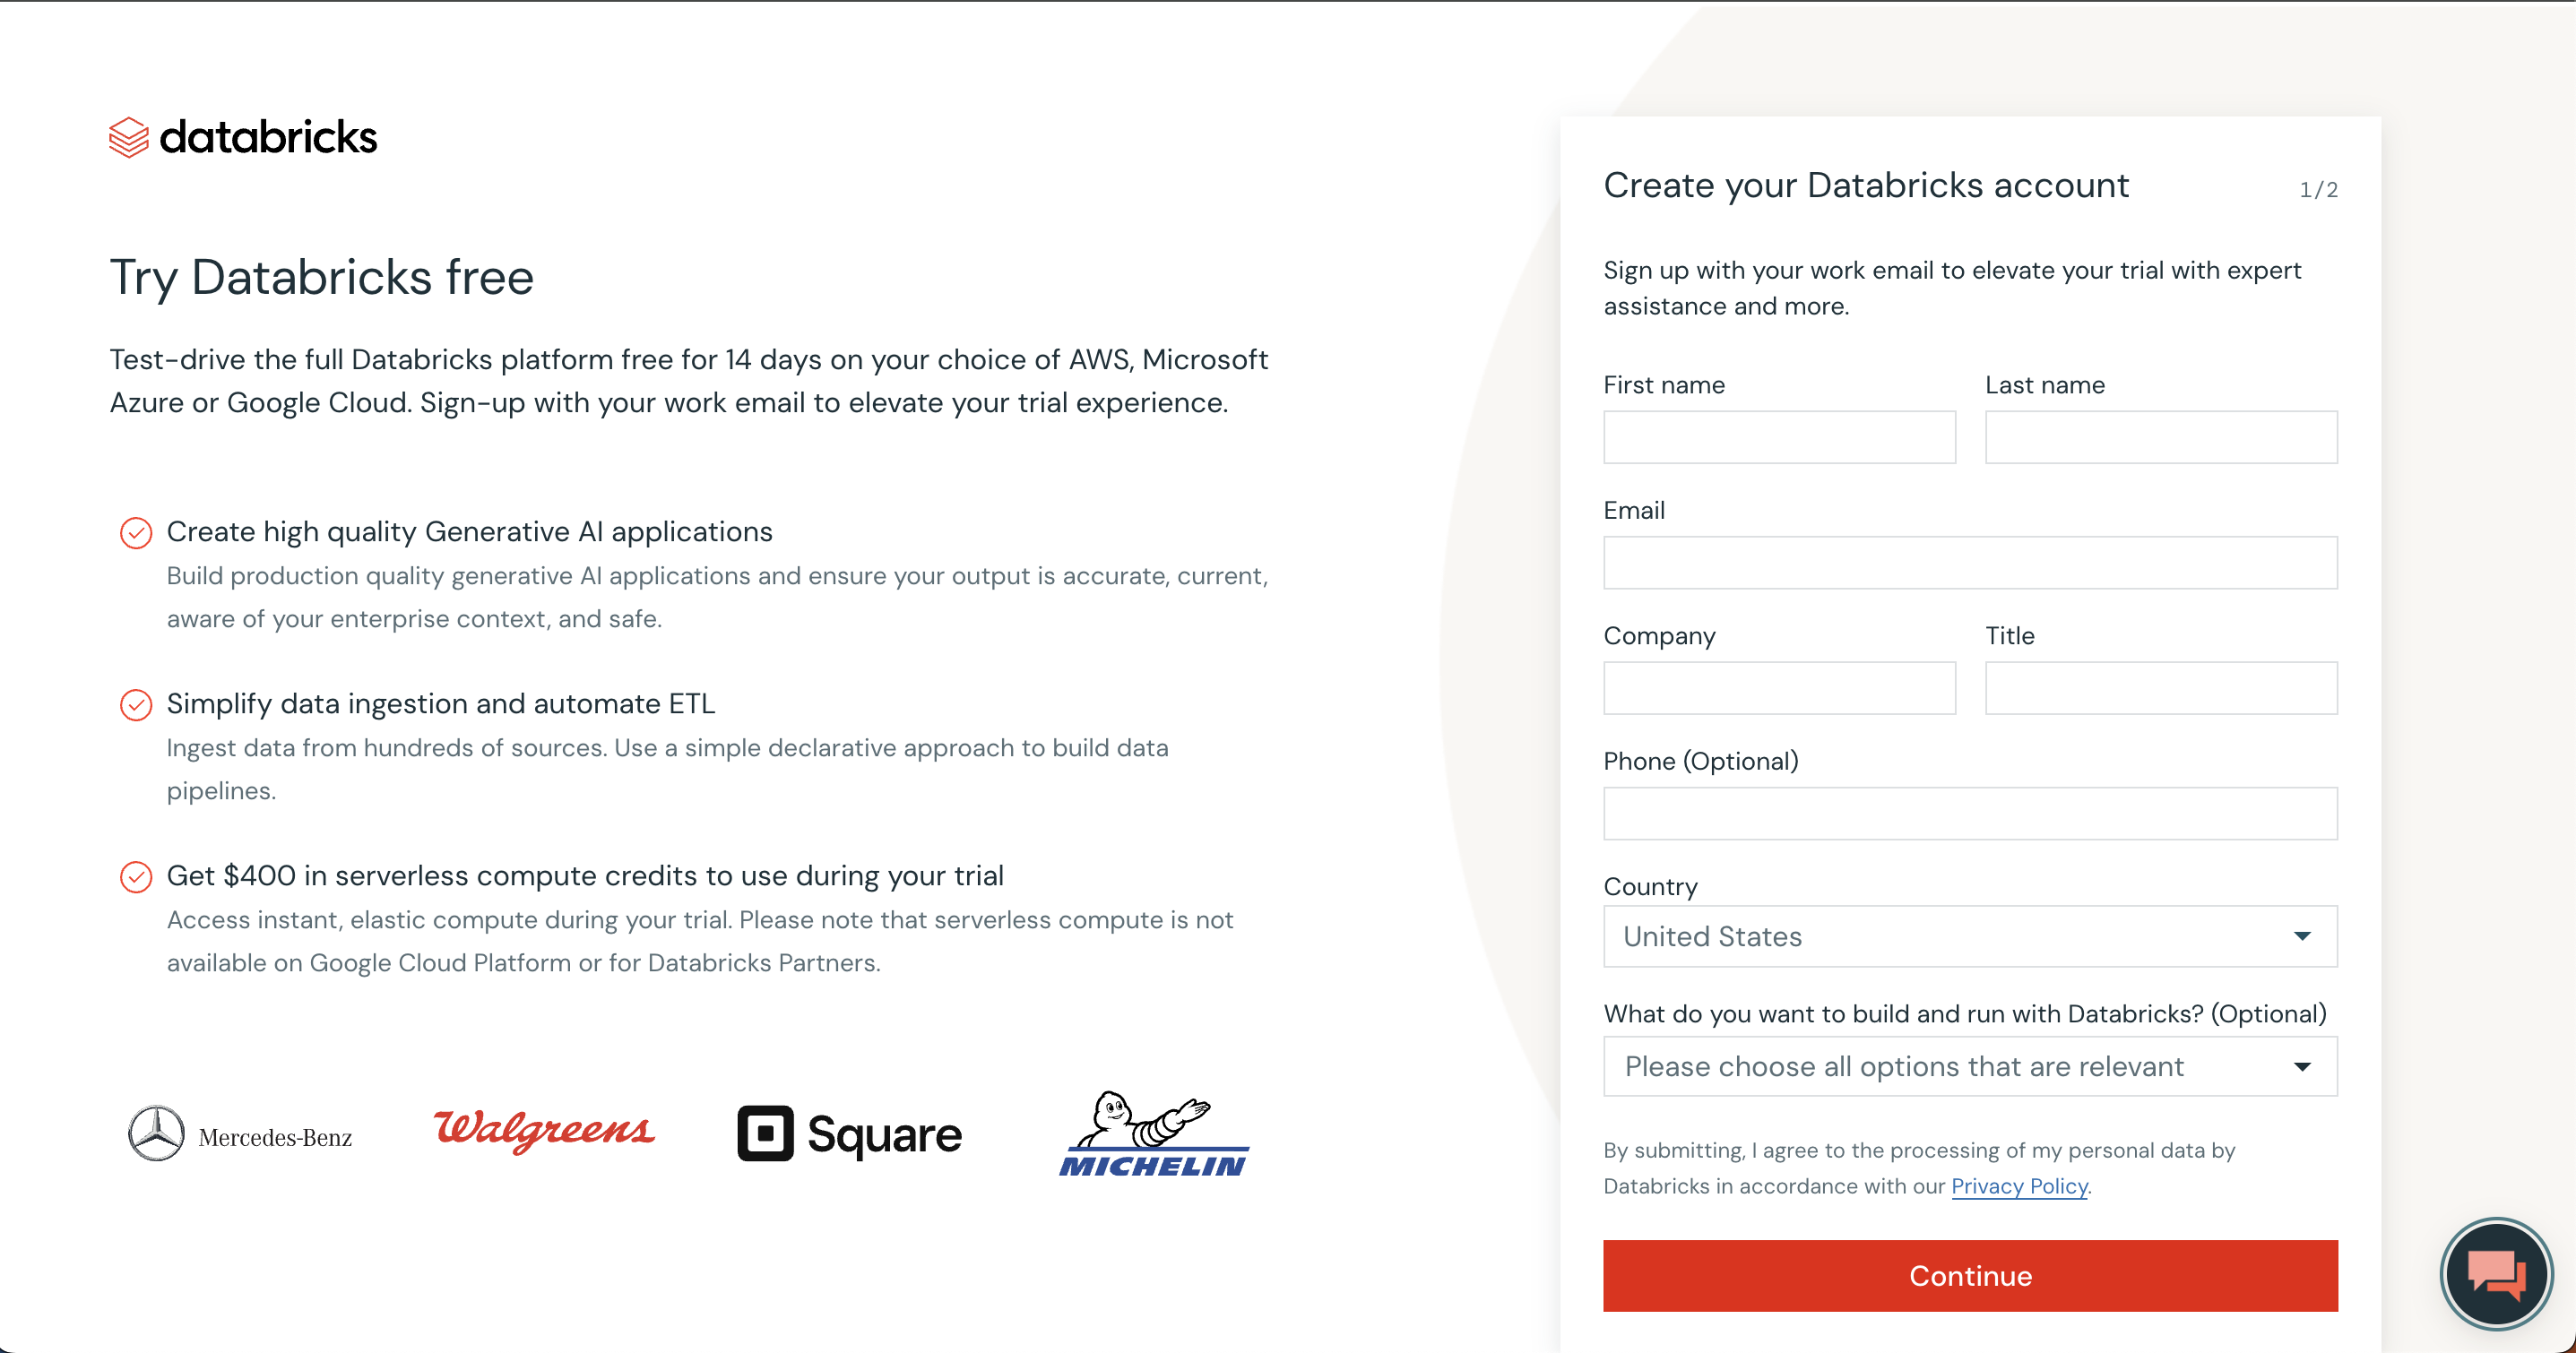
Use your existing account or sign up for a Databricks account. Complete the form with your user information and click Continue.
-
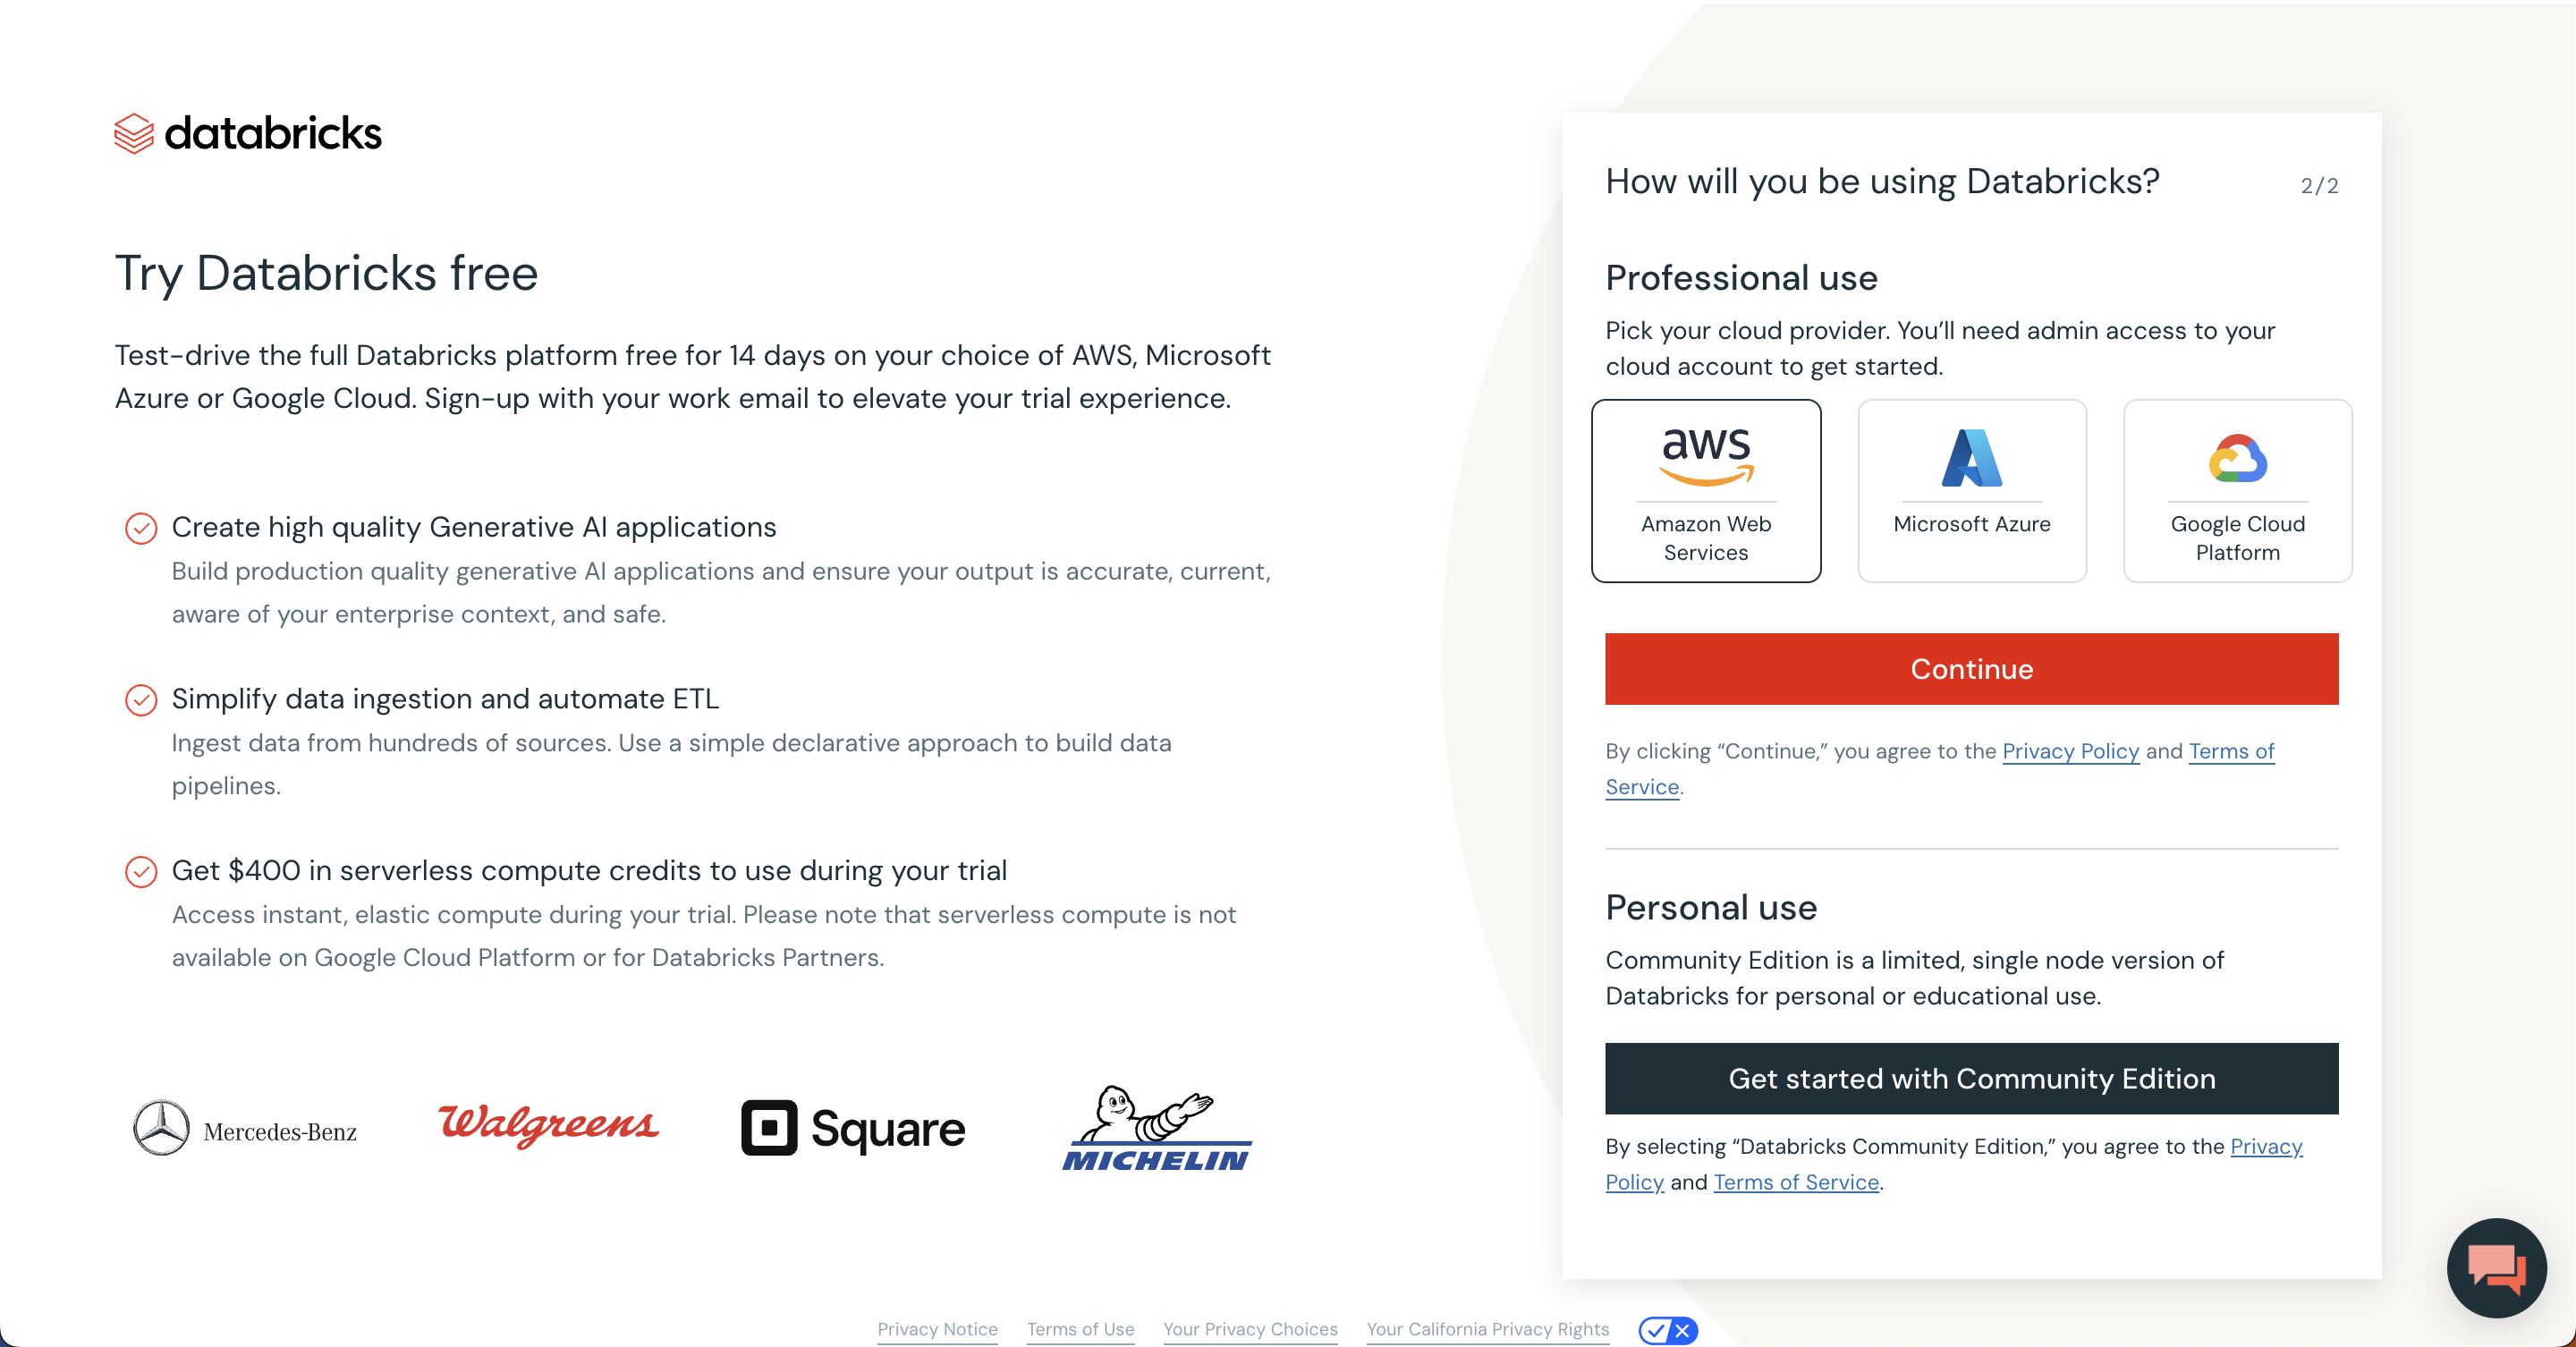
On the next screen, select your cloud provider. This tutorial uses AWS as the cloud provider, but if you use Azure or GCP internally, please select your platform. The setup process will be similar. Do not select the Get started with Community Edition option, as this will not provide the required compute for this guide.
-
Check your email and complete the verification process.
-
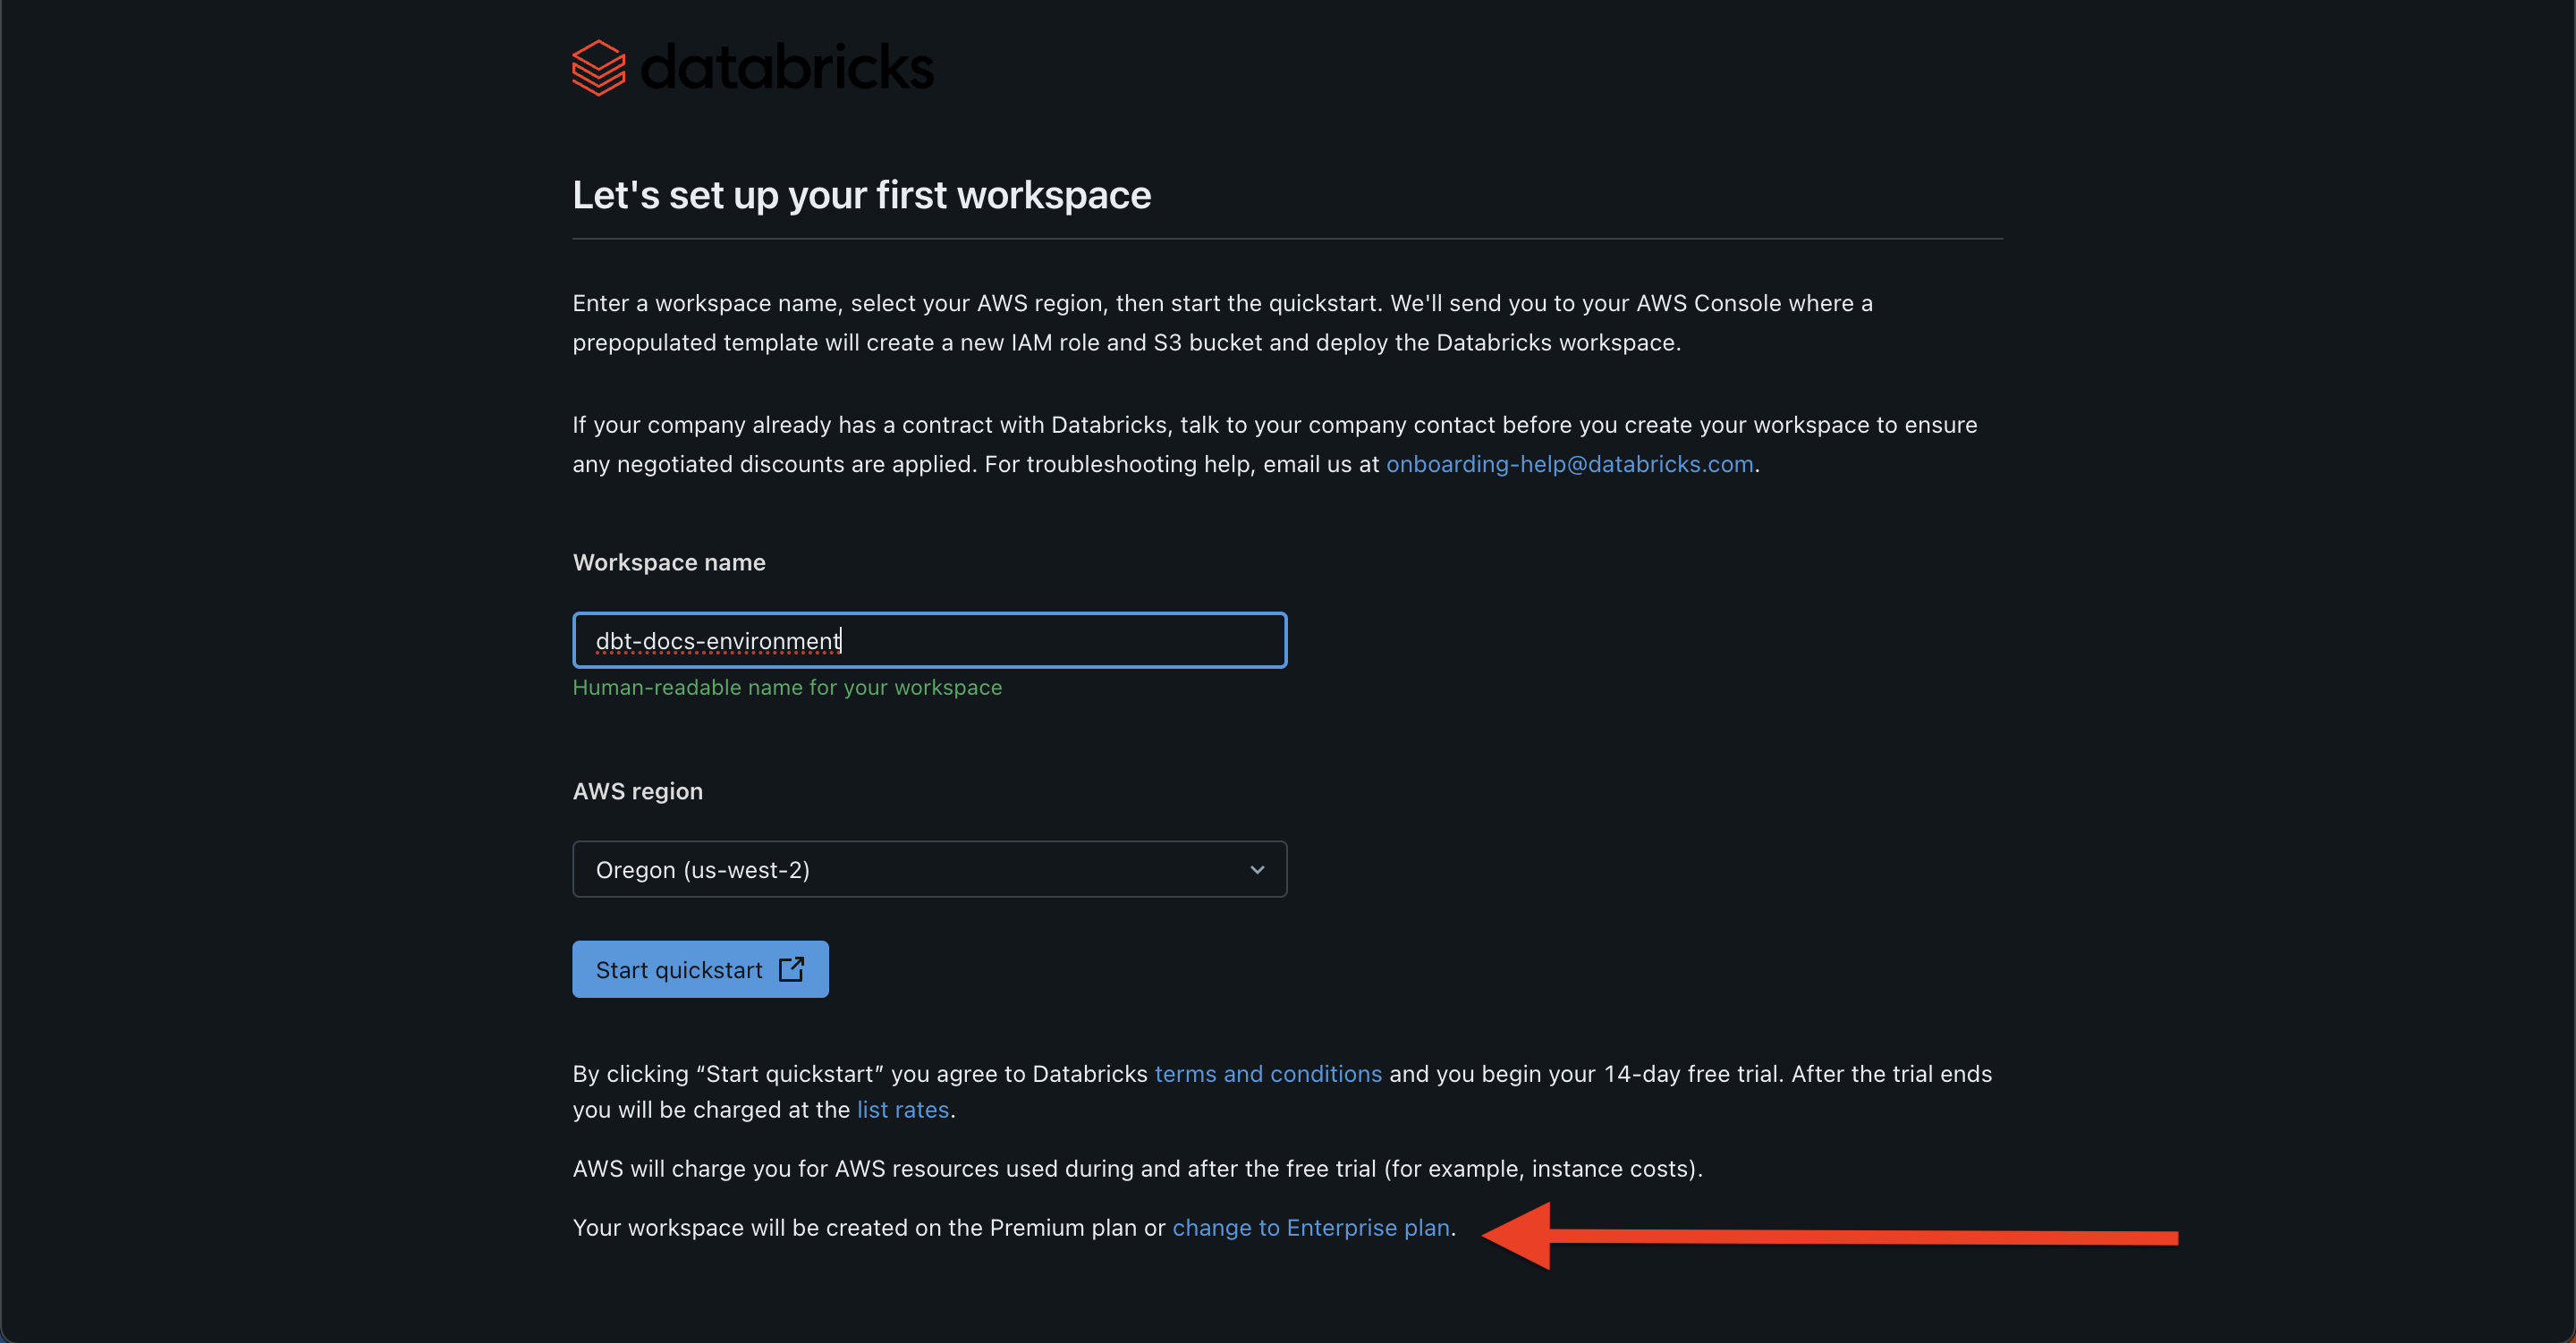
After completing the verification processes, you will be brought to the first setup screen. Databricks defaults to the
Premiumplan and you can change the trial toEnterpriseon this page. -
Now, it's time to create your first workspace. A Databricks workspace is an environment for accessing all of your Databricks assets. The workspace organizes objects like notebooks, SQL warehouses, clusters, and more so into one place. Provide the name of your workspace, choose the appropriate AWS region, and click Start Quickstart. You might get the checkbox of I have data in S3 that I want to query with Databricks. You do not need to check this off for this tutorial.
-
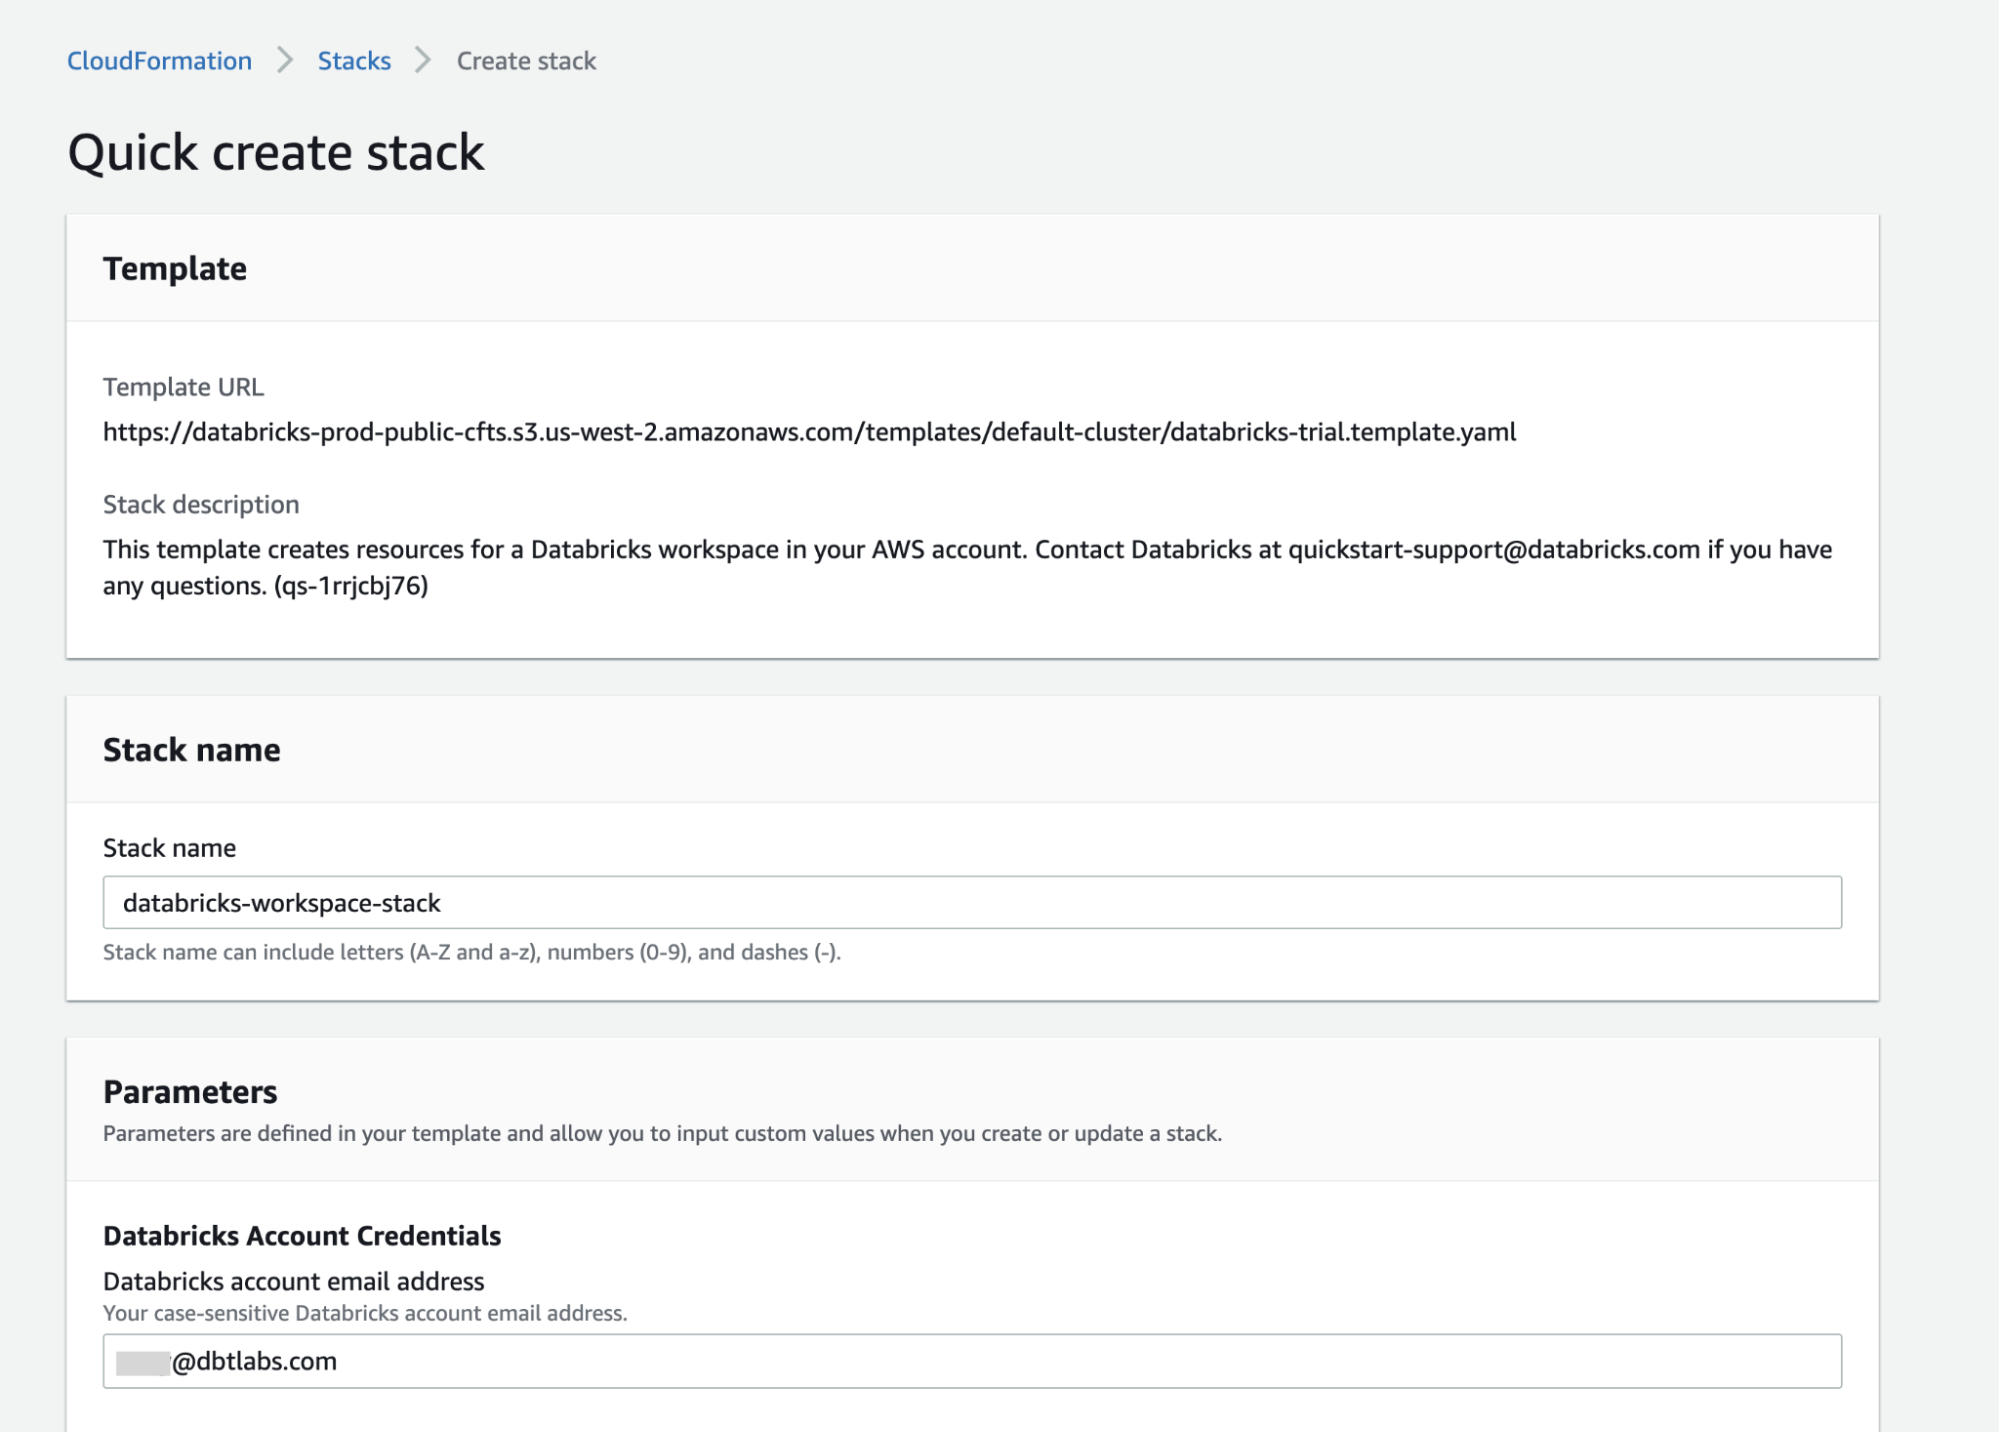
By clicking on
Start Quickstart, you will be redirected to AWS and asked to log in if you haven’t already. After logging in, you should see a page similar to this.
If you get a session error and don’t get redirected to this page, you can go back to the Databricks UI and create a workspace from the interface. All you have to do is click create workspaces, choose the quickstart, fill out the form and click Start Quickstart.
-
There is no need to change any of the pre-filled out fields in the Parameters. Just add in your Databricks password under Databricks Account Credentials. Check off the Acknowledgement and click Create stack.
-
Go back to the Databricks tab. You should see that your workspace is ready to use.
-
Now let’s jump into the workspace. Click Open and log into the workspace using the same login as you used to log into the account.
Load data
-
Download these CSV files (the Jaffle Shop sample data) that you will need for this guide:
-
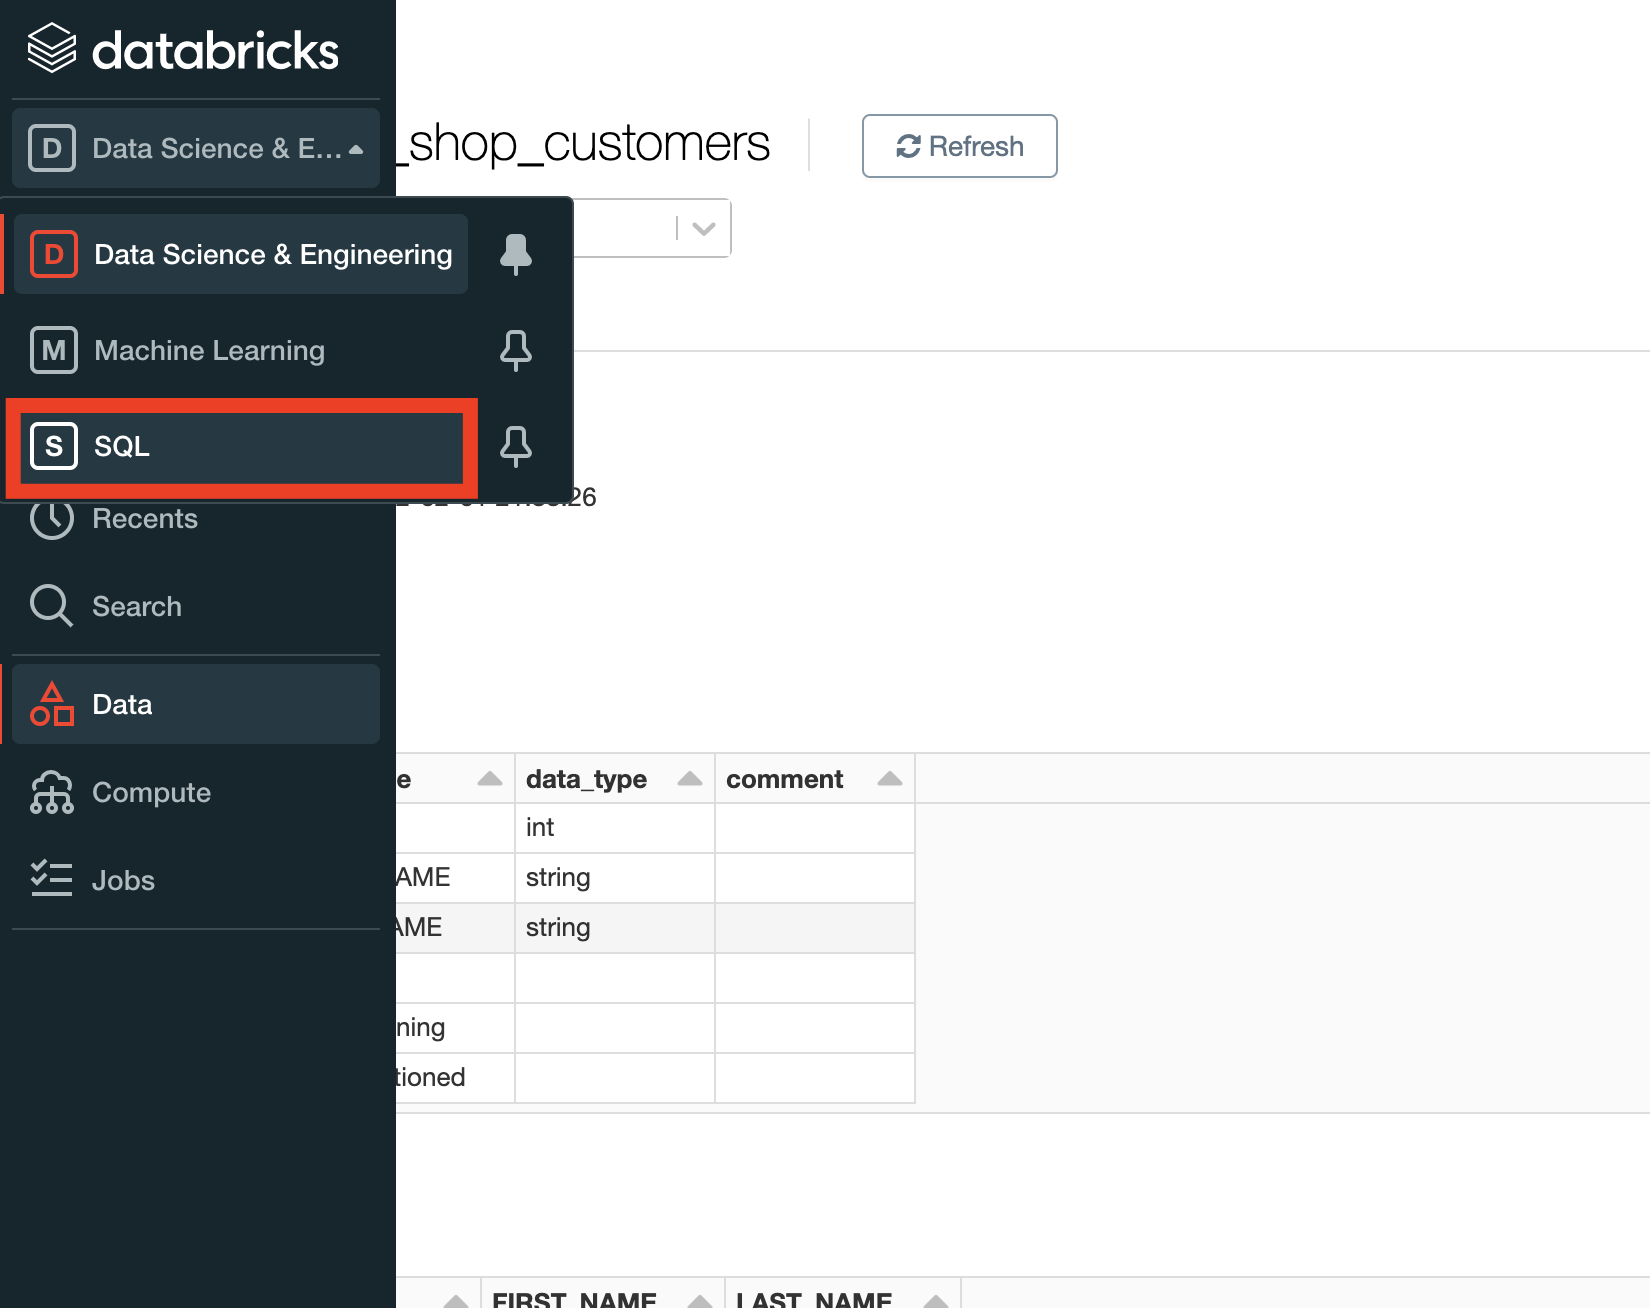
First we need a SQL warehouse. Find the drop down menu and toggle into the SQL space.
-
We will be setting up a SQL warehouse now. Select SQL Warehouses from the left hand side console. You will see that a default SQL Warehouse exists.
-
Click Start on the Starter Warehouse. This will take a few minutes to get the necessary resources spun up.
-
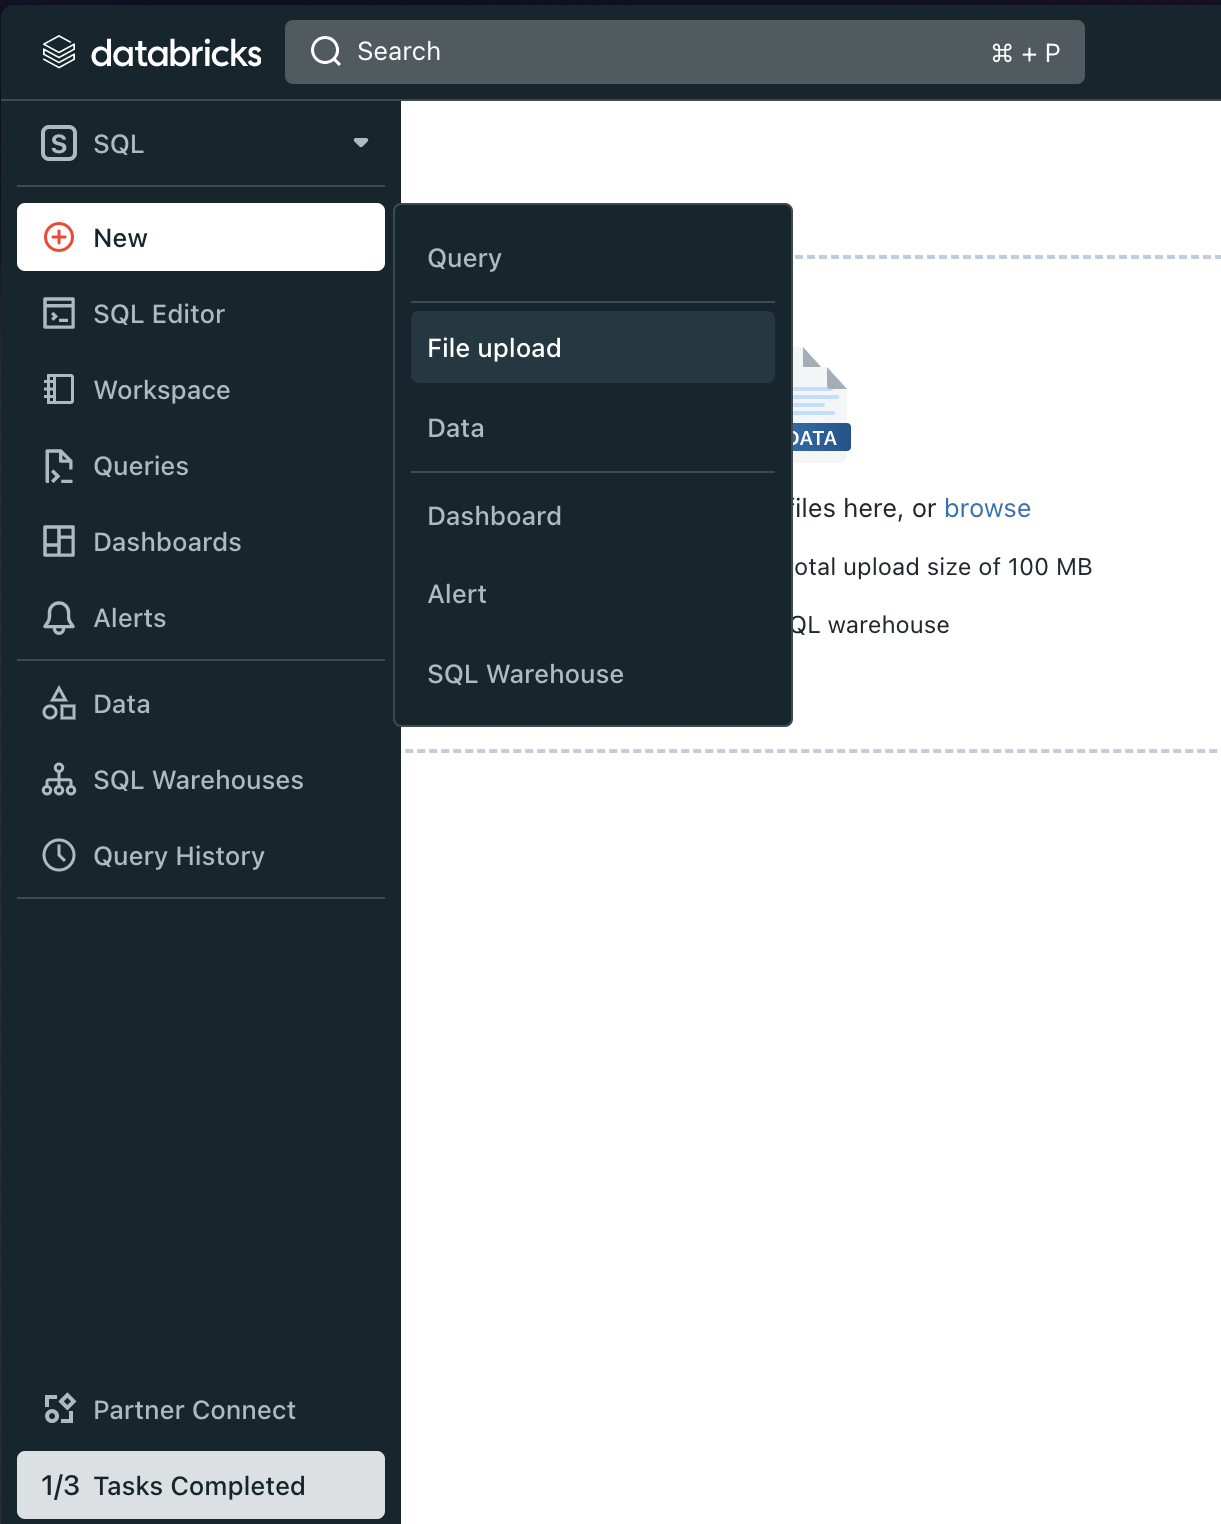
Once the SQL Warehouse is up, click New and then File upload on the dropdown menu.
-
Let's load the Jaffle Shop Customers data first. Drop in the
jaffle_shop_customers.csvfile into the UI. -
Update the Table Attributes at the top:
- data_catalog = hive_metastore
- database = default
- table = jaffle_shop_customers
- Make sure that the column data types are correct. The way you can do this is by hovering over the datatype icon next to the column name.
- ID = bigint
- FIRST_NAME = string
- LAST_NAME = string
-
Click Create on the bottom once you’re done.
-
Now let’s do the same for
Jaffle Shop OrdersandStripe Payments. -
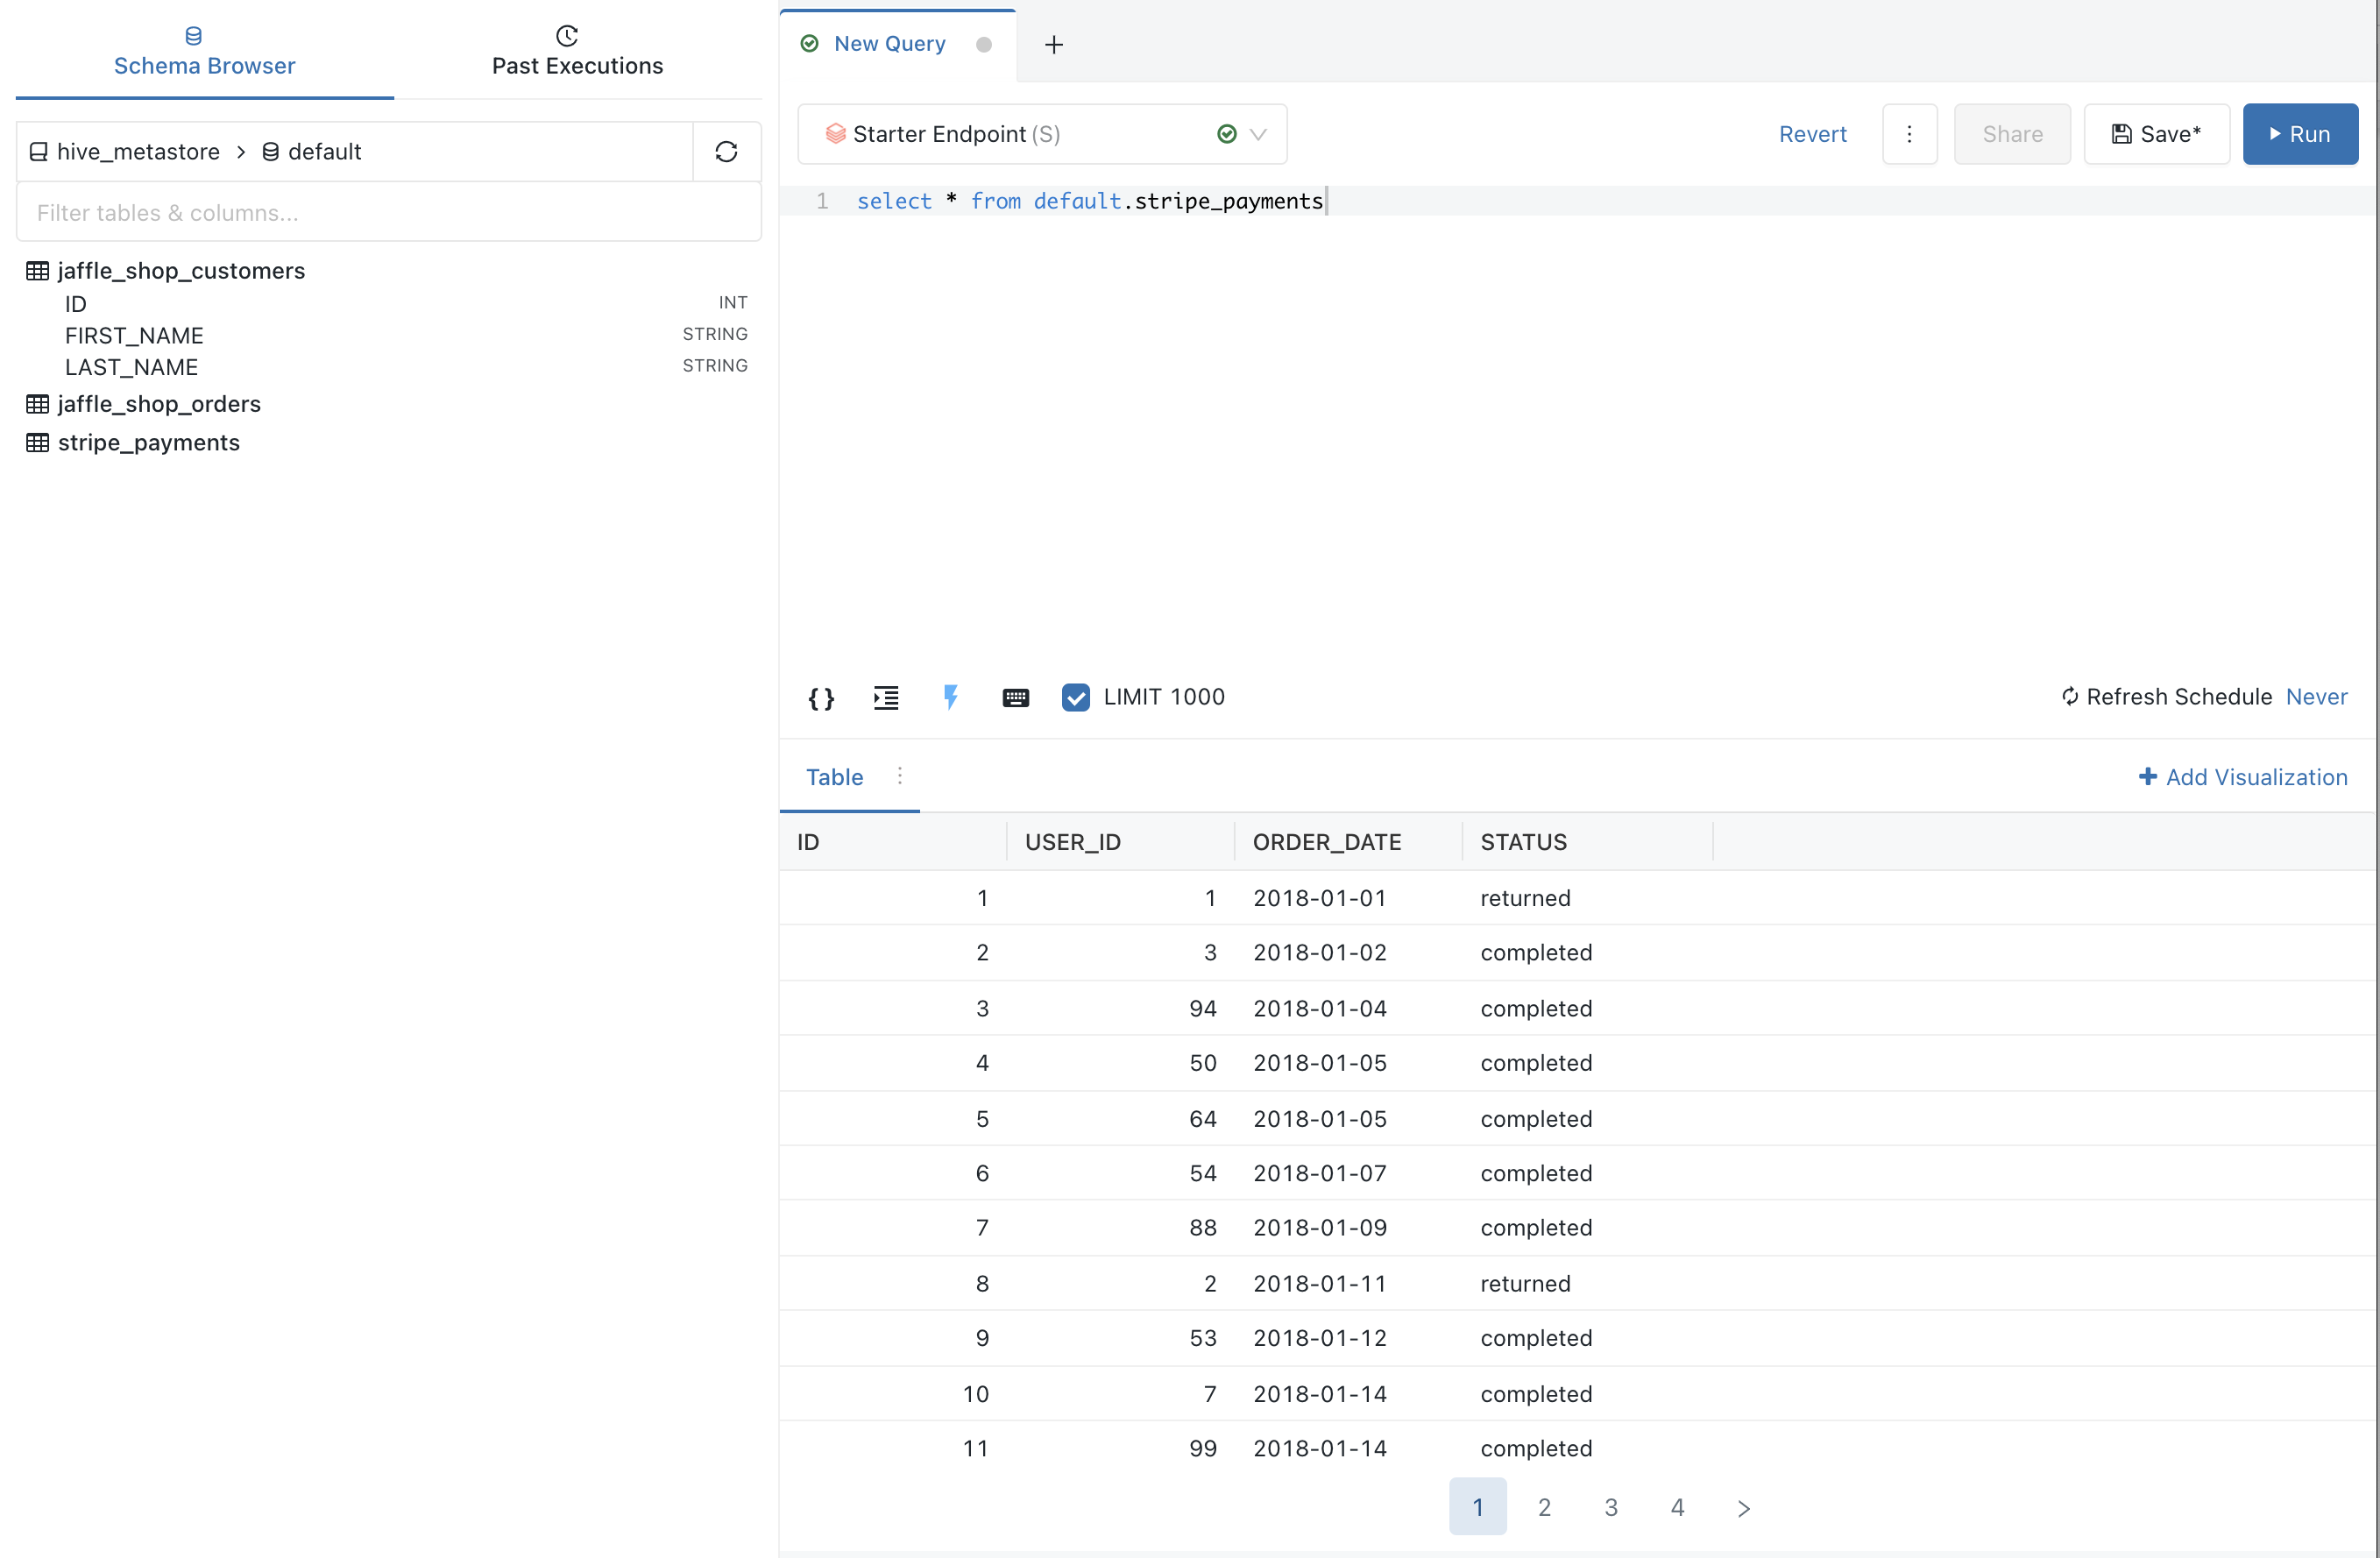
Once that's done, make sure you can query the training data. Navigate to the
SQL Editorthrough the left hand menu. This will bring you to a query editor. -
Ensure that you can run a
select *from each of the tables with the following code snippets.select * from default.jaffle_shop_customers
select * from default.jaffle_shop_orders
select * from default.stripe_payments -
To ensure any users who might be working on your dbt project has access to your object, run this command.
grant all privileges on schema default to users;
Connect dbt to Databricks
There are two ways to connect dbt to Databricks. The first option is Partner Connect, which provides a streamlined setup to create your dbt account from within your new Databricks trial account. The second option is to create your dbt account separately and build the Databricks connection yourself (connect manually). If you want to get started quickly, dbt Labs recommends using Partner Connect. If you want to customize your setup from the very beginning and gain familiarity with the dbt setup flow, dbt Labs recommends connecting manually.
Set up the integration from Partner Connect
Partner Connect is intended for trial partner accounts. If your organization already has a dbt account, connect manually. Refer to Connect to dbt manually in the Databricks docs for instructions.
To connect dbt to Databricks using Partner Connect, do the following:
-
In the sidebar of your Databricks account, click Partner Connect.
-
Click the dbt tile.
-
Select a catalog from the drop-down list, and then click Next. The drop-down list displays catalogs you have read and write access to. If your workspace isn't
<UC>-enabled, the legacy Hive metastore (hive_metastore) is used. -
If there are SQL warehouses in your workspace, select a SQL warehouse from the drop-down list. If your SQL warehouse is stopped, click Start.
-
If there are no SQL warehouses in your workspace:
- Click Create warehouse. A new tab opens in your browser that displays the New SQL Warehouse page in the Databricks SQL UI.
- Follow the steps in Create a SQL warehouse in the Databricks docs.
- Return to the Partner Connect tab in your browser, and then close the dbt tile.
- Re-open the dbt tile.
- Select the SQL warehouse you just created from the drop-down list.
-
Select a schema from the drop-down list, and then click Add. The drop-down list displays schemas you have read and write access to. You can repeat this step to add multiple schemas.
Partner Connect creates the following resources in your workspace:
- A Databricks service principal named DBT_CLOUD_USER.
- A Databricks personal access token that is associated with the DBT_CLOUD_USER service principal.
Partner Connect also grants the following privileges to the DBT_CLOUD_USER service principal:
- (Unity Catalog) USE CATALOG: Required to interact with objects within the selected catalog.
- (Unity Catalog) USE SCHEMA: Required to interact with objects within the selected schema.
- (Unity Catalog) CREATE SCHEMA: Grants the ability to create schemas in the selected catalog.
- (Hive metastore) USAGE: Required to grant the SELECT and READ_METADATA privileges for the schemas you selected.
- SELECT: Grants the ability to read the schemas you selected.
- (Hive metastore) READ_METADATA: Grants the ability to read metadata for the schemas you selected.
- CAN_USE: Grants permissions to use the SQL warehouse you selected.
-
Click Next.
The Email box displays the email address for your Databricks account. dbt Labs uses this email address to prompt you to create a trial dbt account.
-
Click Connect to dbt.
A new tab opens in your web browser, which displays the getdbt.com website.
-
Complete the on-screen instructions on the getdbt.com website to create your trial dbt account.
Set up a dbt managed repository
When you develop in dbt, you can leverage Git to version control your code.
To connect to a repository, you can either set up a dbt-hosted managed repository or directly connect to a supported git provider. Managed repositories are a great way to trial dbt without needing to create a new repository. In the long run, it's better to connect to a supported git provider to use features like automation and continuous integration.
To set up a managed repository:
- Under "Setup a repository", select Managed.
- Type a name for your repo such as
bbaggins-dbt-quickstart - Click Create. It will take a few seconds for your repository to be created and imported.
- Once you see the "Successfully imported repository," click Continue.
Initialize your dbt project and start developing
Now that you have a repository configured, you can initialize your project and start development in dbt:
- Click Start developing in the Studio IDE. It might take a few minutes for your project to spin up for the first time as it establishes your git connection, clones your repo, and tests the connection to the warehouse.
- Above the file tree to the left, click Initialize dbt project. This builds out your folder structure with example models.
- Make your initial commit by clicking Commit and sync. Use the commit message
initial commitand click Commit. This creates the first commit to your managed repo and allows you to open a branch where you can add new dbt code. - You can now directly query data from your warehouse and execute
dbt run. You can try this out now:- Click + Create new file, add this query to the new file, and click Save as to save the new file:
select * from default.jaffle_shop_customers - In the command line bar at the bottom, enter
dbt runand click Enter. You should see adbt run succeededmessage.
- Click + Create new file, add this query to the new file, and click Save as to save the new file:
Build your first model
You have two options for working with files in the Studio IDE:
- Create a new branch (recommended) — Create a new branch to edit and commit your changes. Navigate to Version Control on the left sidebar and click Create branch.
- Edit in the protected primary branch — If you prefer to edit, format, or lint files and execute dbt commands directly in your primary git branch. The Studio IDE prevents commits to the protected branch, so you will be prompted to commit your changes to a new branch.
Name the new branch add-customers-model.
- Click the ... next to the
modelsdirectory, then select Create file. - Name the file
customers.sql, then click Create. - Copy the following query into the file and click Save.
with customers as (

    select
        id as customer_id,
        first_name,
        last_name

    from jaffle_shop_customers

),

orders as (

    select
        id as order_id,
        user_id as customer_id,
        order_date,
        status

    from jaffle_shop_orders

),

customer_orders as (

    select
        customer_id,

        min(order_date) as first_order_date,
        max(order_date) as most_recent_order_date,
        count(order_id) as number_of_orders

    from orders

    group by 1

),

final as (

    select
        customers.customer_id,
        customers.first_name,
        customers.last_name,
        customer_orders.first_order_date,
        customer_orders.most_recent_order_date,
        coalesce(customer_orders.number_of_orders, 0) as number_of_orders

    from customers

    left join customer_orders using (customer_id)

)

select * from final
- Enter
dbt runin the command prompt at the bottom of the screen. You should get a successful run and see the three models.
Later, you can connect your business intelligence (BI) tools to these views and tables so they only read cleaned up data rather than raw data in your BI tool.
FAQs
Change the way your model is materialized
One of the most powerful features of dbt is that you can change the way a model is materialized in your warehouse, simply by changing a configuration value. You can change things between tables and views by changing a keyword rather than writing the data definition language (DDL) to do this behind the scenes.
By default, everything gets created as a view. You can override that at the directory level so everything in that directory will materialize to a different materialization.
-
Edit your
dbt_project.ymlfile.-
Update your project
nameto:dbt_project.ymlname: 'jaffle_shop' -
Configure
jaffle_shopso everything in it will be materialized as a table; and configureexampleso everything in it will be materialized as a view. Update yourmodelsconfig block to:dbt_project.ymlmodels:
jaffle_shop:
+materialized: table
example:
+materialized: view -
Click Save.
-
-
Enter the
dbt runcommand. Yourcustomersmodel should now be built as a table!infoTo do this, dbt had to first run a
drop viewstatement (or API call on BigQuery), then acreate table asstatement. -
Edit
models/customers.sqlto override thedbt_project.ymlfor thecustomersmodel only by adding the following snippet to the top, and click Save:models/customers.sql{{
config(
materialized='view'
)
}}
with customers as (
select
id as customer_id
...
) -
Enter the
dbt runcommand. Your model,customers, should now build as a view.- BigQuery users need to run
dbt run --full-refreshinstead ofdbt runto full apply materialization changes.
- BigQuery users need to run
-
Enter the
dbt run --full-refreshcommand for this to take effect in your warehouse.
FAQs
Delete the example models
You can now delete the files that dbt created when you initialized the project:
-
Delete the
models/example/directory. -
Delete the
example:key from yourdbt_project.ymlfile, and any configurations that are listed under it.dbt_project.yml# before
models:
  jaffle_shop:
    +materialized: table
    example:
+materialized: viewdbt_project.yml# after
models:
jaffle_shop:
+materialized: table -
Save your changes.
FAQs
Build models on top of other models
As a best practice in SQL, you should separate logic that cleans up your data from logic that transforms your data. You have already started doing this in the existing query by using common table expressions (CTEs).
Now you can experiment by separating the logic out into separate models and using the ref function to build models on top of other models:
-
Create a new SQL file,
models/stg_customers.sql, with the SQL from thecustomersCTE in our original query. -
Create a second new SQL file,
models/stg_orders.sql, with the SQL from theordersCTE in our original query.models/stg_customers.sqlselect
id as customer_id,
first_name,
last_name
from jaffle_shop_customersmodels/stg_orders.sqlselect
id as order_id,
user_id as customer_id,
order_date,
status
from jaffle_shop_orders -
Edit the SQL in your
models/customers.sqlfile as follows:models/customers.sqlwith customers as (
select * from {{ ref('stg_customers') }}
),
orders as (
select * from {{ ref('stg_orders') }}
),
customer_orders as (
select
customer_id,
min(order_date) as first_order_date,
max(order_date) as most_recent_order_date,
count(order_id) as number_of_orders
from orders
group by 1
),
final as (
select
customers.customer_id,
customers.first_name,
customers.last_name,
customer_orders.first_order_date,
customer_orders.most_recent_order_date,
coalesce(customer_orders.number_of_orders, 0) as number_of_orders
from customers
left join customer_orders using (customer_id)
)
select * from final -
Execute
dbt run.This time, when you performed a
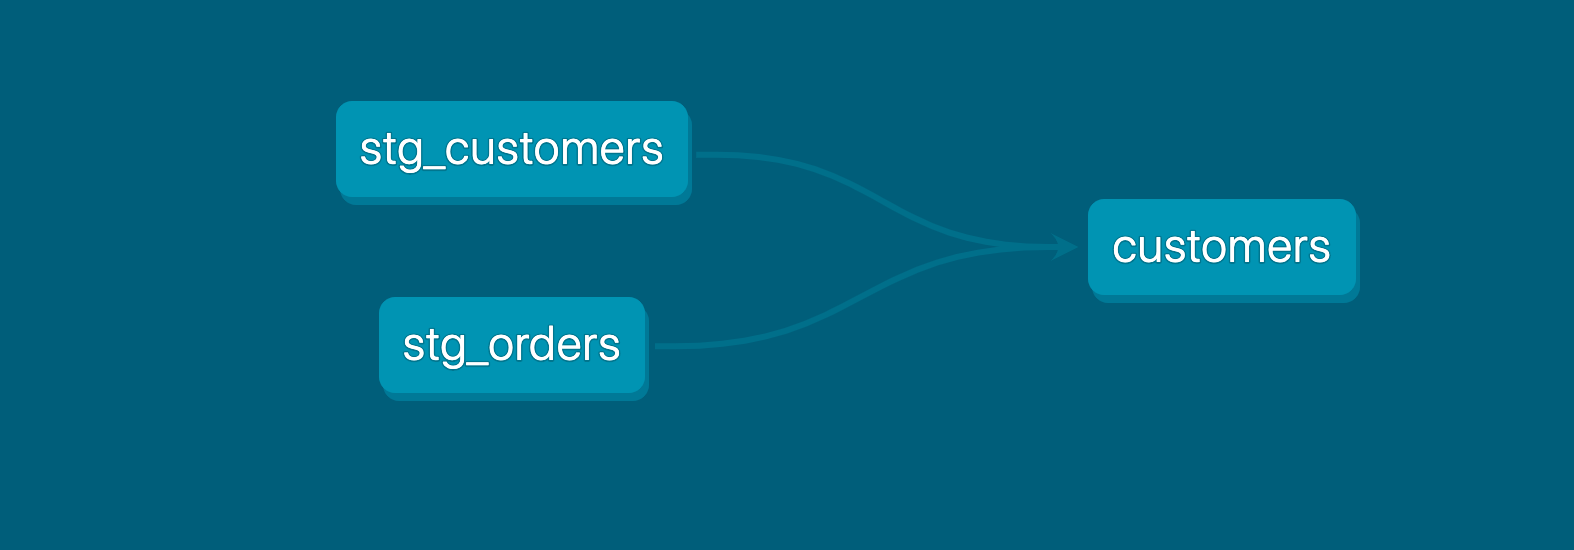
dbt run, separate views/tables were created forstg_customers,stg_ordersandcustomers. dbt inferred the order to run these models. Becausecustomersdepends onstg_customersandstg_orders, dbt buildscustomerslast. You do not need to explicitly define these dependencies.
FAQs
Add tests to your models
Adding data tests to a project helps validate that your models are working correctly.
To add data tests to your project:
-
Create a new YAML file in the
modelsdirectory, namedmodels/schema.yml -
Add the following contents to the file:
models/schema.ymlversion: 2
models:
- name: customers
columns:
- name: customer_id
data_tests:
- unique
- not_null
- name: stg_customers
columns:
- name: customer_id
data_tests:
- unique
- not_null
- name: stg_orders
columns:
- name: order_id
data_tests:
- unique
- not_null
- name: status
data_tests:
- accepted_values:
arguments: # available in v1.10.5 and higher. Older versions can set the <argument_name> as the top-level property.
values: ['placed', 'shipped', 'completed', 'return_pending', 'returned']
- name: customer_id
data_tests:
- not_null
- relationships:
arguments:
to: ref('stg_customers')
field: customer_id -
Run
dbt test, and confirm that all your tests passed.
When you run dbt test, dbt iterates through your YAML files, and constructs a query for each test. Each query will return the number of records that fail the test. If this number is 0, then the test is successful.
FAQs
Document your models
Adding documentation to your project allows you to describe your models in rich detail, and share that information with your team. Here, we're going to add some basic documentation to our project.
-
Update your
models/schema.ymlfile to include some descriptions, such as those below.models/schema.ymlversion: 2
models:
- name: customers
description: One record per customer
columns:
- name: customer_id
description: Primary key
data_tests:
- unique
- not_null
- name: first_order_date
description: NULL when a customer has not yet placed an order.
- name: stg_customers
description: This model cleans up customer data
columns:
- name: customer_id
description: Primary key
data_tests:
- unique
- not_null
- name: stg_orders
description: This model cleans up order data
columns:
- name: order_id
description: Primary key
data_tests:
- unique
- not_null
- name: status
data_tests:
- accepted_values:
arguments: # available in v1.10.5 and higher. Older versions can set the <argument_name> as the top-level property.
values: ['placed', 'shipped', 'completed', 'return_pending', 'returned']
- name: customer_id
data_tests:
- not_null
- relationships:
arguments:
to: ref('stg_customers')
field: customer_id -
Run
dbt docs generateto generate the documentation for your project. dbt introspects your project and your warehouse to generate a JSON file with rich documentation about your project.
- Click the book icon in the Develop interface to launch documentation in a new tab.
FAQs
Commit your changes
Now that you've built your customer model, you need to commit the changes you made to the project so that the repository has your latest code.
If you edited directly in the protected primary branch:
- Click the Commit and sync git button. This action prepares your changes for commit.
- A modal titled Commit to a new branch will appear.
- In the modal window, name your new branch
add-customers-model. This branches off from your primary branch with your new changes. - Add a commit message, such as "Add customers model, tests, docs" and and commit your changes.
- Click Merge this branch to main to add these changes to the main branch on your repo.
If you created a new branch before editing:
- Since you already branched out of the primary protected branch, go to Version Control on the left.
- Click Commit and sync to add a message.
- Add a commit message, such as "Add customers model, tests, docs."
- Click Merge this branch to main to add these changes to the main branch on your repo.
Deploy dbt
Use dbt's Scheduler to deploy your production jobs confidently and build observability into your processes. You'll learn to create a deployment environment and run a job in the following steps.
Create a deployment environment
- From the main menu, go to Orchestration > Environments.
- Click Create environment.
- In the Name field, write the name of your deployment environment. For example, "Production."
- In the dbt Version field, select the latest version from the dropdown.
- Under Deployment connection, enter the name of the dataset you want to use as the target, such as "Analytics". This will allow dbt to build and work with that dataset. For some data warehouses, the target dataset may be referred to as a "schema".
- Click Save.
Create and run a job
Jobs are a set of dbt commands that you want to run on a schedule. For example, dbt build.
As the jaffle_shop business gains more customers, and those customers create more orders, you will see more records added to your source data. Because you materialized the customers model as a table, you'll need to periodically rebuild your table to ensure that the data stays up-to-date. This update will happen when you run a job.
- After creating your deployment environment, you should be directed to the page for a new environment. If not, select Orchestration from the main menu, then click Jobs.
- Click Create job > Deploy job.
- Provide a job name (for example, "Production run") and select the environment you just created.
- Scroll down to the Execution settings section.
- Under Commands, add this command as part of your job if you don't see it:
dbt build
- Select the Generate docs on run option to automatically generate updated project docs each time your job runs.
- For this exercise, do not set a schedule for your project to run — while your organization's project should run regularly, there's no need to run this example project on a schedule. Scheduling a job is sometimes referred to as deploying a project.
- Click Save, then click Run now to run your job.
- Click the run and watch its progress under Run summary.
- Once the run is complete, click View Documentation to see the docs for your project.
Congratulations 🎉! You've just deployed your first dbt project!
