Connect to the remote dbt MCP server
The remote MCP server connects to dbt platform using HTTP. No self-hosted installation is required — you configure your MCP client with a URL and headers instead of running uvx dbt-mcp.
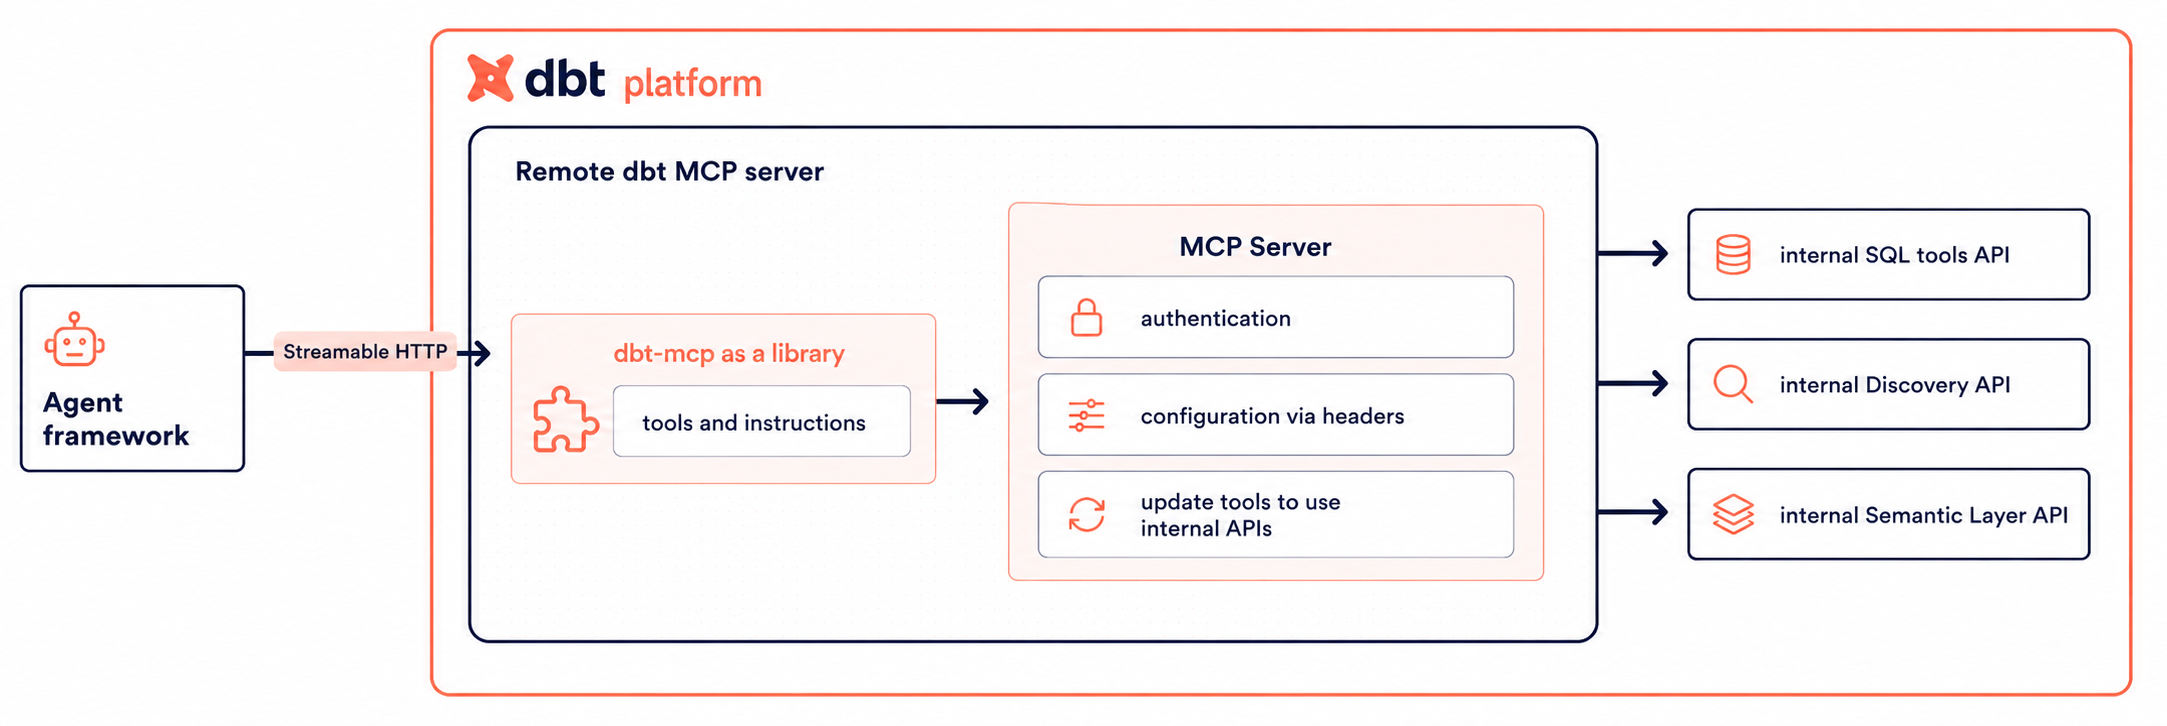 Remote dbt MCP server architecture
When to use remote MCP
Remote MCP is a good fit when:
- You don't want to or can't install software (
uvx, dbt-mcp) on your machine. - Your use case is consumption-based: querying metrics, exploring metadata, viewing lineage, or running SQL on the platform.
- You need Semantic Layer, Administrative, and Discovery APIs access without a local dbt project.
Self-hosted development and agentic workflows (for example, running dbt commands like dbt run or dbt build from your AI assistant) require the self-hosted MCP server. Remote MCP does not support the self-hosted dbt v1 or dbt v2 CLI or local project access. Use Connect to dbt platform or Run self-hosted dbt for those workflows.
Set up remote MCP
Follow these steps to set up the remote MCP server.
1. Manage AI features (optional)
AI features are enabled by default. Admins can turn them off or back on anytime.
Remote MCP works without AI features enabled. Only text_to_sql requires them; when disabled, this tool is hidden and all other tools work as usual.
2. Get your credentials
Obtain the following information from dbt platform:
- dbt platform host: Form the URL as
https://YOUR_DBT_HOST_URL/api/ai/v1/mcp/(for example,https://cloud.getdbt.com/api/ai/v1/mcp/). For multi-cell accounts, the host is in the formatACCOUNT_PREFIX.us1.dbt.com. Refer to Access, Regions, & IP addresses. - Production environment ID: From Orchestration → Environments in dbt platform. You will use it as the
x-dbt-prod-environment-idheader (token-based setup only). Refer to How to find your dbt MCP IDs for step-by-step instructions. - Token — PAT or service token with Semantic Layer and Developer permissions (token-based setup only).
- If you use
execute_sqlwith token-based auth: You must use a PAT, plus your development environment ID and user ID. Refer to How to find your dbt MCP IDs for details. With OAuth, you only need your MCP URL.
3. Choose authentication: OAuth or tokens
| Type | Info |
|---|---|
| OAuth (remote) | No API tokens in your client config. Requires an OAuth-capable MCP client. Supports execute_sql. Available in public beta for Starter, Enterprise, and Enterprise+ accounts. |
| Token-based | PAT or service token in the Authorization header. Works with any client and is required for shared/CI setups. For execute_sql, you must use a PAT (service tokens do not work). |
Remote MCP OAuth is available in public beta for Starter, Enterprise, and Enterprise+ accounts.
4. Get your MCP URL and IDs
You can copy your full MCP URL from Account settings → Access URLs → MCP Endpoint URL in dbt platform, and paste it directly into your AI tool.
Depending on your auth method, you may also need:
- Production environment ID: From Orchestration → Environments in dbt platform. Used as the
x-dbt-prod-environment-idheader for token-based setup. Refer to How to find your dbt MCP IDs for step-by-step instructions. - Token — PAT or service token with Semantic Layer and Developer permissions (token-based setup only).
- If you use
execute_sqlwith token-based auth: You must use a PAT, plus your development environment ID and user ID. Refer to How to find your dbt MCP IDs for details. With OAuth, you only need your MCP URL.
You don't need AI features enabled to use remote MCP. If an admin turns AI features off, text_to_sql is the only tool hidden and every other tool keeps working.
text_to_sql is also the only tool that consumes your dbt Copilot action allotment. Other MCP tools don't.
If your account runs out of dbt Copilot actions, text_to_sql will not work until the limit resets. Other remote MCP tools keep working. If you need help, contact your account manager.
5. Configure your MCP client
Configure your MCP client with the MCP URL from the previous step. If you use token-based authentication, also add the required headers.
- OAuth
- Token-based
Available for Starter, Enterprise, and Enterprise+ accounts
Before you connect
- Your MCP client must support OAuth for HTTP-based MCP servers. If it doesn't, use token-based authentication instead.
- On first connect, your client opens a browser for sign-in. dbt then shows a consent screen with the scopes (the specific permissions the client is allowed to use) it's requesting — see Scopes and consent for what each scope means.
- Most modern MCP clients self-register on first connect via dynamic registration (RFC 7591). Clients that don't support it need an admin to register them in Account settings → Integrations → App integrations. See Manual registration.
For the full flow, sessions, and limitations, refer to OAuth (remote MCP).
Configure your client with the MCP URL from the previous step. On first connect, your client opens a browser for sign-in and consent. You don't need a personal access token or extra headers to use execute_sql.
Some tools (like Claude Desktop) let you add dbt as a custom connector through their UI instead of editing a config file:
The following steps show how to connect dbt as a custom connector in Claude Desktop. The exact UI varies by tool, but the flow is the same: add a custom connector with your MCP URL, complete the OAuth consent flow, then connect.
- In your AI tool, go to its connector settings and choose to add a custom connector (in Claude Desktop, go to Chat → Customize → Connectors, then click Add custom connector).
- Enter a name (for example,
dbt) and paste your dbt platform MCP URL (for example,https://abc123.us1.dbt.com/api/ai/v1/mcp), then click Add.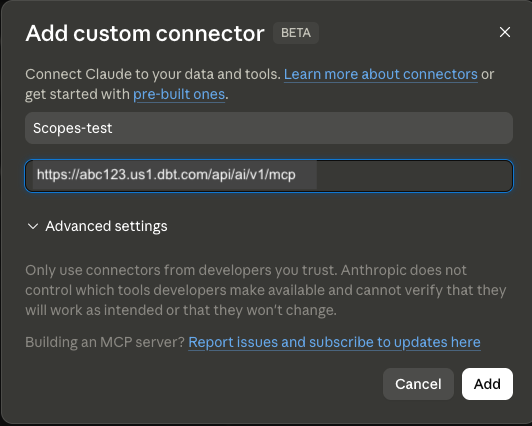 Custom connector dialog showing the dbt MCP URL
 - Click Connect. The tool redirects you to dbt to complete the OAuth consent flow, where you can approve or deny individual scopes.
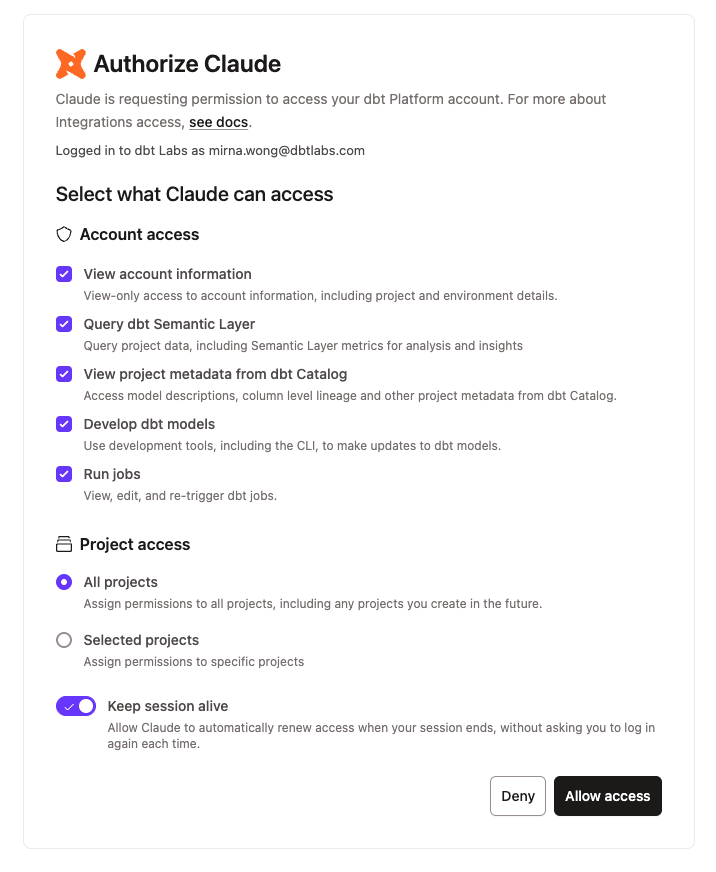 OAuth consent screen showing requested scopes and project access
 - After you approve, the connector is added to the Custom connectors table and shows as connected.
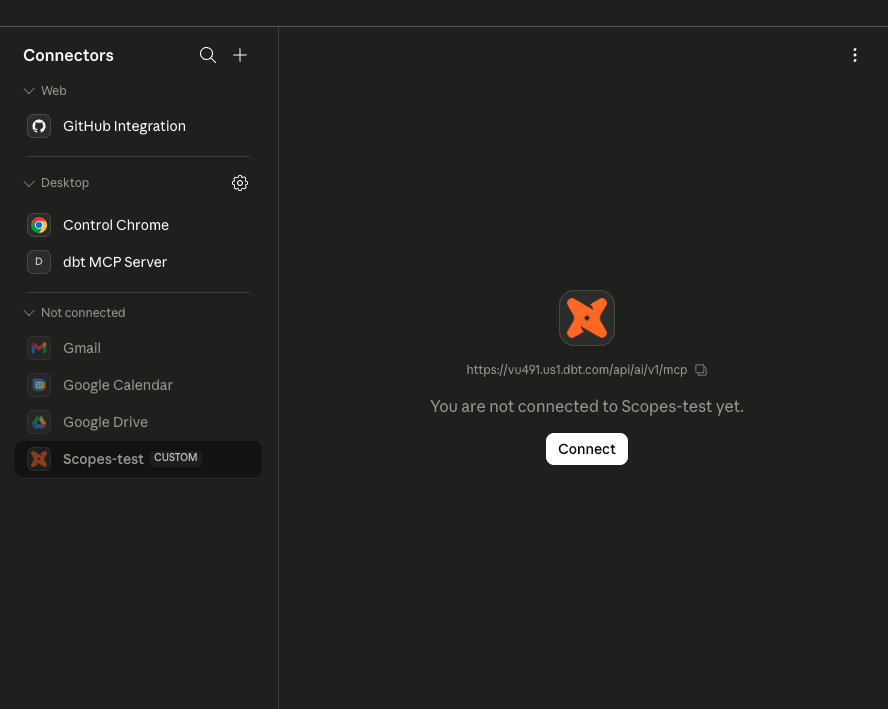 Adding a custom dbt connector in an AI tool's connector settings
 - That's it 🎉! Ask your tool a data question like "What is the total revenue for the last 30 days?" to confirm the connection.
For tools configured with a JSON file, use the tab that matches your client:
- Claude Code
- Cursor
- VS Code
Add this to .mcp.json at your project root:
{
  "mcpServers": {
    "dbt": {
      "type": "http",
      "url": "https://YOUR_DBT_HOST_URL/api/ai/v1/mcp/"
    }
  }
}
Add this to .cursor/mcp.json (or use the Cursor deeplink in Integrate Cursor with MCP):
{
  "mcpServers": {
    "dbt": {
      "url": "https://YOUR_DBT_HOST_URL/api/ai/v1/mcp/"
    }
  }
}
Add this to mcp.json (run MCP: Open Workspace Folder MCP Configuration from the command palette). VS Code uses the servers key, not mcpServers:
{
  "servers": {
    "dbt": {
      "type": "http",
      "url": "https://YOUR_DBT_HOST_URL/api/ai/v1/mcp/"
    }
  }
}
Set the server url to https://YOUR_DBT_HOST_URL/api/ai/v1/mcp/ and add the required headers:
- Required:
Authorization(valueToken YOUR_TOKENorBearer YOUR_TOKEN),x-dbt-prod-environment-id - For
execute_sqlwith token-based auth or dbt v2 tools: Also addx-dbt-dev-environment-idandx-dbt-user-id - Use numeric IDs in headers, not full URLs copied from your browser.
- Claude Code
- Cursor
- VS Code
- Gemini
{
  "mcpServers": {
    "dbt": {
      "type": "http",
      "url": "https://YOUR_DBT_HOST_URL/api/ai/v1/mcp/",
      "headers": {
        "Authorization": "Token YOUR_DBT_ACCESS_TOKEN",
        "x-dbt-prod-environment-id": "DBT_PROD_ENV_ID",
        "x-dbt-user-id": "DBT_USER_ID",
        "x-dbt-dev-environment-id": "DBT_DEV_ENV_ID"
      }
    }
  }
}
{
  "mcpServers": {
    "dbt": {
      "url": "https://YOUR_DBT_HOST_URL/api/ai/v1/mcp/",
      "headers": {
        "Authorization": "Token YOUR_DBT_ACCESS_TOKEN",
        "x-dbt-prod-environment-id": "DBT_PROD_ENV_ID",
        "x-dbt-user-id": "DBT_USER_ID",
        "x-dbt-dev-environment-id": "DBT_DEV_ENV_ID"
      }
    }
  }
}
VS Code uses the servers key, not mcpServers:
{
  "servers": {
    "dbt": {
      "type": "http",
      "url": "https://YOUR_DBT_HOST_URL/api/ai/v1/mcp/",
      "headers": {
        "Authorization": "Token YOUR_DBT_ACCESS_TOKEN",
        "x-dbt-prod-environment-id": "DBT_PROD_ENV_ID",
        "x-dbt-user-id": "DBT_USER_ID",
        "x-dbt-dev-environment-id": "DBT_DEV_ENV_ID"
      }
    }
  }
}
Gemini uses the httpUrl key instead of url:
{
  "mcpServers": {
    "dbt": {
      "httpUrl": "https://YOUR_DBT_HOST_URL/api/ai/v1/mcp/",
      "headers": {
        "Authorization": "Token YOUR_DBT_ACCESS_TOKEN",
        "x-dbt-prod-environment-id": "DBT_PROD_ENV_ID",
        "x-dbt-user-id": "DBT_USER_ID",
        "x-dbt-dev-environment-id": "DBT_DEV_ENV_ID"
      }
    }
  }
}
- For the complete list of headers, Cursor and other client examples, and optional headers, refer to Set up remote MCP.
- For self-hosted MCP, configuration uses environment variables; check out the Environment variables reference for more information.
Once you have configured your MCP client, you can test your setup by asking your AI assistant a data-related question (for example, "What models are in my dbt project?" or "What metrics are defined in my Semantic Layer?"). If dbt MCP is working, the response will use your dbt metadata.
Was this page helpful?
This site is protected by reCAPTCHA and the Google Privacy Policy and Terms of Service apply.