Integrate VS Code with MCP

Microsoft Visual Studio Code (VS Code) is a powerful and popular integrated development environment (IDE).

These instructions are for integrating dbt MCP and VS Code. Before starting, ensure you have:

  • Completed the local MCP setup
  • Installed VS Code with the latest updates
  • (For local MCP with CLI) Configured your dbt project paths

Set up with local dbt MCP server

To get started, in VS Code:

  1. Open the Settings menu and select the correct tab atop the page for your use case:

    • Workspace: Configures the server in the context of your workspace
    • User: Configures the server in the context of your user

    Note for WSL users: If you're using VS Code with Windows Subsystem for Linux (WSL), you'll need to configure WSL-specific settings. Run the Preferences: Open Remote Settings command from the Command Palette (F1) or select the Remote tab in the Settings editor. Local user settings are reused in WSL but can be overridden with WSL-specific settings. Configuring MCP servers in the local user settings will not work properly in a WSL environment.

  2. Select Features --> Chat

  3. Ensure that MCP is Enabled

mcp-vscode-settingsmcp-vscode-settings
  1. Open the command palette Control/Command + Shift + P, and select either:

    • MCP: Open Workspace Folder MCP Configuration — if you want to install the MCP server for this workspace
    • MCP: Open User Configuration — if you want to install the MCP server for the user
  2. Add your server configuration (dbt) to the provided mcp.json file as one of the servers:

     Local MCP with dbt platform OAuth

    Local MCP with OAuth is for users who want to use the dbt platform features.

    Choose your configuration based on your use case:

    This option is for users who only want dbt platform features (Discovery API, Semantic Layer, job management) without local CLI commands.

    When you use only the dbt platform, the CLI tools are automatically disabled. You can find the DBT_HOST field value in your dbt platform account information under Access URLs.

    {
    "mcpServers": {
    "dbt": {
    "command": "uvx",
    "args": ["dbt-mcp"],
    "env": {
    "DBT_HOST": "https://<your-dbt-host-with-custom-subdomain>",
    }
    }
    }
    }

    Note: Replace <your-dbt-host-with-custom-subdomain> with your actual host (for example, abc123.us1.dbt.com). This enables OAuth authentication without requiring local dbt installation.

     Local MCP (CLI only)

    For users who only want to use dbt CLI commands with dbt Core or Fusion

    {
    "servers": {
    "dbt": {
    "command": "uvx",
    "args": ["dbt-mcp"],
    "env": {
    "DBT_PROJECT_DIR": "/path/to/your/dbt/project",
    "DBT_PATH": "/path/to/your/dbt/executable"
    }
    }
    }
    }

    Finding your paths:

    • DBT_PROJECT_DIR: Full path to the folder containing your dbt_project.yml file
      • macOS/Linux: Run pwd from your project folder.
      • Windows: Run cd from your project folder in Command Prompt.
    • DBT_PATH: Path to dbt executable
      • macOS/Linux: Run which dbt.
      • Windows: Run where dbt.
     Local MCP with .env

    For advanced users who need custom environment variables or service token authentication

    Using the env field (recommended - single-file configuration):

    {
    "servers": {
    "dbt": {
    "command": "uvx",
    "args": ["dbt-mcp"],
    "env": {
    "DBT_HOST": "cloud.getdbt.com",
    "DBT_TOKEN": "your-token-here",
    "DBT_PROD_ENV_ID": "12345",
    "DBT_PROJECT_DIR": "/path/to/project",
    "DBT_PATH": "/path/to/dbt"
    }
    }
    }
    }

    Using an .env file (alternative - two-file configuration):

    {
    "servers": {
    "dbt": {
    "command": "uvx",
    "args": ["--env-file", "/path/to/.env", "dbt-mcp"]
    }
    }
    }
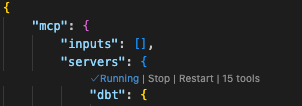
  3. You can start, stop, and configure your MCP servers by:

    • Running the MCP: List Servers command from the Command Palette (Control/Command + Shift + P) and selecting the server.
    • Utilizing the keywords inline within the mcp.json file.
VS Code inline managementVS Code inline management

Now, you can access the dbt MCP server in VS Code through interfaces like GitHub Copilot.

Troubleshooting

This section contains troubleshooting steps for errors you might encounter when integrating VS Code with MCP.

 Cannot find `uvx` executable

If you see errors like Could not connect to MCP server dbt or spawn uvx ENOENT, VS Code may be unable to find the uvx executable.

To resolve, use the full path to uvx in your configuration:

  1. Find the full path:

    • macOS/Linux: Run which uvx in Terminal.
    • Windows: Run where uvx in Command Prompt or PowerShell.
  2. Update your mcp.json to use the full path:

    {
    "servers": {
    "dbt": {
    "command": "/full/path/to/uvx",
    "args": ["dbt-mcp"],
    "env": { ... }
    }
    }
    }

    Example on macOS with Homebrew: "command": "/opt/homebrew/bin/uvx"

 Configuration not working in WSL

If you're using VS Code with Windows Subsystem for Linux (WSL), make sure you've configured the MCP server in the WSL-specific settings, not the local user settings. Use the Remote tab in the Settings editor or run Preferences: Open Remote Settings from the Command Palette.

 Server not starting

Check the MCP server status:

  1. Run MCP: List Servers from the Command Palette (Control/Command + Shift + P).
  2. Look for any error messages next to the dbt server.
  3. Click on the server to see detailed logs.

Common issues:

  • Missing or incorrect paths for DBT_PROJECT_DIR or DBT_PATH
  • Invalid authentication tokens
  • Missing required environment variables

Resources

Was this page helpful?

This site is protected by reCAPTCHA and the Google Privacy Policy and Terms of Service apply.

0