
Continuous Integration (CI) sets the system up to test everyone’s pull request before merging. Continuous Deployment (CD) deploys each approved change to production. “Slim CI” refers to running/testing only the changed code, thereby saving compute. In summary, CI/CD automates dbt pipeline testing and deployment.
dbt Cloud, a much beloved method of dbt deployment, supports GitHub- and Gitlab-based CI/CD out of the box. It doesn’t support Bitbucket, AWS CodeCommit/CodeDeploy, or any number of other services, but you need not give up hope even if you are tethered to an unsupported platform.
Although this article uses Bitbucket Pipelines as the compute service and Bitbucket Downloads as the storage service, this article should serve as a blueprint for creating a dbt-based Slim CI/CD anywhere. The idea is always the same:
- Deploy your product and save the deployment artifacts.
- Use the artifacts to allow dbt to determine the stateful changes and run only those (thereby achieving “slimness”).
Overview of steps
To accomplish this, we’ll need to prepare three parts of our pipeline to work together:
- Database access - ensure that our warehouse has users, roles and permissions to run our pipelines
- Repository preparation - setup our repository and build our automation based on our git platform provider’s (in this example, Bitbucket) capabilities
- Bitbucket (or other platform) environment - configure our environment with the necessary secrets and variables to run our workflow
Step 1: Database preparation
In general, we want the following:
- Create a CI user with proper grants in your database, including the ability to create the schema(s) they’ll write to (
create on [dbname]). - Create a production user with proper grants in your database.
The specifics will differ based on the database type you’re using. To see what constitutes “proper grants”, please consult the dbt Discourse classic “The exact grant statements we use in a dbt project” and Matt Mazur’s “Wrangling dbt Database Permissions”.
In my case, I created:
- A
dev_ciPostgres user which had been granted a previously createdrole_devrole (same as all other development users).role_devhas connect and create grants on the database. - A
dbt_bitbucketuser which has been granted a previously createdrole_prodrole (same as dbt Cloud production environment). Therole_prodrole must have write access to your production schemas.
create role role_dev;

grant create on database [dbname] to role_dev;

-- Grant all permissions required for the development role

create role role_prod;

grant create on database [dbname] to role_prod;

-- Grant all permissions required for the production role

create role dev_ci with login password [password];

grant role_dev to dev_ci;

create schema dbt_ci;

grant all on schema dbt_ci to role_dev;

alter schema dbt_ci owner to role_dev;

create role dbt_bitbucket with login password [password];

grant role_prod to dbt_bitbucket;
Role Masking
Finally - and this might be a Postgres-only step - I had to make sure that the regularly scheduled dbt Cloud jobs connected with a dbt_cloud user with a role_prod grant would be able to drop and re-create views and tables during their run, which they could not if dbt_bitbucket had previously created and owned them. To do that, I needed to mask both roles:
alter role dbt_bitbucket set role role_prod;

alter role dbt_cloud set role role_prod;
That way, any tables and views created by either user would be owned by “user” role_prod.
Step 2: Repository preparation
Next, we’ll need to configure the repository. Within the repo, we’ll need to configure:
- The pipeline environment
- The database connections
- The pipeline itself
Pipeline environment: requirements.txt
You’ll need at least your dbt adapter-specific package, ideally pinned to a version. Mine is just:
dbt-[adapter] ~= 1.0
Database connections: profiles.yml
You shouldn’t ever commit secrets in a plain-text file, but you can reference environmental variables (which we’ll securely define in Step 3).
your_project:
  target: ci
  outputs:
    ci:
      type: postgres
      host: "{{ env_var('DB_CI_HOST') }}"
      port: "{{ env_var('DB_CI_PORT') | int }}"
      user: "{{ env_var('DB_CI_USER') }}"
      password: "{{ env_var('DB_CI_PWD') }}"
      dbname: "{{ env_var('DB_CI_DBNAME') }}"
      schema: "{{ env_var('DB_CI_SCHEMA') }}"
      threads: 16
      keepalives_idle: 0
    prod:
      type: postgres
      host: "{{ env_var('DB_PROD_HOST') }}"
      port: "{{ env_var('DB_PROD_PORT') | int }}"
      user: "{{ env_var('DB_PROD_USER') }}"
      password: "{{ env_var('DB_PROD_PWD') }}"
      dbname: "{{ env_var('DB_PROD_DBNAME') }}"
      schema: "{{ env_var('DB_PROD_SCHEMA') }}"
      threads: 16
      keepalives_idle: 0
Pipeline itself: bitbucket-pipelines.yml
This is where you’ll define the steps that your pipeline will take. In our case, we’ll use the Bitbucket Pipelines format, but the approach will be similar for other providers.
There are two pipelines we need to configure:
- Continuous Deployment (CD) pipeline, which will deploy and also store the production run artifacts
- Continuous Integration (CI) pipeline, which will retrieve them for state-aware testing runs in development
The entire file is accessible in a Gist, but we’ll take it step-by-step to explain what we’re doing and why.
Continuous Deployment: Transform by latest master and keep the artifacts
Each pipeline is a speedrun of setting up the environment and the database connections, then running what needs to be run. In this case, we also save the artifacts to a place we can retrieve them from - here, it’s the Bitbucket Downloads service, but it could just as well be AWS S3 or another file storage service.
image: python:3.8

pipelines:
  branches:
    main:
      - step:
          name: Deploy to production
          caches:
            - pip
          artifacts:  # Save the dbt run artifacts for the next step (upload)
            - target/*.json
          script:
            - python -m pip install -r requirements.txt
            - mkdir ~/.dbt
            - cp .ci/profiles.yml ~/.dbt/profiles.yml
            - dbt deps
            - dbt seed --target prod
            - dbt run --target prod
            - dbt snapshot --target prod
      - step:
          name: Upload artifacts for slim CI runs
          script:
            - pipe: atlassian/bitbucket-upload-file:0.3.2
              variables:
                BITBUCKET_USERNAME: $BITBUCKET_USERNAME
                BITBUCKET_APP_PASSWORD: $BITBUCKET_APP_PASSWORD
                FILENAME: 'target/*.json'
Reading the file over, you can see that we:
- Set the container image to Python 3.8
- Specify that we want to execute the workflow on each change to the branch called main (if yours is called something different, you’ll want to change this)
- Specify that this pipeline is a two-step process
- Specify that in the first step called “Deploy to production”, we want to:
- Use whatever pip cache is available, if any
- Keep whatever JSON files are generated in this step in target/
- Run the dbt setup by first installing dbt as defined in requirements.txt, then adding
profiles.ymlto the location dbt expects them in, and finally runningdbt depsto install any dbt packages - Run
dbt seed,run, andsnapshot, all withprodas specified target
- Specify that in the first step called “Upload artifacts for slim CI runs”, we want to use the Bitbucket “pipe” (pre-defined action) to authenticate with environment variables and upload all files that match the glob
target/*.json.
In summary, anytime anything is pushed to main, we’ll ensure our production database reflects the dbt transformation, and we’ve saved the resulting artifacts to defer to.
❓ What are artifacts and why should I defer to them? dbt artifacts are metadata of the last run - what models and tests were defined, which ones ran successfully, and which failed. If a future dbt run is set to defer to this metadata, it means that it can select models and tests to run based on their state, including and especially their difference from the reference metadata. See Artifacts, Selection methods: “state”, and Caveats to state comparison for details.
Slim Continuous Integration: Retrieve the artifacts and do a state-based run
The Slim CI pipeline looks similar to the CD pipeline, with a couple of differences explained in the code comments. As discussed earlier, it’s the deferral to the artifacts is that makes our CI run “slim”.
pipelines:
  pull-requests:
    '**':  # run on any branch that’s referenced by a pull request
      - step:
          name: Set up and build
          caches:
            - pip
          script:
            # Set up dbt environment + dbt packages. Rather than passing
            # profiles.yml to dbt commands explicitly, we'll store it where dbt
            # expects it:
            - python -m pip install -r requirements.txt
            - mkdir ~/.dbt
            - cp .ci/profiles.yml ~/.dbt/profiles.yml
            - dbt deps

            # The following step downloads dbt artifacts from the Bitbucket
            # Downloads, if available. (They are uploaded there by the CD
            # process -- see "Upload artifacts for slim CI runs" step above.)
            #
            # curl loop ends with "|| true" because we want downstream steps to
            # always run, even if the download fails. Running with "-L" to
            # follow the redirect to S3, -s to suppress output, --fail to avoid
            # outputting files if curl for whatever reason fails and confusing
            # the downstream conditions.
            #
            # ">-" converts newlines into spaces in a multiline YAML entry. This
            # does mean that individual bash commands have to be terminated with
            # a semicolon in order not to conflict with flow keywords (like
            # for-do-done or if-else-fi).
            - >-
              export API_ROOT="https://api.bitbucket.org/2.0/repositories/$BITBUCKET_REPO_FULL_NAME/downloads";
              mkdir target-deferred/;
              for file in manifest.json run_results.json; do
                curl -s -L --request GET \
                  -u "$BITBUCKET_USERNAME:$BITBUCKET_APP_PASSWORD" \
                  --url "$API_ROOT/$file" \
                  --fail --output target-deferred/$file;
              done || true
            - >-
              if [ -f target-deferred/manifest.json ]; then
                export DBT_FLAGS="--defer --state target-deferred/ --select +state:modified";
              else
                export DBT_FLAGS="";
              fi

            # Finally, run dbt commands with the appropriate flag that depends
            # on whether state deferral is available. (We're skipping `dbt
            # snapshot` because only production role can write to it and it's
            # not set up otherwise.)
            - dbt seed
            - dbt run $DBT_FLAGS
            - dbt test $DBT_FLAGS
In short, we:
- Set up the pipeline trigger condition to trigger on any pull request
- Set up dbt
- Retrieve the files from Bitbucket Downloads via API and credentials
- Set flags for state deferral if the retrieval was successful
- Run dbt with the default target (which we’d defined in
profiles.ymlasci)
Step 3: Bitbucket environment preparation
Finally, we need to setup the environment so that all the steps requiring authentication can succeed, this includes:
- Database authentication - for dbt communicating with the warehouse
- Bitbucket Downloads authentication - for storing our dbt artifacts
As with the earlier steps, these specific instructions are for Bitbucket but the basic principles apply to any other platform.
Database authentication
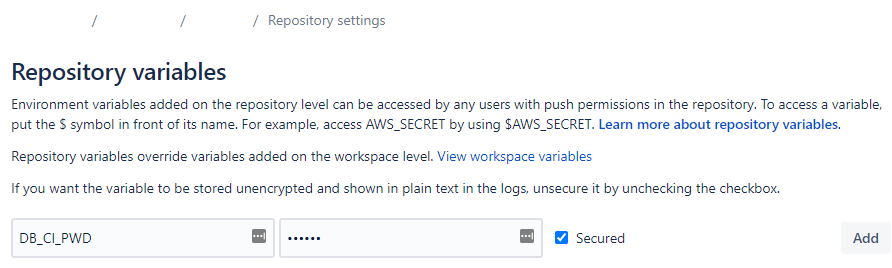
- Determine the values of all of the variables in
.ci/profiles.yml(DB_{CI,PROD}_{HOST,PORT,USER,PWD,DBNAME,SCHEMA}) - Go to Repository > Repository Settings > Repository Variables in Bitbucket and define them there, making sure to store any confidential values as “Secured”.
Bitbucket Downloads authentication
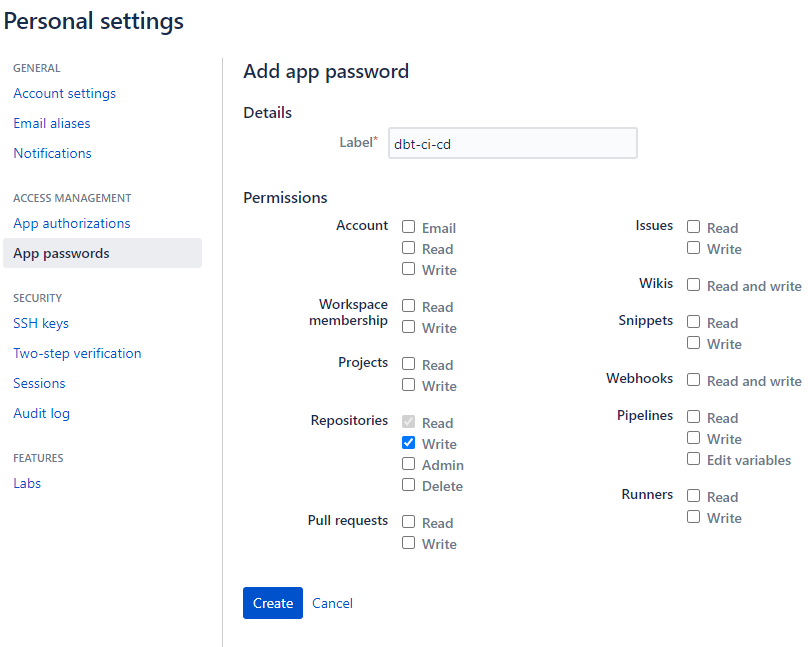
- Go to Personal Settings > App Passwords in Bitbucket and create a Bitbucket App Password with scope
repository:write. - Go to Repository > Repository Settings > Repository Variables and define the following:
BITBUCKET_USERNAME, which is not your sign-up e-mail, but rather the username found by clicking your avatar in the top left > Personal settings > Account settings page, under Bitbucket Profile Settings.BITBUCKET_APP_PASSWORD, making sure to store it as “Secured”
Enable Bitbucket Pipelines
Lastly, under Repository > Repository Settings > Pipelines Settings, check “Enable Pipelines”.

Step 4: Test
You’re all done! Now it’s time to test that things work:
- Push a change to your main branch. This should trigger a Pipeline. Check that it’s successful.
- File a Pull Request with a change to a single model / addition of a single test. Check that only that model/test ran.
Conclusion
It’s important to remember that CI/CD is a convenience, not a panacea. You must still devise the model logic and determine the appropriate tests. Some things it can do, though: catch more mistakes early, make sure that the database always reflects the most up-to-date code, and decrease the friction in collaboration. By automating the steps that should always be taken, it frees you up to think about the unusual steps required (e.g., do your changes to incremental models require an additional deployment with --full-refresh?) and reduces the amount of review that others’ actions necessitate.
Plus, it’s a good time, and it’s fun to watch the test lights turn green. Ding!

Comments